• Skip to primary navigation
  • Skip to main content
  • Skip to primary sidebar

A cook named Rebecca

  • Home
  • Favorite Cookbooks
  • Recipes
  • Travel
You are here: Home / Archives for Dessert

Dessert

love this. a perfect apple pie, my # 1 Go-To!

October 15, 2024 by Becky Spoon

Apple Pie
Apple Pie
Apple Pie

This is the perfect Apple Pie! Not only is this pie loaded with Honeycrisp apples, it is laced with Boiled Cider! I learned about Boiled Cider from King Arthur Flour where you can purchase it, or you can make it yourself, which I do!

The photo is the boiled cider that I make. That is all it is, boiled cider. I take a bottle of good apple cider, bring to a boil, reduce the heat and cook, stirring occasionally, until cooked down to a syrup. https://amzn.to/30rTMPw

this. perfect apple pie.

Apple Pie
Apple Pie

I also precook the filling before baking. Have you ever made an apple pie, piled it high with apples, then after baking, your apples sunk and you just have a crust on top and 3 inches below is your filling? I have and that’s why I cook a little first.

Apple Pie

What are the best apples for apple pie? Here’s a list from Taste of Home:

Braeburn

If you’re looking for a good balance between sweet and tart, Braeburn is an excellent choice. It has a very concentrated apple flavor that becomes more pronounced when it’s baked. Add the fact that it naturally contains cinnamon and nutmeg-like flavors, and this New Zealand apple is a no-brainer to use in apple pie. It doesn’t hurt that it has a super crisp, firm texture that doesn’t lose its form as it bakes, either.

Cortland

Unlike most apples, Cortlands don’t turn brown after they’re sliced, so you don’t have to worry about storing them in water while you prepare the rest of the ingredients. That said, you’ll want to use these New York-grown apples soon after they’re harvested because their super sweet, slightly tart flavor fades quickly. This McIntosh variety is extra juicy and has a crisp texture, making it perfect for something like Mom’s Fried Apples.

Golden Delicious

These bright yellow apples certainly don’t stand out as an eating apple; they have a mealy texture and a not-too-sweet, not-too-tart flavor. The heat of the oven coaxes out their sweetness, though, and they take on honeyed notes. Golden Delicious will break down and lose their shape more than some of the apples on this list, so don’t reach for these if you’re hoping for firm chunks of apples. They’re absolutely perfect in softer recipes like custard apple pie.

Granny Smith

If you ask most chefs about their go-to baking apple, this one will be it. Granny Smiths are available year-round, and you’ll immediately recognize them by their bright green skin and extra tart flavor. The high acidity contributes to the apple’s flavor as well as its ability to hold together as it bakes. If you like the texture but want a sweeter filling, try blending them with some of the sweeter apples on this list.

Jonagold

This apple is a cross between a Jonathan and Golden Delicious, giving it an appealing greenish-yellow color with red splotches. It has the same honeyed flavor as Golden Delicious, but it’s sweeter with a bolder, more puckery finish. The firm-fleshed, crisp, acidic apple is a great choice for slow-cooked apple desserts, like this Apple Comfort recipe.

Honeycrisp

These are one of our favorite snacking apples because they’re so intensely sweet. They have become wildly popular in the last few years, driving up the price tag, but they’re worth it. When baked, they don’t break down too much but their sweet flavor intensifies, becoming fun and complex. That’s why we use them in this wow-worthy apple pie recipe.

McIntosh

McIntosh is a classic apple with bright red with green splotches. The early harvests tend to be more acidic, while late-season McIntosh are sweeter and juicier. They have an incredible warming spice flavor, but they do tend to break down as they cook. That makes them the ideal sweet apple to pair with something tart (like Granny Smith) for pies and baked goods.

Here’s another favorite pie in our home! The Cherry Pie. Here’s the link: Allen’s Favorite, Delicious Cherry Pie

Cherry Pie
Cherry Pie

Here’s the recipe for this delicious apple pie!

Apple Pie

Perfect Apple Pie

Print Recipe Pin Recipe
Course: Dessert
Cuisine: American
Ingredients Method

Ingredients
  

  • 1 Prepared pie crust (I used Pillsbury store bought, but use your favorite)
  • 8 Cups peeled, sliced apple (from about 3 1/4 pounds whole apples) I used a combination of Grammy Smith and Honey Crisp
  • 2 Tbsp Lemon juice
  • 3/4 Cup Sugar
  • 2 Tbsp All purpose flour
  • 2 Tbsp Cornstarch
  • 1/4 Tsp Salt
  • 1 Tsp Cinnamon
  • 1/4 Tsp nutmeg
  • 1/4 Tsp Allspice
  • 1/4 cup  boiled cider  or undiluted apple juice concentrate (see comments in post how to make your own)

  • 2 Tsp Vanilla (optional)
  • 2 Tbsp Butter

Method
 

  1. Preheat the oven to 425 degrees. Place the bottom crust in the bottom of your pie pan.
  2. Combine the spices, flour and cornstarch and set aside.
  3. Melt the butter in a large pan and add the apples. Cook turning periodically until the apples begin to soften. Add the sugar and lemon juice and combine along with the vanilla.
  4. Stir in the dry ingredients and mix well. Pour the apple mixture into the crust evening out.
  5. Place the top crust and crimp the edges, and put vents in the top of the pie. You can also make the top a lattice top. Brush the top of the pie with a beaten egg or with heavy cream.
  6. Place on a cookie sheet, place in the oven and cook until golden brown. Let the pie fool before slicing if you can wait! Serve with vanilla ice cream or whipped cream.
  • Click to share on Pinterest (Opens in new window) Pinterest
  • Click to share on Facebook (Opens in new window) Facebook
  • Click to email a link to a friend (Opens in new window) Email
  • Click to print (Opens in new window) Print
  • Click to share on X (Opens in new window) X
  • Click to share on Tumblr (Opens in new window) Tumblr
  • More
  • Click to share on Reddit (Opens in new window) Reddit

Filed Under: Dessert Tagged With: holidays, thanksgiving

Easy Pumpkin Cheesecake Bars

November 17, 2023 by Becky Spoon

Pumpkin Cheesecake BarsJump to Recipe
Pumpkin Cheesecake Bars
Just in time for Thanksgiving, these Pumpkin Cheesecake Bars are delicious! What's not to love? There's a graham cracker bottom layer, then a cheesecake layer, then a pumpkin layer!
Pumpkin Cheesecake Bars

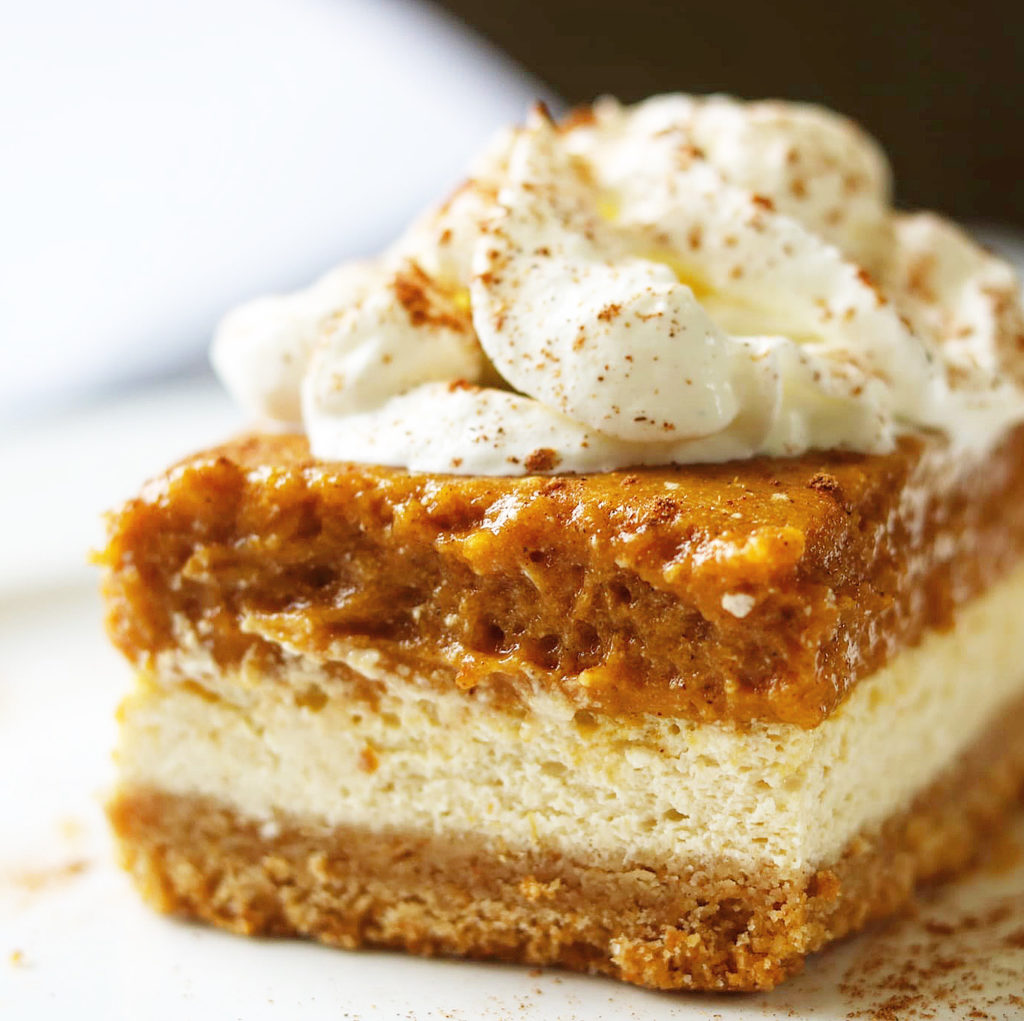
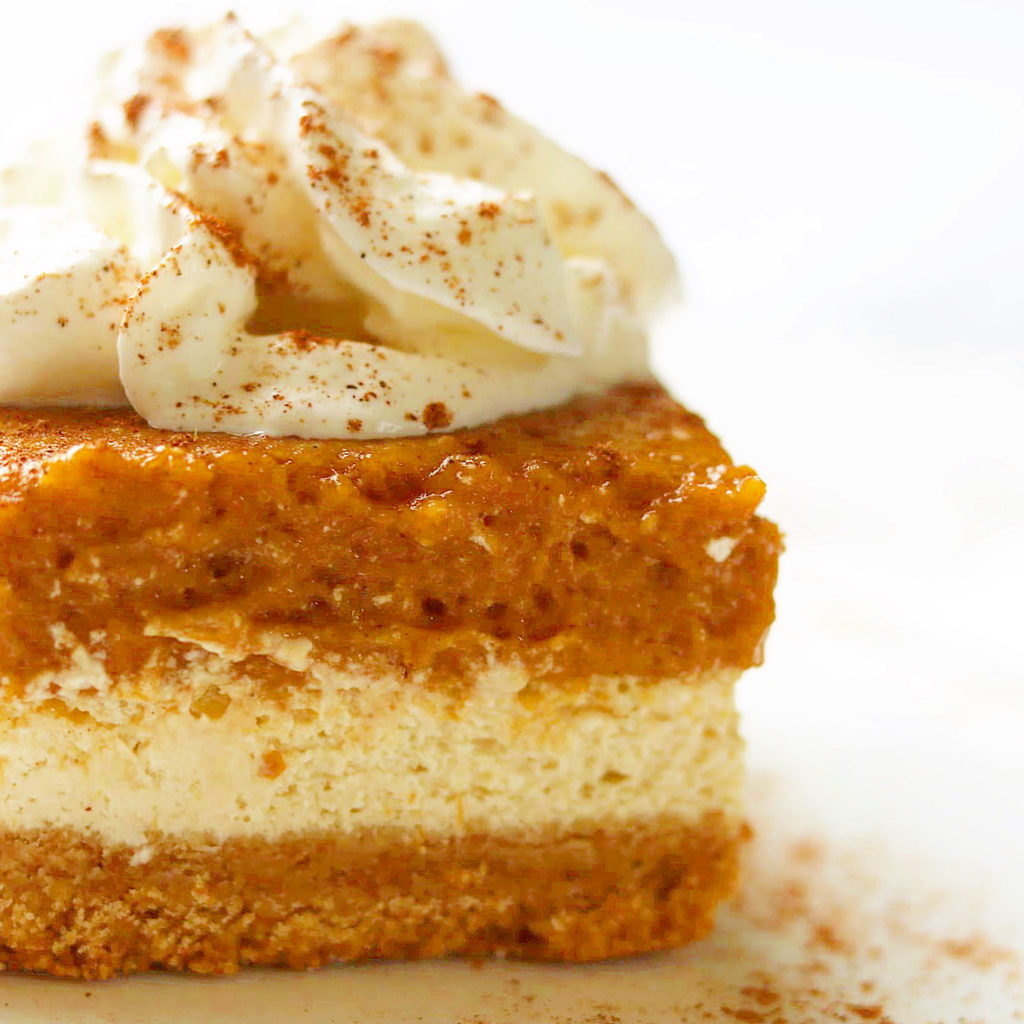
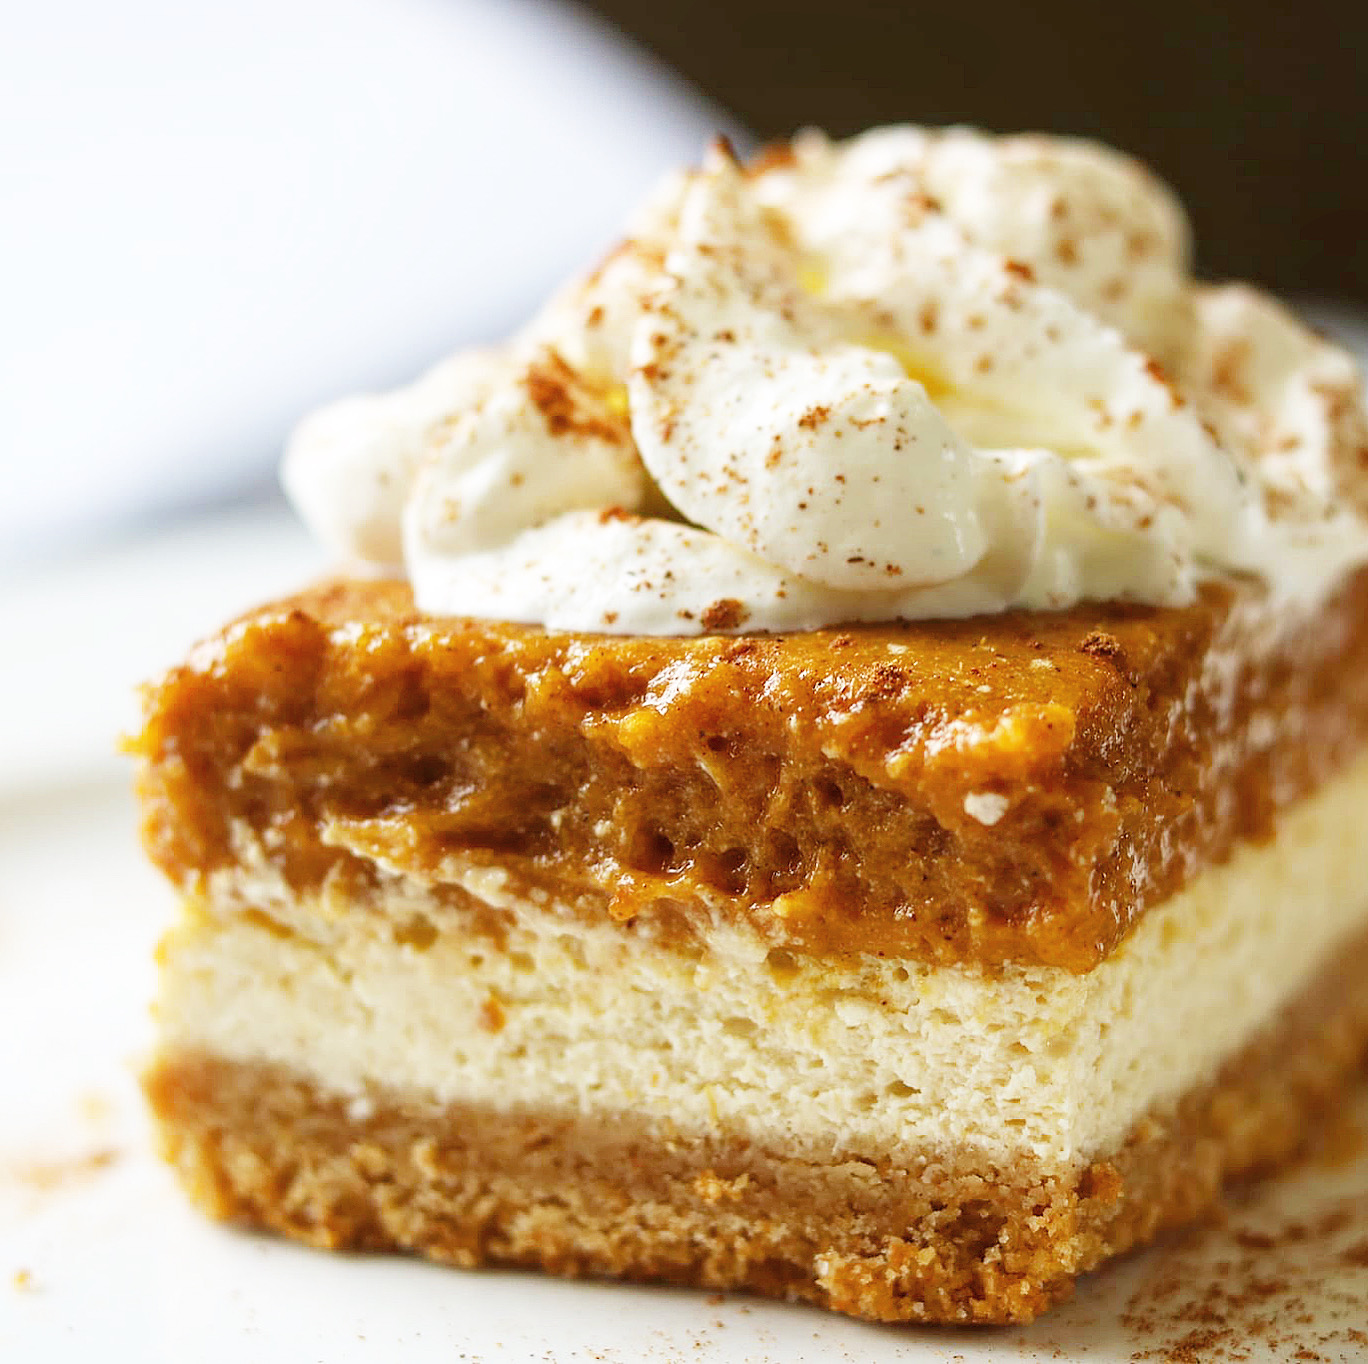
Just in time for Thanksgiving, these Pumpkin Cheesecake Bars are delicious! What’s not to love? There’s a graham cracker bottom layer, then a cheesecake layer, then a pumpkin layer!

Pumpkin Cheesecake Bars

I’m more of a savory food person than a sweet food person. We honestly don’t eat a lot of sweets. That doesn’t mean we don’t love choclolate or that I don’t keep a stash of chocolate candy in a candy jar at all times. That just means I don’t

I made these in an 8×8 pan that I lined with foil so that I could easily remove the cheesecake from the pan. As you can see by looking at the photo, you want to be able to cut the cheesecake into bars.

Pumpkin Cheesecake Bars

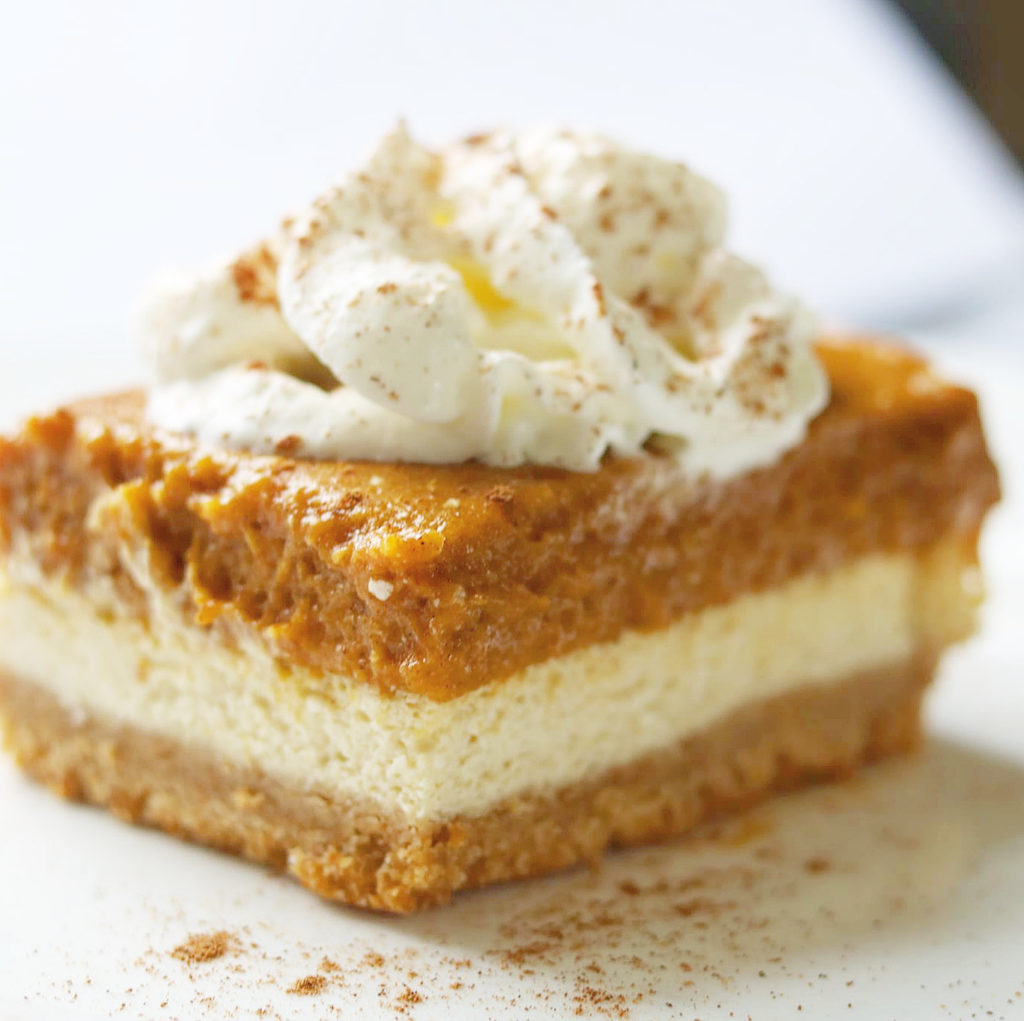
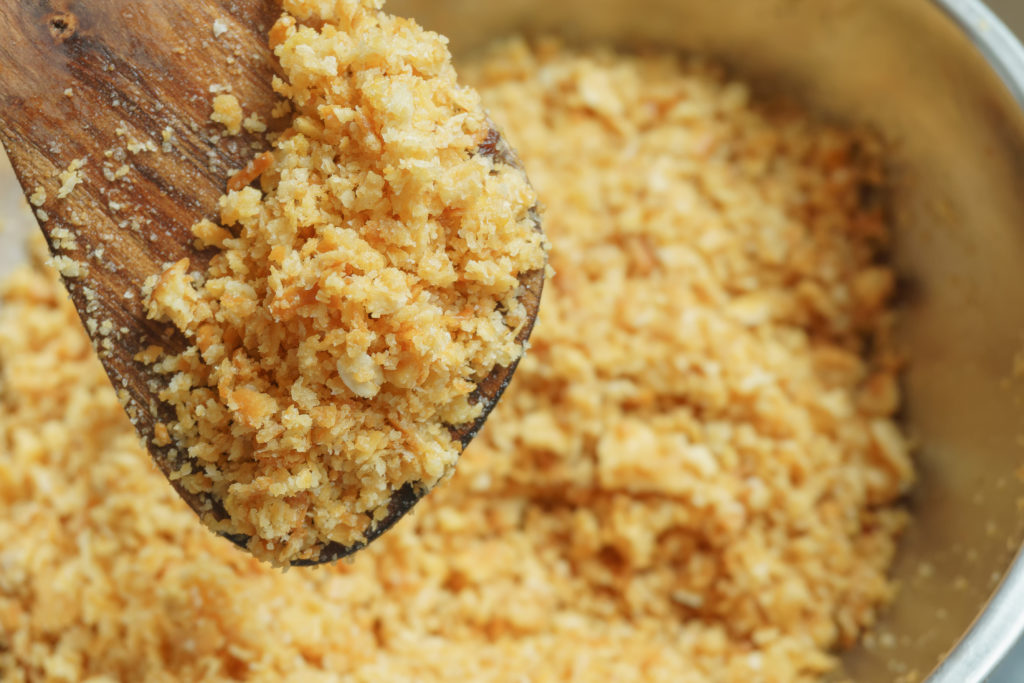
The bottom layer is the graham cracker crust which is graham crackers that I processed in my food processer along with sugar and with the machine running, I added the melted butter and pulsed until the crumbs came together. I then poured the graham crackers into the prepared pan and pressed down in an even layer.

Graham Cracker
blending cracker crust mixing with butter : preparation of dessert

Next is the cheesecake layer which is cream cheese, eggs, sour cream, vanilla and sugar. This mixture is whipped with a mixer then spread evenly over the graham crackers and baked at 350 for about 20 minutes.

The pumpkin layer takes a little bit more time but it’s well worth the extra effort. The recipe calls for unflavored gelatin in the pumpkin portion of the recipe. The first time I made a recipe with gelatin, I have to honestly say, I didn’t know what to buy. Because of that and if you aren’t used to using gelatin in a recipe either, I’ll help you out. I used Know Unflavored Gelatin and here is a link that will save you lot’s of time because you’ll know what you are looking for! https://www.amazon.com/Knox-Gelatine-Unflavored-Count-Ounce/dp/B00BCMU7T4.

After it’s all said and done, you’ll be so proud you made this recipe! Not only will it make a great presentation at your gathering, it also taste so good! A win-win!

Easy Pumpkin Cheesecake Bars

Before we publish this recipe, I wanted to share a link for one of my other recipes that will be great for Thanksgiving. https://the2spoons.com/delicious-cherry-pie/. This is a link for Allen’s favorite pie, Cherry Pie!

Cherry Pie

There’s a couple of steps on this recipe, but don’t be discouraged by that, they’re well worth it. I am a multi-tasker so these recipes that may have a couple of steps don’t bother me because I’m doing something else! Let me know what you think about this recipe.

Pumpkin Cheesecake Bars

Pumpkin Cheesecake Bars

Print Recipe Pin Recipe
Servings: 14 servings
Course: Dessert
Cuisine: American
Ingredients Method

Ingredients
  

For the Crust
  • 1 1/2 cups graham cracker crumbs
  • 3 tbsp granulated sugar
  • 5 tbsp melted butter
For the Cheesecake Layer
  • 8 oz cream cheese softened
  • 1/4 cup sour cream
  • 1/3 cup granulated sugar
  • 1/2 tsp vanilla extract
  • 2 eggs
For the Pumpkin Layer
  • 3 egg yolks
  • 15 oz can pumpkin puree
  • 1/2 cup packed brown sugar
  • 1/2 cup milk
  • 1/2 tsp salt
  • 1 tsp pumpkin pie spice
  • 1/2 tsp cinnamon
  • 1/2 tsp vanilla extract
  • 1 tsp unflavored gelatin
  • 1/4 cup cold water
  • 1/4 cup granulated sugar
  • 3 egg whites
  • pinch of cream of tarter
For the Topping
  • Whipped Cream
  • Pinch of Pumpkin Pie Spice

Method
 

  1. In a small bowl, combine the graham cracker crumbs, sugar and the melted butter. Press into a foil-lined 8×8-inch pan.
  2. In a small bowl, using a hand mixer, beat the cream cheese, sour cream, granulated sugar, and vanilla extract until smooth. Add the eggs, mix just until combined, then pour over crust. Place in the oven and bake at 350° for 20-25 minutes or until set. Transfer the pan to a wire rack to cool.
  3. Meanwhile, separate the three remaining eggs. In a medium saucepan set over medium-low heat, combine the yolks, pumpkin puree, brown sugar, milk, salt, pumpkin pie spice, and cinnamon. Cook, whisking every few minutes for 10 minutes or until mixture reaches 160°. Remove from the heat, whisk in the vanilla extract.
  4. In a small microwave-safe bowl, sprinkle the gelatin over the water; let stand for 1 minute, then microwave for 30 seconds or until the gelatin is dissolved. Stir into pumpkin mixture; set aside.
  5. In the top of a double boiler, combine the granulated sugar, egg whites and cream of tartar. Beat with an electric mixer set at low speed for 30 seconds, then set the pan over boiling water (the pan shouldn't touch the water). Beating at high speed, for about 7-9 minutes, or until it's stiff and glossy. Remove it from the heat, and beat an additional 1-2 minutes.
  6. Fold into the pumpkin mixture then spread evenly over cream cheese layer. Refrigerate uncovered for 1 hour, then cover and refrigerate for an additional 3 hours or until firm. Garnish with whipped cream and pumpkin pie spice; if desired.

Pumpkin Cheesecake Bars
Cherry Pie
Cherry Pie
Cherry Pie
Cherry Pie
  • Click to share on Pinterest (Opens in new window) Pinterest
  • Click to share on Facebook (Opens in new window) Facebook
  • Click to email a link to a friend (Opens in new window) Email
  • Click to print (Opens in new window) Print
  • Click to share on X (Opens in new window) X
  • Click to share on Tumblr (Opens in new window) Tumblr
  • More
  • Click to share on Reddit (Opens in new window) Reddit

Filed Under: Dessert Tagged With: cheesecake, Pumpkin, pumpkin cheesecake

love this chocolate peanut butter pie.

November 7, 2021 by Becky Spoon

Chocolate Peanut Butter PieJump to Recipe
Chocolate Peanut Butter Pie

Chocolate? Peanut Butter? Potato Chips! Heavy Cream? Yes, potato chips! What more could you want? This Chocolate Peanut Butter Pie is that perfect pie for the chocolate and peanut butter lover. Especially chocolate because other than the pudding, there is an Oreo cookie crust.. more chocolate!

Chocolate Peanut Butter Pie

This pie is salty and sweet from the kettle chips on top! There is an Oreo and butter crust that has a chocolate seal on it, then loaded with a velvety chocolate pudding, then a peanut butter mousse! Yes!

This dessert will be perfect with my Slow braised short ribs recipe!https://the2spoons.com/amazing-slow-braised-beef-short-ribs/

Braised Beef Short Ribs

love this chocolate peanut butter pie.

I love these clear pie plates that are perfect to bake this pie in. https://amzn.to/3hTzYev

I’ve had similar forever and use them for all pies savory and sweet.

The pie has a few steps but it is definitely worth it! Enjoy!

Chocolate Peanut Butter Pie

Chocolate Peanut Butter Pie

5 from 1 vote
Print Recipe Pin Recipe
Course: Dessert
Cuisine: American
Ingredients Method

Ingredients
  

For the Oreo Crust
  • 2 Cups Finely ground Oreo cookies (about25)
  • 4 Tbsp Butter, melted
  • 1/4 Cup Semi sweet chocolate, melted
For the Potato Chip Topping
  • 1/3 Heaping cup kettle potato chips, crushed
  • 3 Tbsp Flour
  • 2 1/2 Tsp Granulated sugar
  • Pinch of salt
  • 2 Tbsp Butter, melted
Chocolate Pudding
  • 1/2 Cup Sugar
  • 1/4 Cup Corn starch
  • 1/4 Tsp Salt
  • 1/4 Cup Unsweetened cocoa powder
  • 3 Egg yolks
  • 2 1/2 Cups Whole milk
  • 4 Oz Bittersweet chocolate, chopped
  • 2 Tbsp Butter
  • 1/2 Cup Powdered sugar
  • 1 Tsp Vanilla
Peanut Butter Mousse
  • 1 Cup Heavy Whipping Cream
  • 8 Oz Cream cheese, room temperature
  • 1 Cup Creamy Peanut Butter
  • 1/2 Cup Powdered Sugar
  • 1 Tsp Vanilla

Method
 

For the Oreo Crust
  1. Run your Oreos through a food process until finely ground. Mix it in a bowl with the melted butter until completely moistened.
    Pour it into a 9 inch pie dish and press it into the bottom and up the sides. Place your pie crust in the fridge for at least 1 hour to set.
    Once set, take your melted chocolate and spread it in an even and thin layer on the bottom of your crust. This creates a barrier between the pudding and the crust so it doesn’t get soggy. Place it back in the fridge for 30 minutes for the chocolate to set.
For the Potato Chip Topping
  1. Preheat the oven to 325F and line a baking sheet with parchment paper. Crush up your potato chips in a ziplock bag. You want it to be mostly small pieces about the size of old fashioned oats.
    Mix together all the ingredients in a bowl and spread it even on your baking sheet. Bake for 10 minutes. It will still look pretty pale when it’s done so just take a fork to it to make sure it crumbles. That’s when you know it’s ready.
    Let it sit out at room temperature to cool then transfer to an air tight container until you’re ready to top your pie. Do not put it in a closed container when it’s hot because it will get soggy and don’t put it in the fridge.
Chocolate Pudding
  1. In a medium saucepan, whisk together the dry ingredients (sugar, cornstarch, salt, and cocoa powder).
    In a separate bowl, whisk together the milk and egg yolks.
    Mix this into the dry ingredients and bring to a boil over medium high heat, stir constantly. It will be liquid up until it reaches a boil. At that point it should get pretty thick but cook for about one or two minutes longer then take it off the heat.
    Whisk in the chocolate and then the butter and vanilla.
    Pour into your cooled crust and spread it even. Let it sit out for 45 minutes then move it to the fridge. Cover in plastic wrap and press it to the surface of the pudding so you don’t get a skin. Refrigerate for at least 2 hours or until the pudding is somewhat firm to the touch.
Peanut Butter Mousse
  1. When your pudding is ready, make the peanut butter mousse. Start by creaming together your room temperature cream cheese and peanut butter. Once combined, mix in the powdered sugar and vanilla.
    In a separate bowl, whisk your heavy cream on high until it forms soft peaks (3-5 minutes).
    Scoop about ⅓ of the whipped cream into the peanut butter mixture and fold it in. Once it’s almost combined, add in the rest of the whipped cream and continue to fold until it’s fully combined.
    Spread this over top the pudding layer of your pie. You can also make little swirls with the back of a spoon. Pop the pie in the fridge for another hour to set.
    Before serving, crumble the potato chips all over the top with as much or as little as you like. I recommend being a little heavy handed because the salty crunch helps to balance out the sweetness of the pie. You can also add more crushed Oreos.
    Serve chilled or at room temperature but store it in the fridge. Enjoy!

Chocolate Peanut Butter Pie

Chocolate Peanut Butter Pie
Jump to Recipe
  • Click to share on Pinterest (Opens in new window) Pinterest
  • Click to share on Facebook (Opens in new window) Facebook
  • Click to email a link to a friend (Opens in new window) Email
  • Click to print (Opens in new window) Print
  • Click to share on X (Opens in new window) X
  • Click to share on Tumblr (Opens in new window) Tumblr
  • More
  • Click to share on Reddit (Opens in new window) Reddit

Filed Under: Dessert Tagged With: Chocolate, chocolate peanut butter pie, chocolate pudding, dessert

simple and delicious banana pudding – 1 of the best

September 4, 2021 by Becky Spoon

Banana Pudding

This banana pudding will become your #1 recipe go to for those Southern meals!

Jump to Recipe
Banana Pudding
Banana Pudding

This Banana Pudding really is amazing!! This is not my usual recipe but this may be my go to from now on! I ran across this recipe and it is supposed to be from the Magnolia Bakery in New York City that ships this deliciousness everywhere! So, with that said this is “supposedly” a close to their recipe and it is so good!

If you find yourself in New York City here is the link for their store www.magnoliabakery.com. And, of course, a photo of this deliciousness!

I’m going to tell you from the beginning that although this recipe is beyond simple, I do start the day before because you want the pudding portion to be thick and chilled before you go to the next step which is folding in heavy whipped cream. Yes, I said that, heavy whipped cream. If I haven’t gotten your attention yet, read on.

amazing, simple banana pudding.

Banana Pudding
Banana Pudding

This recipe for the banana pudding combines a box of vanilla instant pudding with a can of sweetened condensed milk. Yes. That in itself speaks deliciousness. I always use Eagle Brand but there are other brands available. https://amzn.to/37SYB6T this is a 4 pack.

And, of course vanilla wafers. I know there’s other brands of vanilla wafers, but I’m a diehard fan of Nabisco Vanilla Wafers. Can’t help it, I always get the Nabisco brand. https://amzn.to/2Zaq3t9.

amazing, simple banana pudding.

Banana Pudding
Banana Pudding

What you may need to make this banana pudding.

Before I post the recipe, here are some of my favorite things used in this recipe. I love these pyrex wet measuring cups. https://amzn.to/2ClKxHk.

If you don’t already use a roll of commercial clear wrap you have to if you have room for it! It is so easy to use, just put the bowl you want to wrap or ingredient in front, cover then the easy blade cuts it without any twisting or untangling saran wrap. I have used this foodservice for years: https://amzn.to/37NCj6F


Here is another delicious dessert I think you’ll love!Perfectly Peachy – Peach Cobbler

Perfectly Peachy - Peach Cobbler
Perfectly Peachy – Peach Cobbler


Here’s the recipe for this Magnolia Bakery Banana Pudding! Enjoy!

Banana Pudding

Magnolia Bakery Banana Pudding

Print Recipe Pin Recipe
Servings: 15 servings
Course: Dessert
Cuisine: American
Ingredients Method

Ingredients
  

  • 1 14oz can sweetened condensed milk
  • 1 1/2 cups ice cold water
  • 1 3.4 oz box vanilla instant pudding mix
  • 3 cups heavy cream
  • 4 cups sliced, barely ripe bananas
  • 1 15 oz box Nilla Wafers

Method
 

  1. In a large bowl, beat together the sweetened condensed milk and water until well combined – about 1 minute. Add the pudding mix and beat well – about 2 minutes. Cover and refrigerate for 3-4 hours or overnight. It is very important to allow the proper amount of time for the pudding mixture to set. It will be watery if you don't let it set up long enough.
  2. In a large bowl, whip the heavy cream until stiff peaks form. Gently fold the whipped cream into the pudding mixture until no streaks of pudding remain.
  3. Dessert can either be made in individual portions or in a large glass bowl with 4-5 quart capacity (a 9×13 baking dish also works).
  4. To assemble dessert, arrange 1/3 of the Nilla wafers covering the bottom, overlapping if necessary. Next, layer 1/3 of the bananas, and 1/3 of the pudding mixture. Repeat twice more, garnishing with additional wafers or wafer crumbs on the top layer. Cover tightly and allow to chill in the fridge for at least 4 hours – or up to 8 hours, no longer (because bananas will start to brown.
  • Click to share on Pinterest (Opens in new window) Pinterest
  • Click to share on Facebook (Opens in new window) Facebook
  • Click to email a link to a friend (Opens in new window) Email
  • Click to print (Opens in new window) Print
  • Click to share on X (Opens in new window) X
  • Click to share on Tumblr (Opens in new window) Tumblr
  • More
  • Click to share on Reddit (Opens in new window) Reddit

Filed Under: Dessert Tagged With: Banana Pudding, bananas, dessert, magnolia bakery banana pudding, puddijng

the best – aunt donna lou’s decadent chocolate meringue pie.

September 1, 2020 by Becky Spoon

Aunt Donna Lou's decadent chocolate meringue pieJump to Recipe
Aunt Donna Lou's decadent chocolate meringue pie
Aunt Donna Lou’s decadent chocolate meringue pie

Just look at this decadent chocolate meringue pie! This pie is amazingly simple and so chocolatey. I really have never been a big sweet eater until I got older and I haven’t made a lot of desserts. I find them kind of tedious, having to make everything exact, but a pie like this is well worth the trouble.

I grew up in an amazing time of America. We spent time with family. Just not immediate family but with cousins, aunts and uncles, and of course our grand parents. One thing I always loved were the family reunions. There would be loads of food and without fail, there would be a chocolate pie, actually probably several. My sisters make pies much better than I, one in particular specializes in cream pies with meringue because they are a favorite of her husband.

This custard is a little different than I’ve made before. You blend sugar, flour, a little salt and the chocolate, then add boiling water, whisking constantly to prevent lumping. Then I temper the eggs and add to the mixture, then cook until the custard has thickened.

Aunt Donna Lou's decadent chocolate meringue pie
Aunt Donna Lou’s decadent chocolate meringue pie

This recipe uses cocoa powder and I like to use a really good cocoa powder. One of my favorites is Ghirardelli Cocoa Powder. https://amzn.to/2ERSXaC

the best – aunt donna lou’s decadent chocolate meringue pie.

Aunt Donna Lou's Chocolate Pie

I have to admit I didn’t cook my chocolate long enough to thicken a little more, but I’m telling you this chocolate pudding in this pie is amazing. I sure don’t mind eating it with a spoon!! The meringue is just icing on the cake, well you know what I mean. If you like chocolate as much as I do, try this chocolate recipe https://the2spoons.com/love-%f0%9f%92%95-chocolate-peanut-butter-pie/.

Chocolate Peanut Butter Pie

This pie is so delicious!!! Ok, here’s the new recipe for my Aunt’s recipe! Hope you make it.

Chocolate Meringue Pie

Print Recipe
Course: Dessert
Cuisine: American
Ingredients Method

Ingredients
  

For the Custard (for 2 pies or one deep dish pie pan)
  • 2 cups granulated sugar
  • 2/3 cup flour
  • pinch of salt
  • 1/2 cup cocoa
  • 6 yolks, reserve the whites for the meringue
  • 2 cups boiling water
  • 1 tbsp butter
For the Meringue
  • 6 room temperature egg whites
  • 1/2 cup sugar
  • 1/4 tsp vanilla

Method
 

  1. Prebake your preferred crust at 425 degrees. I prick the crust with a fork, add parchment paper and pie weights. Cook for 10-12 minutes until browned. I used a store bought Pillsbury pie crust that worked perfectly.
  2. Combine the sugar, flour, salt and cocoa in a sauce pan. Bring water to a boil and while whisking, add to the dry ingredients, continuing to whisk to prevent lumps.
  3. Temper the eggs by adding a little of the hot pudding to them and combining, then add to the custard. Continue to cook until thick. Remove from the heat and add the butter. I refrigerated mine before adding to the cooled crust.
  4. Beat the egg whites, while adding a little sugar at a time, along with the vanilla until stiff peaks form.
  5. Spread on the pie and bake for a few minutes at 450 degrees until lightly browned. Cool before cutting.
  • Click to share on Pinterest (Opens in new window) Pinterest
  • Click to share on Facebook (Opens in new window) Facebook
  • Click to email a link to a friend (Opens in new window) Email
  • Click to print (Opens in new window) Print
  • Click to share on X (Opens in new window) X
  • Click to share on Tumblr (Opens in new window) Tumblr
  • More
  • Click to share on Reddit (Opens in new window) Reddit

Filed Under: Dessert Tagged With: Chocolate, chocolate pie, dessert, pie

heavenly summer peaches and cream pretzel pie.

July 30, 2020 by Becky Spoon

Peaches and Cream Pretzel PieJump to Recipe
Peaches and Cream Pretzel Pie

This Peaches and Cream Pretzel Pie screams summer with those delicious Texas Peaches! Texas peaches are in season from May until the first week of August. These were freestone which I much prefer over the clingstone peaches. So much easier and I just think you get more peach. You probably want to make this the day before you plan on serving it because it does require several hours to firm up.

I got this recipe from Teigen’s blog, Half Baked Harvest and made a couple of changes. Her recipe called for crème fraiche or cream cheese, and I use sour cream instead that was perfect. Certainly wanted to give her the credit for this pie, as I’m not sure I would have thought of a pretzel crust. It is delicious though.

Peaches and Cream Pretzel Pie

Just look how delicious this pie looks. It basically is peaches and cream in a pretzel pie crust. I used a deep dish pie pan like thishttps://amzn.to/309rjOz

heavenly summer peaches and cream pretzel pie.

Peaches and Cream Pretzel Pie

You refrigerate this pie for a while before slicing and I actually placed it in the freezer to get a cleaner cut.

Here is another fruit dessert I have on the blog https://the2spoons.com/my-favorite-dessert-delicious-fresh-berry-crisp/. I love a crisp and this is delicious.

Fresh Berry Crisp
Fresh Berry Crisp

Here’s the recipe for this delicious Peaches and Cream Pretzel Pie.

Peaches and Cream Pretzel Crust

Print Recipe
Servings: 8 Servings
Course: Dessert
Cuisine: American
Ingredients Method

Ingredients
  

Pretzel Crust
  • 1 1/2 cups finely ground salted pretzels
  • 1 stick butter, melted
  • 2 tbsp honey or brown sugar
  • 1/2 tsp cinnamon
For the Peaches and Cream Filling
  • 2 cups heavy cream
  • 2 tsp vanilla
  • 8 ounces sour cream
  • 4-6 tbsp powdered sugar
  • 2 tbsp raspberry or peach jam or preserves
  • 1/3 cup honey
  • 3 ripe, but firm peaches, sliced
  • 1/2 cup fresh raspberries

Method
 

  1. To make the Crust: Preheat the oven to 350 degrees F.
  2. In a medium bowl, combine the pretzel crumbs, butter, the 2 tbsp honey and cinnamon, and mix until combined.
  3. Remove 2 tablespoons of the pretzel mixture and spread on a small baking sheet. Press the remaining dough into and 8-9 inch pie plate. Transfer both to the oven and bake until toasted, about 8 minutes. Let cool completely before filling. Break the extra toasted pretzel crumbs and set aside.
  4. To make the cream. In a large bowl, using an electric mixer, beat the cream, sugar and vanilla on high speed until stiff peaks form. Fold in the sour cream. Chill until ready to assemble.
  5. To Assemble, spread the raspberry or peach jam over the bottom of the cooled crust. Add the cream mixture. Refrigerate for at least 6 hours or overnight.
  6. To make the beaches, bring the honey to a low boil in a medium saucepan, and simmer one minute and remove for the heat and stir in the peaches, tossing to combine. Let sit about 10 minutes.
  7. To serve spoon a few peach slices over the cream, reserving the remaining peaches and honey for serving individually. Add a handful of raspberries and sprinkle on the reserved pretzel crumbs. Slice and serve immediately, topped with additional peaches and honey sauce.
  8. To make a frozen pie, which I did because it makes a cleaner slice. Complete the recipe through the 4th step and chill the pie while you make the peaches, then top the pie with the peaches and freeze until firm, 3-4 hours or overnight. To serve remove the pie 10 minutes before slicing. Slice and serve as directed above.
  • Click to share on Pinterest (Opens in new window) Pinterest
  • Click to share on Facebook (Opens in new window) Facebook
  • Click to email a link to a friend (Opens in new window) Email
  • Click to print (Opens in new window) Print
  • Click to share on X (Opens in new window) X
  • Click to share on Tumblr (Opens in new window) Tumblr
  • More
  • Click to share on Reddit (Opens in new window) Reddit

Filed Under: Dessert Tagged With: heavy whipping cream, peaches, peaches and cream, peaches and cream pretzel crust, pretzel crust, texas peaches

  • Page 1
  • Page 2
  • Page 3
  • Page 4
  • Go to Next Page »

Primary Sidebar

Categories

  • Appetizer
  • Beans, Lentils, Grains, Rice
  • Beef
  • Bread
  • Breakfast/Brunch
  • Cocktails
  • Dessert
  • Dishes of Mexico, Tex Mex and New Mexico Red and Green Chile
  • Fish/Seafood
  • Ice Cream
  • Pasta
  • Pizza
  • Pork
  • Poultry
  • Salad Dressings
  • Salads
  • Salsas
  • Sandwiches/Burgers/Hot Dogs
  • Sauces, Compound Butters, Condiments
  • Side dish
  • Soups/Stews/Gumbo//Chili
  • Stocks, Broths, Gravies
  • Vegetables

Copyright © 2025 The 2 Spoons on the Foodie Pro Theme

Manage Cookie Consent
We use cookies to optimize our website and our service.
Functional Always active
The technical storage or access is strictly necessary for the legitimate purpose of enabling the use of a specific service explicitly requested by the subscriber or user, or for the sole purpose of carrying out the transmission of a communication over an electronic communications network.
Preferences
The technical storage or access is necessary for the legitimate purpose of storing preferences that are not requested by the subscriber or user.
Statistics
The technical storage or access that is used exclusively for statistical purposes. The technical storage or access that is used exclusively for anonymous statistical purposes. Without a subpoena, voluntary compliance on the part of your Internet Service Provider, or additional records from a third party, information stored or retrieved for this purpose alone cannot usually be used to identify you.
Marketing
The technical storage or access is required to create user profiles to send advertising, or to track the user on a website or across several websites for similar marketing purposes.
Manage options Manage services Manage {vendor_count} vendors Read more about these purposes
Preferences
{title} {title} {title}