• Skip to primary navigation
  • Skip to main content
  • Skip to primary sidebar

A cook named Rebecca

  • Home
  • Favorite Cookbooks
  • Recipes
  • Travel
You are here: Home / Home

Love Gumbo! This Super Shrimp, Okra and Andouille Smoked Sausage Gumbo is Over the Top

September 11, 2019 by Becky Spoon

Shrimp, Okra and Andouille Smoked Sausage Gumbo
Please follow and like us:
onpost_follow
fb-share-icon
Tweet
Shrimp, Okra and Andouille Smoked Sausage Gumbo

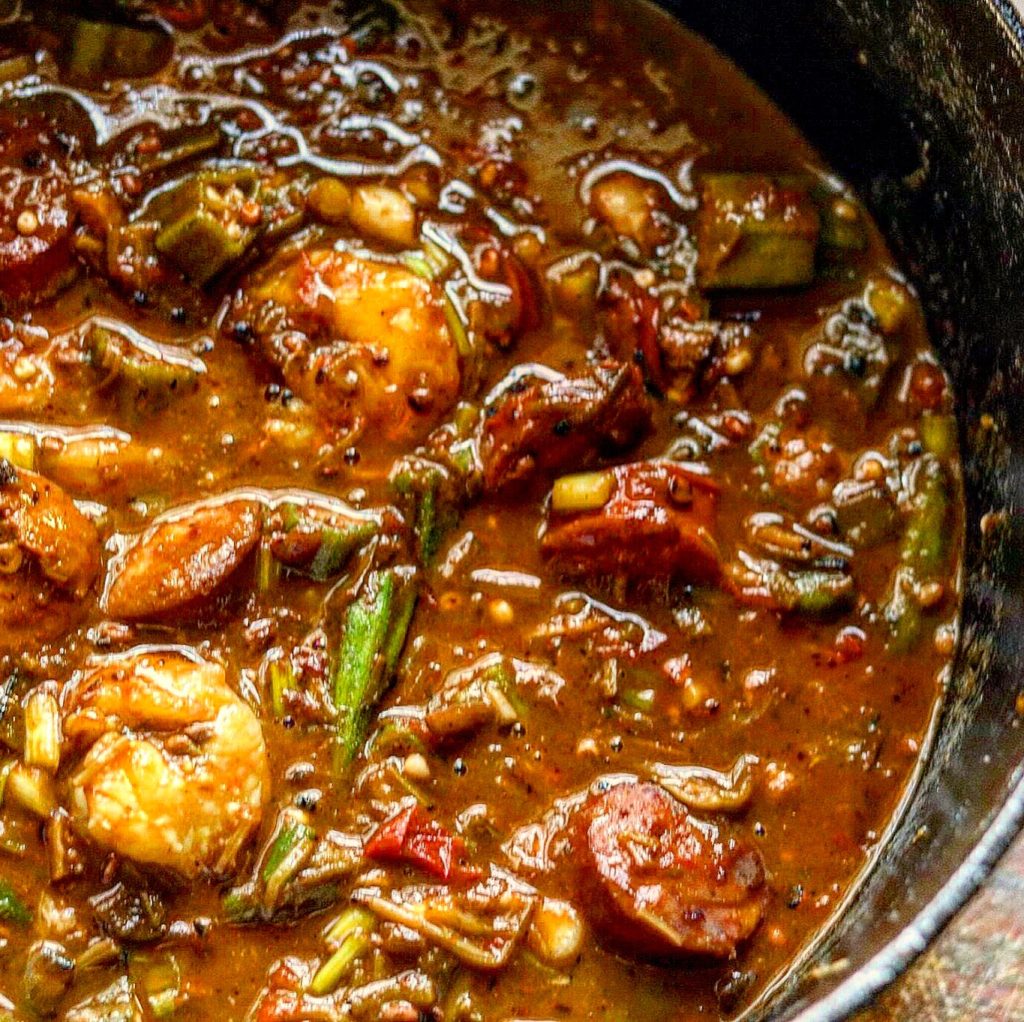
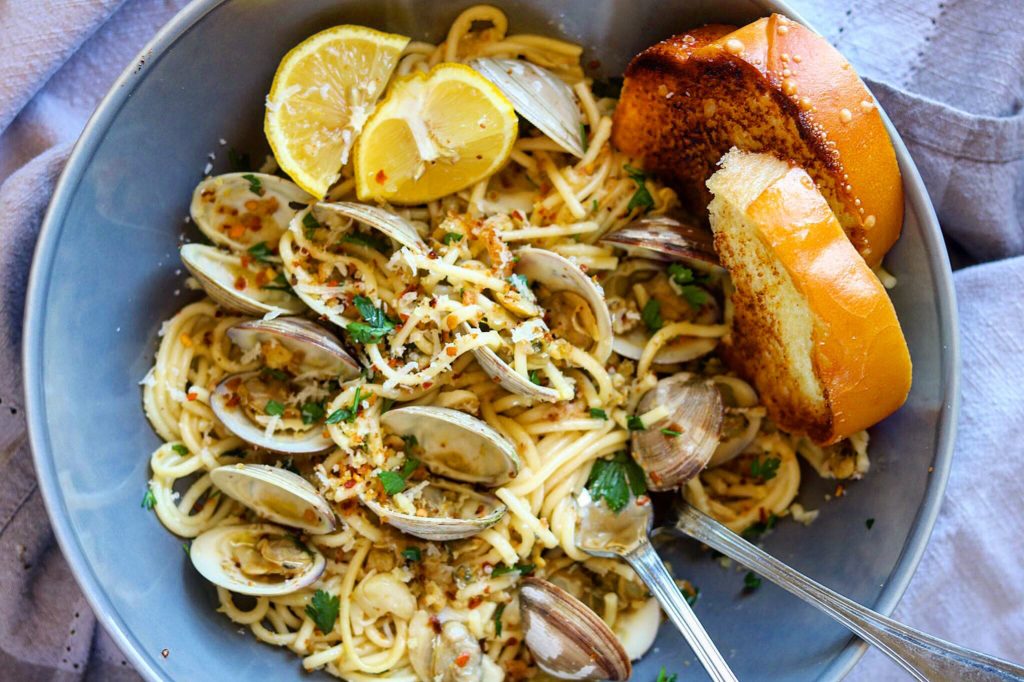
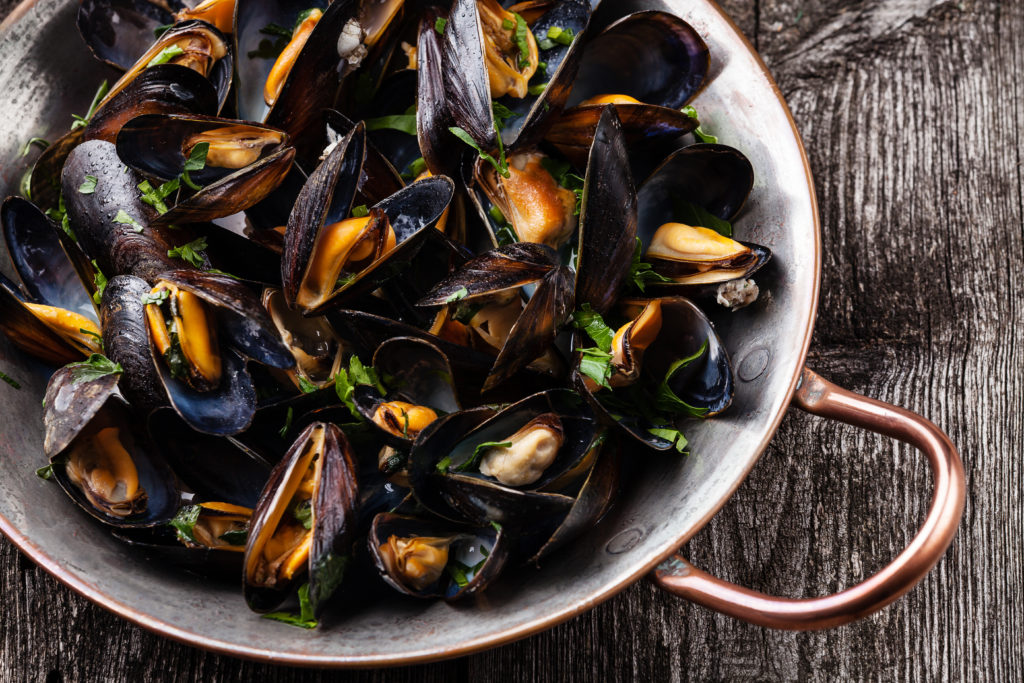
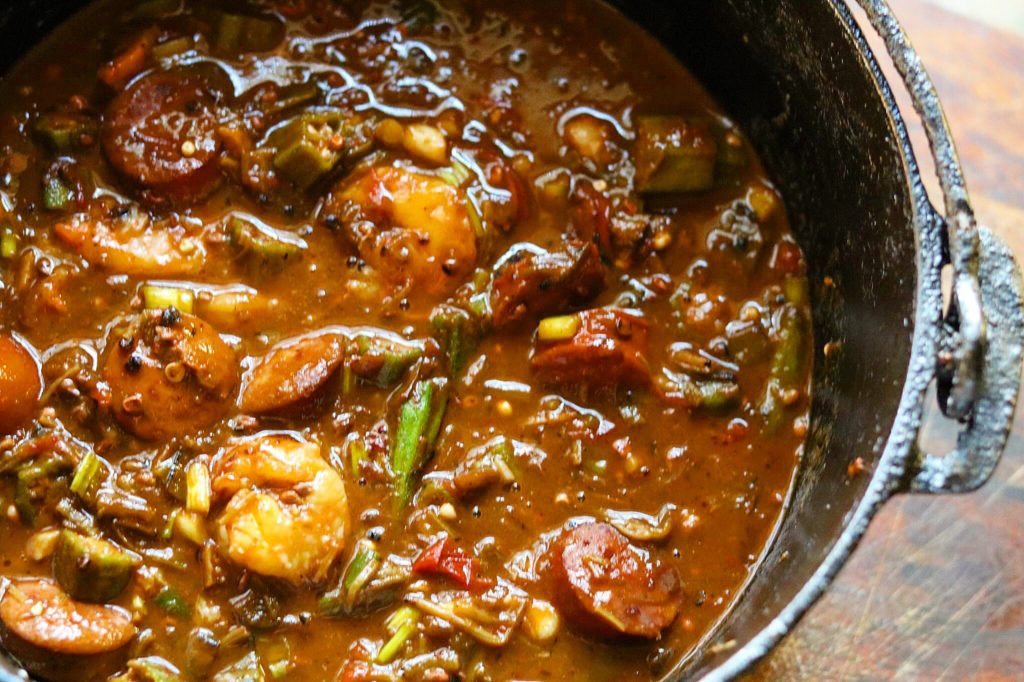
This Shrimp, Okra and Andouille Smoked Sausage Gumbo really is over the top! It is absolutely delicious!

Shrimp, Okra and Andouille Smoked Sausage Gumbo

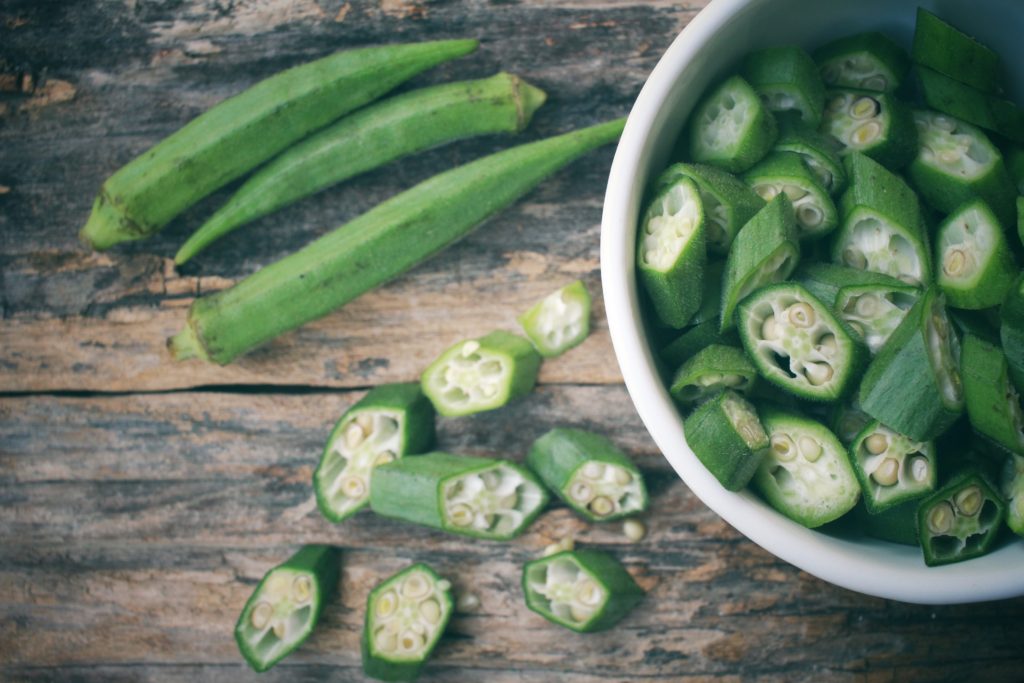
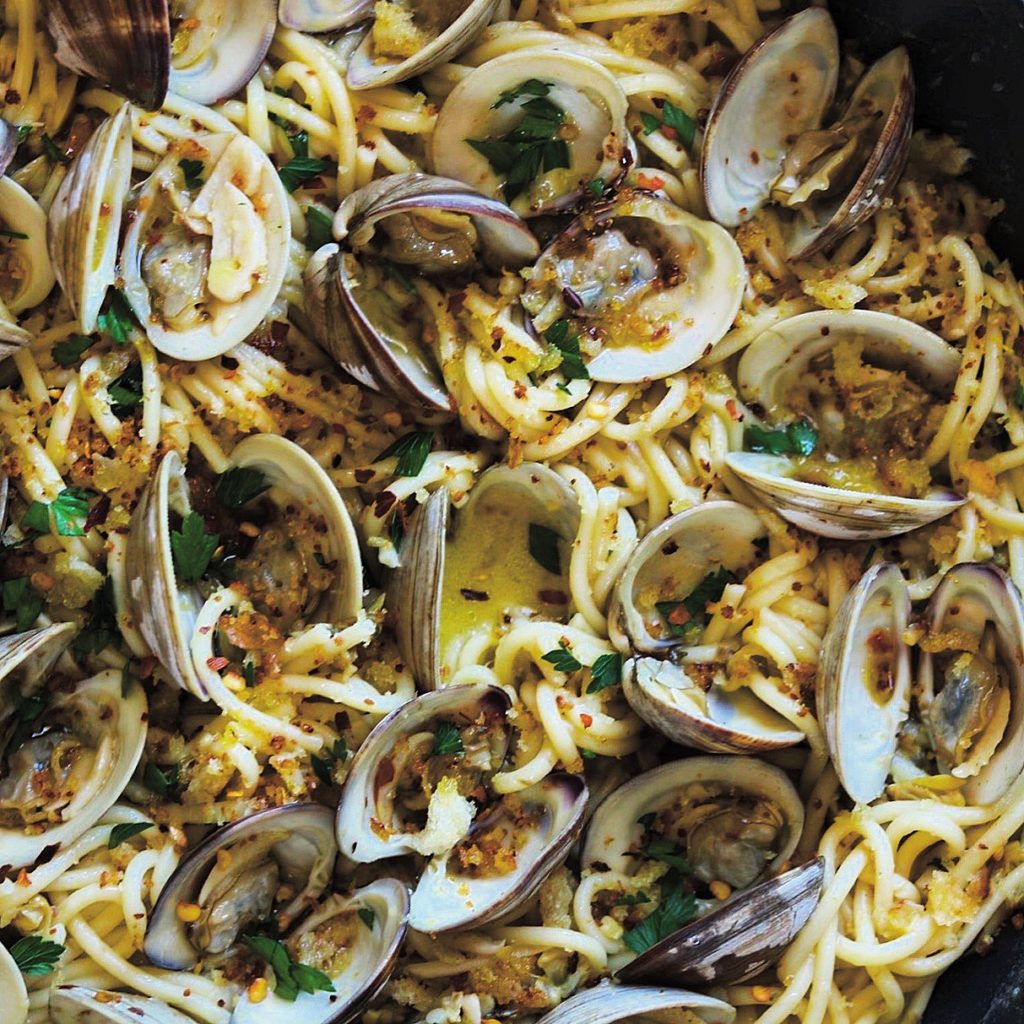
Unlike other gumbos or other Louisiana dishes that start with a roux from oil and flour, the roux or thickness in this dish is from the okra. You start with a portion of the okra being cooked in oil over pretty high heat for several minutes, then adding seasonings, continuing to cook and scraping the bits from the bottom to make a roux that will thicken your dish. Not only will the initial spices browned and cooked with the okra thicken your gumbo, but this adds layers of flavor. The flavors are crazy in this dish.

Okra

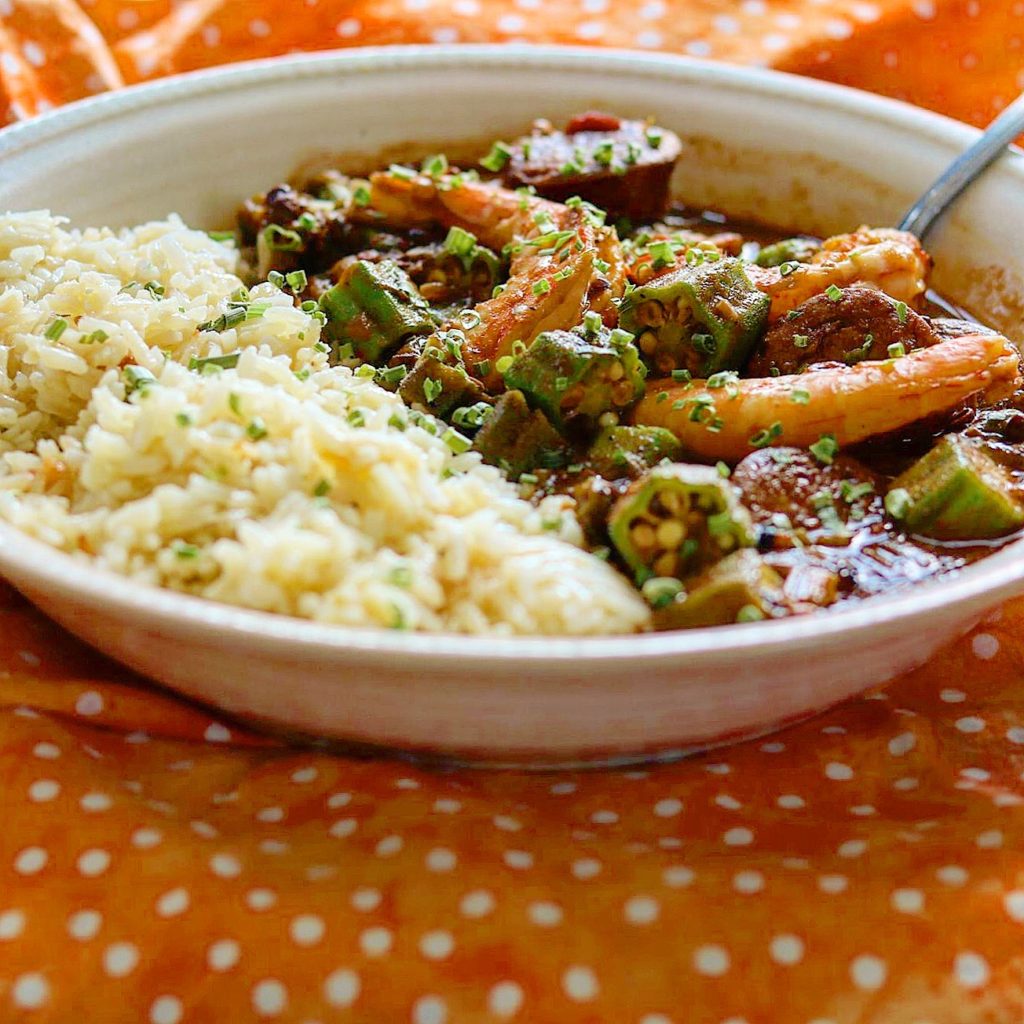
I served this with basic Louisiana rice which is a perfect addition! All I did was saute a little onion in butter or extra virgin olive oil until translucent, then I added 1 1/2 cups rice, 3 cups chicken stock, a bay leaf and a pinch of salt. Then brought it to a boil, reduced the heat to simmer, placed a lid on it and cooked and cooked about 20 minutes on a simmer.

This is another recipe from one of my favorite chef’s from Louisiana, Chef Paul Prudhomme. I bought his book ” Chef Paul Prudhomme’s Louisiana Kitchen” in the 1980’s. My cook book is tattered with food stains and pages almost falling out…that’s how much I’ve made his recipes. You can still get this awesome cookbook. Here’s the link: https://www.amazon.com/Chef-Paul-Prudhommes-Louisiana-Kitchen/dp/0688028470.

Shrimp, Okra and Andouille Smoked Sausage Gumbo

Over the Top – Super Shrimp, Okra and Andouille Smoked Sausage Gumbo

Another Gumbo dish I love and that is on my blog is a delicious Seafood Gumbo. Here’s the link for that recipe: https://the2spoons.com/delicious-louisiana-seafood-gumbo/. I hope you enjoy this new recipe for gumbo.

Shrimp, Okra and Andouille Smoked Sausage Gumbo

Print Recipe
Course Appetizer, dinner, Lunch, Main Course
Cuisine cajun, creole
Servings 8 servings

Ingredients
  

  • 1/3 cup pork lard (preferred, or use chicken fat or vegetable oil)
  • 2 1/2 lbs okra, quartered lengthwise and sliced (8 1/2 cups in all
  • 1 1/2 tsp white pepper, in all
  • 1 1/2 tsp ground red pepper (preferably cayenne) in all
  • 1 tsp black pepper
  • 2 cups finely chopped onions
  • 10 cups Basic Seafood Stock (recipe follows) ***If you don't want to make you can purchase, but as always homemade is the best***
  • 2 cups peeled and chopped tomatoes
  • 2 tsp salt
  • 1 tsp minced garlic
  • 3/4 tsp onion powder
  • 1/2 tsp dried thyme leaves
  • 1/4 lb (1 stick) unsalted butter
  • 1 lb andouille smoked sausage (preferred) or any other good pure smoked pork sausage such as Polish sausage (kielbasa) cut into 1/4 inch slices
  • 1 lb peeled medium shrimp
  • 1/2 cup chopped green onions
  • 2 1/4 cups Basic Cooked Rice (In the content of the post)

For the Basic Seafood Stock

  • 1 1/2-2 lbs shrimp heads and shells,or crawfish heads and shells or crab shells.
  • 2 qts cold water
  • 1 medium onion, unpeeled and quartered
  • 1 large garlic clove, unpeeled and quartered
  • 1 rib celery

Instructions
 

For the Seafood Stock

  • Place all ingredients in a stock pot or a large saucepan. Bring to a boil over high heat, then gently simmer at least 4 hours, preferably 8 , replenishing the water as need to keep about 1 quart of liquid in the pan. Cover with a lid if you like leaving it askew. Strain and refrigerate until ready to use. ****If you have an Instant Pot, you can make this stock rich and delicious in about 2 hours*** Even if you don't have the 4 to 8 hours, any homemade stock is far better than using water…the stock just makes these Louisiana dishes.

For the Gumbo

  • In a 5 1/2 quart saucepan or large dutch oven (preferably cast iron) melt the fat over high heat until it begins to smoke, about 3 minutes. Add 6 cups of the okra. Cook for about 3 minutes, stirring occasionally. Add 1 teaspoon of the white pepper, 1 teaspoon of the red pepper and the black pepper; stir well.
    **Remember to not add all the okra because you will add the remaining 2 1/2 cups at the end. Most of the okra you add now will be pretty cooked down, as this is what makes your sauce. The last 2 1/2 cups will remain in it's form.****
  • Continue cooking until well browned, about 10 minutes, stirring frequently. Stir in the onions; cook for 5 minutes, stirring fairly often and scraping pan bottom as needed. Add 1 cup of the stock; cook 5 minutes, cook 5 minutes, stirring occasionally and scraping pan bottom sell.
  • Stir in the tomatoes and cook about 8 minutes, stirring and scraping frequently. Add another 2 cups stock; cook for 5 minutes, stirring occasionally. Stir in the remaining 1/2 teaspoon white pepper, 1/2 teaspoon red pepper and the salt, garlic, onion powder and thyme. Add the butter and continue cooking over high heat, stirring until butter is melted and scraping the pan bottom well.
  • Add the remaining 7 cups stock, stirring well. Bring to a boil, stirring occasionally. Add the andouille and return to a boil; reduce heat and simmer about 45 minutes more, stirring occasionally. Add the remaining 2 /2 cups okra; simmer 10 minutes, Then add the shrimp and green onions. Return gumbo to a boil, then remove from heat. Skim any oil from the survace and serve immediately.
  • To serve, place a mounded 1/4 cup in the center of each serving bowl if you like, spoon 1 1/2 cups gumbo around the rice. This is a great appetizer also…just decrease the serving by half.
Keyword gumbo, louisiana, okra, shrimp, shrimp okra smoked sausage gumbo
Okra
  • Click to share on Pinterest (Opens in new window) Pinterest
  • Click to share on Facebook (Opens in new window) Facebook
  • Click to email a link to a friend (Opens in new window) Email
  • Click to print (Opens in new window) Print
  • Click to share on X (Opens in new window) X
  • Click to share on Tumblr (Opens in new window) Tumblr
  • More
  • Click to share on Reddit (Opens in new window) Reddit

Filed Under: Soups/Stews/Gumbo//Chili Tagged With: cajun, Gumbo, shrimp, shrimp okra and andouille smoked sausage gumbo

Easy, Sausage Egg and Cheese Biscuit

September 7, 2019 by Becky Spoon

Sausage Egg and Cheese Biscuit
Please follow and like us:
onpost_follow
fb-share-icon
Tweet
Jump to Recipe
Sausage Egg and Cheese Biscuit

This Sausage Egg and Cheese Biscuit is so easy and one of my favorite things to eat for breakfast. Do you remember the Self Rising Flour Biscuits I posted the other day? That recipe is the recipe I used for these biscuits.

You can make these biscuits ahead of time, individually freeze them and pull them out as you need them. You can even go ahead and cook the sausage and add them to the biscuit before freezing. Take them out the night before and place them in your refrigerator, turn your oven on warm and heat through while you’re doing other things the next morning. Fry or scramble some eggs with a little cheese. Voila! Getting kids to school and getting yourself off to work is a challenge, so a little prep on the weekend or night before can mean a super easy breakfast to throw together.

Easy Self-Rising Flour Buttermilk Biscuits

Easy Sausage Egg and Cheese Biscuit

Here’s the recipe for my Self Rising Flour Biscuits. https://the2spoons.com/easy-self-rising-flour-buttermilk-biscuits/.

I hope you will make these Easy Sausage Egg and Cheese Biscuit’s soon! They are yummy!

Easy Sausage Egg and Cheese Biscuit

Print Recipe
Course Bread, Breakfast, dinner, Lunch
Cuisine American

Ingredients
  

  • 2 1/2 cups Self-Rising Flour
  • 2 tsp. sugar
  • 1/2 cup butter or shortening
  • 3/4-1 cup buttermilk, more if needed
  • Green tops of scallions, finely chopped (optional)
  • Fresh Ground Black Pepper

For the Sausage Egg and Cheese Biscuits

  • Breakfast Sausage of your choice
  • Eggs
  • Sliced Cheddar or a cheese of your choice
  • Louisiana Hot Sauce (optional)
  • butter for cooking the eggs

Instructions
 

  • Heat oven to 450 degrees. In a medium bowl, stir together the flour and sugar. I grate the butter with a box grater. Using your hands (that's what I do) or a pastry cutter, blend the butter in until it is crumbly. If you are adding the chopped scallions and black pepper, add them to the dry ingredients. Stir in the buttermilk until dough comes together adding more buttermilk as needed. I prefer a wetter dough than dry. You can add more flour as you knead.
    Knead a couple of times on a floured surface until a smooth dough forms. Roll to 1/2 inch thickness. Cut the dough with floured 2 1/2 floured biscuit cutter or cutter of your choice. Sometime I make small for appetizers that I fill with ham and mustard.
    On an ungreased sheet pan, place touching if you want soft sides or 1 inch apart if you want crusty sides. Bake 10-12 minutes or until golden brown.

For the Sausage Egg and Cheese Biscuit

  • This biscuit recipe will make 10-12 biscuits depending on the size of your biscuit cutter. You can half the recipe easily.
  • Cook breakfast sausage of your choice for the number of biscuit sandwiches you are making. If you are making enough for the recipe, then make that many slices of breakfast sausage. Cook the breakfast sausage in a skillet on medium until done or until the juices are running clear. Top each piece of sausage with a slice of cheese and let the cheese melt.
  • Meanwhile, either pan fry your eggs on medium to low heat until your desired doneness. I like mine medium with a yolk that is still running but if you like hard, then fry hard. If you prefer a scrambled egg, then you will scramble one egg per biscuit. Combine the number of eggs you are using in a bowl and whisk. Pour into a skillet with butter and cook to your desired doneness. Don't forget to season your eggs with a little salt and pepper.
  • To assemble: Half each biscuit. Top with the eggs, then the sausage and cheese. Drizzle with Louisiana Hot Sauce. Add the top of the biscuit and enjoy!!
Keyword biscuits, buttermilk, buttermilk biscuits, self-rising
Easy Self-Rising Flour Buttermilk Biscuits
Sausage Egg and Cheese Biscuit
Easy Self-Rising Flour Buttermilk Biscuits
  • Click to share on Pinterest (Opens in new window) Pinterest
  • Click to share on Facebook (Opens in new window) Facebook
  • Click to email a link to a friend (Opens in new window) Email
  • Click to print (Opens in new window) Print
  • Click to share on X (Opens in new window) X
  • Click to share on Tumblr (Opens in new window) Tumblr
  • More
  • Click to share on Reddit (Opens in new window) Reddit

Filed Under: Breakfast/Brunch Tagged With: biscuits, easy, eggs, sausage, Sausage Egg and Cheese Biscuit

Favorite – Hearty Smoked Chicken Hash and Eggs

September 6, 2019 by Becky Spoon

Smoked Chicken Hash and Eggs
Please follow and like us:
onpost_follow
fb-share-icon
Tweet
Jump to Recipe
Smoked Chicken Hash and Eggs

I love this Smoked Chicken Hash with Eggs! I actually love hash anyway. When I was growing up my mother would make hash with leftover pot roast with potatoes and onions and add the leftover gravy in and it was absolutely delicious. It seems I make more these days with smoked sausage, smoked brisket, and chicken.

Smoked Chicken Hash with Eggs

As you see in this picture, adding parmesan is a great addition! A really beautiful dish, this is great for company or just for your family. Loaded with bell peppers, leftover baked potatoes, chicken, onions, fresh herbs, this is a hearty dish and would be great for inner. This is something you could make the night before, re-heat the next morning and just cook your eggs to top the hash. Add some buttered toast, and you are all set!

Smoked Chicken Hash with Eggs

Smoked Chicken Hash with Eggs

I love a one-pot meal! The clean-up is easy and what’s not to love but cooking an entire meal in one pot? The blog Delish had several recipes of one-pot meals. Here’s the link for you to review: –https://www.delish.com/cooking/g1461/easy-one-pot-dinner-recipes.

Here’s my recipe for brisket hash if you want additional hash recipes: https://the2spoons.com/favorite-breakfast-hash-bowls/

Can’t wait for you to try this! Let me know what you think!

Smoked Chicken Hash and Eggs

Print Recipe
Course Breakfast, brunch, dinner
Cuisine American

Ingredients
  

  • 2 tbsp unsalted butter
  • 2 tbsp extra virgin olive oil
  • 1 cup finely chopped bell pepper or a mixture of red, green, yellow or orange
  • 3/4 cup finely chopped onion
  • 2 large jalapenos–stemmed, seeded and minced
  • 2 garlic cloves, minced
  • 1/2 tsp finely chopped thyme
  • Kosher salt
  • Fresh Ground Black Pepper
  • 1 large baked potato, peeled and cut into 1/2 inch dice 2 1/2 cups
  • 2 cups diced or shredded cooked chicken (I used smoked and it was delicious)
  • Freshly grated Parmigiano-Reggiano cheese or Parmesan Cheese

Instructions
 

  • In a large cast-iron skillet, melt the butter in the olive oil. Add the green pepper, onion, jalapeños, garlic, thyme and a generous pinch each of salt and pepper. Cook over moderate heat, stirring occasionally, until softened and just starting to brown, about 7 minutes. Stir in the potato and chicken and flatten the mixture with a spatula. Cook over high heat until crusty on the bottom, about 5 minutes. Working in sections, turn the hash over and cook until browned on the other side, 3 to 5 minutes.
  • Using the back of a spoon, make 4 depressions in the hash. Carefully crack the eggs into the depressions and season with salt and pepper. Cover the skillet and cook over moderate heat until the egg whites are just set but the yolks are runny, about 4 minutes. Sprinkle the hash with grated cheese and serve right out of the skillet.
Keyword chicken, chicken hash, chicken hash with eggs, hash

  • Click to share on Pinterest (Opens in new window) Pinterest
  • Click to share on Facebook (Opens in new window) Facebook
  • Click to email a link to a friend (Opens in new window) Email
  • Click to print (Opens in new window) Print
  • Click to share on X (Opens in new window) X
  • Click to share on Tumblr (Opens in new window) Tumblr
  • More
  • Click to share on Reddit (Opens in new window) Reddit

Filed Under: Breakfast/Brunch Tagged With: breakfast, brunch, chicken hash with eggs

Best Pasta and Clams

September 5, 2019 by Becky Spoon

Best Pasta and Clams
Please follow and like us:
onpost_follow
fb-share-icon
Tweet
Jump to Recipe
Best Pasta and Clams

This is the Best Pasta and Clams! It really is! This dish is loaded with garlic, lemon, anchovy to name a few, and the dish is finished with buttery breadcrumbs. The buttery breadcrumbs thicken the sauce and brings the dish together.

Best Pasta and clams
Best Pasta and Clams

Best Pasta and Clams

Jump to Recipe
Best Pasta and Clams

I always check out the seafood department to see what is fresh that day. While shopping at my favorite HEB the other day, they had these fresh calms and I could not resist. Pasta and Clams is one of Allen’s favorite dishes and one of his most requested. These are Littleneck Clams. Here’s a link that describes the difference in clams: https://www.thekitchn.com/whats-the-difference-little-ne-61333.

If you like this recipe, try my recipe for delicious mussels, another favorite: https://the2spoons.com/mussels-with-tomatoes-garlic-lemons/.

Best Pasta and Clams

Here’s the recipe! Hope you enjoy!

Best Linguine with Clams

Print Recipe
Course Appetizer, dinner, Lunch, Main Course
Cuisine American, Italian

Ingredients
  

  • 2 tbsp. kosher salt for the pasta water, plus more for seasoning
  • 12 garlic cloves, divided
  • 4 oz sourdough or country-style bread, crusts removed, cut into 1/2 inch pieces
  • 2 tbsp plus 1/4 cup olive oil, plus more for serving
  • 2 tsp finely grated lemon zest
  • 2 oil-packed anchovy filets (optional)
  • 1/2 tsp crushed red pepper flakes, plus more for serving
  • 1/3 cup dry white wine
  • 2 lbs littleneck clams (about 24) or cockles (about 32) scrubbed
  • 12 oz linguine or spaghetti
  • 1/2 cup finely chopped parsley
  • 2 tbsp unsalted butter

Instructions
 

  • Bring 2 Tbsp. salt and 10 cups water to a boil in a large pot.
  • Meanwhile, pulse 3 garlic cloves in a food processor until chopped. Add bread and pulse several times until fine crumbs form.
  • Heat 2 Tbsp. oil in a large Dutch oven over medium-high. Add breadcrumb mixture and cook, stirring often, until crumbs are golden and crisp, 5–7 minutes. Transfer to a medium bowl. Add lemon zest, season with salt, and toss to combine; set aside.
  • Wipe out Dutch oven. Using a mandoline if you have one (if not, use a really sharp knife), very thinly slice remaining 9 garlic cloves. Heat ¼ cup oil in Dutch oven over medium. Cook garlic, stirring often, until golden around the edges, about 3 minutes. Add anchovies, if using, and ½ tsp. red pepper flakes and cook, stirring, until garlic is golden all over and anchovies are dissolved. Quickly stir in wine and simmer until only a couple of tablespoons of liquid are left in pot. Add clams and toss to combine. Cover and cook until clams are open, 5–7 minutes (about 4 minutes for cockles). Uncover pot and transfer clams to a medium bowl, leaving liquid in pot. If any clams are still closed, cover pot again and cook a few minutes longer, then transfer to bowl with others (discard any that have not opened at this point). Tent clams with foil.
  • Cook pasta in boiling water 5 minutes. Using a ladle or heatproof measuring cup, scoop out about 2 cups pasta cooking liquid. Using tongs, transfer pasta to pot with clam liquid. Add 1 cup pasta cooking liquid and bring to a boil. Cook, tossing constantly and adding more pasta cooking liquid a splash at a time if needed, until pasta is al dente and sauce is glossy and thick enough to cling to noodles, about 5 minutes.
  • Remove from heat. Add parsley and butter and toss until butter is melted. Sprinkle about one-third of breadcrumbs over pasta and toss to combine (you can add more or less depending on how much liquid is in bottom of pot—you want them to absorb some of the sauce but not make it dry). Give pasta a taste; you probably won’t need additional salt, but you can add some if you’d like. Divide pasta among shallow bowls and top with reserved clams, more breadcrumbs, red pepper flakes, and a drizzle of oil. Bon Appetit!
Keyword Italian, pasta, pasta with clams, seafood
Best Pasta and Clams
Mussels with Tomatoes, Garlic, Lemons, & Wine
  • Click to share on Pinterest (Opens in new window) Pinterest
  • Click to share on Facebook (Opens in new window) Facebook
  • Click to email a link to a friend (Opens in new window) Email
  • Click to print (Opens in new window) Print
  • Click to share on X (Opens in new window) X
  • Click to share on Tumblr (Opens in new window) Tumblr
  • More
  • Click to share on Reddit (Opens in new window) Reddit

Filed Under: Fish/Seafood Tagged With: clams, littleneck clams, pasta with clams

Delicious! Zucchini Crudo Salad with Fresh Dill

September 3, 2019 by Becky Spoon

Zucchini Crudo Salad with Fresh Dill
Please follow and like us:
onpost_follow
fb-share-icon
Tweet
Zucchini Crudo Salad with Fresh Dill

Zucchini Crudo Salad with Fresh Dill is one of my favorite salad’s. Zucchini and yellow squash or thinly sliced on a mandoline, placed in a colander, salted and left to hang out for about 15 minutes.

Zucchini Crudo Salad with Fresh Dill

Delicious! Zucchini Crudo Salad with Fresh Dill

I found this recipe in Michael Symon’s cookbook “Live to Cook” https://www.amazon.com/Michael-Symons-Live-Cook-Techniques/dp/0307453650. This is what he says about the recipe: “This is a version of A salad Jonathan Waxman is known for that I fell in love with when I first tasted it. Who’d have thought, after decades of cooking, that zucchini could be an epiphany. But it was. I simply never thought of eating it raw. Seriously, it was a jaw-dropping surprise. I think he dressed it only with salt, lemon, and olive oil. I’ve added some garlic and shallots—building the dressing on top of these raw aromatics—along with dill, because I love dill, and with almonds for crunch and nuttiness.

It’s important to salt the zucchini ten to fifteen minutes before serving it; this will leach out the right amount of water but leave some crunch. Put the salt on too early and you can lose that texture. If you need to prepare the dish ahead, the vinaigrette can be made up to a few hours in advance and you can slice the zucchini up to an hour before salting it if you cover it with a damp towel and leave it at room temperature “.

I too love fresh dill and the dill combined with lemon juice in the vinaigrette is amazing! A similar salad with fresh dill on my blog is the Spinach and Berries Salad: https://the2spoons.com/colorful-spinach-and-berries-salad-with-dill/. It is a beautiful salad!

Spinach and Berries Salad with Dill

Delicious! Zucchini Crudo Salad with Fresh Dill

You have to make this recipe soon! Luckily Squash is available all year so this is great anytime of the year! Serve it with just some French bread or as a salad with a pasta dish! This would be a wonderful side with salmon. Substitute the salad in this salmon dish for the zucchini Crudo! It will be perfect! https://the2spoons.com/lemon-parmesan-salmon/.

Enjoy!

Zucchini Crudo

Print Recipe
Course easy side dish, easy side dish, vegetable, Salad
Cuisine American

Ingredients
  

  • 2 Zucchini, thinly Sliced
  • 2 yellow summer squash, thinly sliced
  • 1 tbsp. plus 1/4 tsp. Kosher salt
  • 1 tsp. garlic, minced
  • 1 shallot, finely sliced
  • grated zest and juice of 3 lemons, or to taste
  • 1/2 cup extra virgin olive oil
  • 1/3 cups slivered or sliced almonds, toasted
  • 1/3 cup chopped fresh dill.

Instructions
 

  • Combine the zucchini and yellow squash in a colander in the sink and sprinkle 1 tablespoon of the salt over it. Toss to coat, and set aside for 10 to 15 minutes, no longer. In a large bowl, combine the garlic and shallot, sprinkle with the remaining ¼ teaspoon salt, and whisk in the lemon zest and juice. Whisk in the olive oil in a steady stream, then the almonds and dill. Taste for seasoning and acidity (it should be nicely acidic). Add the zucchini and squash to the dressing, toss, and serve immediately.
Keyword crudo, salad, summer squash, zucchini
  • Zucchini Crudo Salad with Fresh Dill
    Zucchini Crudo Salad with Fresh Dill
  • Lemon Parmesan Salmon with Corn, Tomato and Avocado Salad
    Lemon Parmesan Salmon with Corn, Tomato and Avocado Salad
  • Click to share on Pinterest (Opens in new window) Pinterest
  • Click to share on Facebook (Opens in new window) Facebook
  • Click to email a link to a friend (Opens in new window) Email
  • Click to print (Opens in new window) Print
  • Click to share on X (Opens in new window) X
  • Click to share on Tumblr (Opens in new window) Tumblr
  • More
  • Click to share on Reddit (Opens in new window) Reddit

Filed Under: Salads, Vegetables Tagged With: crudo, salad, summer squash, zucchini

Easy, Self-Rising Flour Buttermilk Biscuits

September 2, 2019 by Becky Spoon

Easy Self-Rising Flour Buttermilk Biscuits
Please follow and like us:
onpost_follow
fb-share-icon
Tweet
Easy Self-Rising Flour Buttermilk Biscuits

These Easy Self-Rising Flour Buttermilk Biscuits are just that! Easy! The only ingredients in the biscuits are self-rising flour, butter, a little sugar, and buttermilk! That’s it!

The other morning I wanted biscuits but I was kind of dreading having to get out all the ingredients together. While gathering my flour and other ingredients, I realized that I had a package of self-rising flour. I do love my homemade buttermilk biscuits from scratch, but as an alternative, I knew these are easy and quick and absolutely delicious. They turned out perfect!

Easy, Self-rising Flour Buttermilk Biscuits

I’m sure you have used Self-Rising flour that you have purchased, but you can make your own and store in zip-lock bags! Here’s a link for the ingredients: https://www.thekitchn.com/how-to-make-self-rising-flour-232729.

I use self-rising flour in my favorite peach cobbler recipe, which is an essential ingredient. Here is a link for that delicious Peach Cobbler using self-rising flourhttps://the2spoons.com/perfectly-peachy-peach-cobbler/.

Perfectly Peachy - Peach Cobbler
Perfectly Peachy – Peach Cobbler

I will always make my Homemade Buttermilk biscuits, but these are a great option. Here’s the link for my Homemade Buttermilk too: https://the2spoons.com/my-easy-homemade-buttermilk-biscuits/.

Homemade Buttermilk Biscuits
Easy Self-Rising Flour Buttermilk Biscuits

I used these biscuits this mornthat morning t make my favorite biscuit sandwich. I’ll posst that recipe on a different post!

Breakfast Sandwich
Breakfast Sandwich

Here’s the simple recipe:

Easy Self-Rising Buttermilk Biscuits

Print Recipe
Course Bread, Breakfast, dinner, Lunch
Cuisine American

Ingredients
  

  • 2 1/2 cups Self-Rising Flour
  • 2 tsp. sugar
  • 1/2 cup butter or shortening
  • 3/4-1 cup buttermilk, more if needed
  • Green tops of scallions, finely chopped (optional)
  • Fresh Ground Black Pepper

Instructions
 

  • Heat oven to 450 degrees. In a medium bowl, stir together the flour and sugar. I grate the butter with a box grater. Using your hands (that's what I do) or a pastry cutter, blend the butter in until it is crumbly. If you are adding the chopped scallions and black pepper, add them to the dry ingredients. Stir in the buttermilk until dough comes together adding more buttermilk as needed. I prefer a wetter dough than dry. You can add more flour as you knead.
    Knead a couple of times on a floured surface until a smooth dough forms. Roll to 1/2 inch thickness. Cut the dough with floured 2 1/2 floured biscuit cutter or cutter of your choice. Sometime I make small for appetizers that I fill with ham and mustard.
    On an ungreased sheet pan, place touching if you want soft sides or 1 inch apart if you want crusty sides. Bake 10-12 minutes or until golden brown.
Keyword biscuits, buttermilk, buttermilk biscuits, self-rising
Breakfast Sandwich
Breakfast Sandwich
Easy Self-Rising Flour Buttermilk Biscuits
  • Click to share on Pinterest (Opens in new window) Pinterest
  • Click to share on Facebook (Opens in new window) Facebook
  • Click to email a link to a friend (Opens in new window) Email
  • Click to print (Opens in new window) Print
  • Click to share on X (Opens in new window) X
  • Click to share on Tumblr (Opens in new window) Tumblr
  • More
  • Click to share on Reddit (Opens in new window) Reddit

Filed Under: Breakfast/Brunch Tagged With: biscuits, self-rising buttermilk biscuits, self-rising flour

  • « Go to Previous Page
  • Page 1
  • Interim pages omitted …
  • Page 36
  • Page 37
  • Page 38
  • Page 39
  • Page 40
  • Interim pages omitted …
  • Page 67
  • Go to Next Page »

Primary Sidebar

Categories

  • Appetizer
  • Beans, Lentils, Grains, Rice
  • Beef
  • Bread
  • Breakfast/Brunch
  • Cocktails
  • Dessert
  • Dishes of Mexico, Tex Mex and New Mexico Red and Green Chile
  • Fish/Seafood
  • Ice Cream
  • Pasta
  • Pizza
  • Pork
  • Poultry
  • Salad Dressings
  • Salads
  • Salsas
  • Sandwiches/Burgers/Hot Dogs
  • Sauces, Compound Butters, Condiments
  • Side dish
  • Soups/Stews/Gumbo//Chili
  • Stocks, Broths, Gravies
  • Vegetables

Copyright © 2025 The 2 Spoons on the Foodie Pro Theme

Manage Cookie Consent
We use cookies to optimize our website and our service.
Functional Always active
The technical storage or access is strictly necessary for the legitimate purpose of enabling the use of a specific service explicitly requested by the subscriber or user, or for the sole purpose of carrying out the transmission of a communication over an electronic communications network.
Preferences
The technical storage or access is necessary for the legitimate purpose of storing preferences that are not requested by the subscriber or user.
Statistics
The technical storage or access that is used exclusively for statistical purposes. The technical storage or access that is used exclusively for anonymous statistical purposes. Without a subpoena, voluntary compliance on the part of your Internet Service Provider, or additional records from a third party, information stored or retrieved for this purpose alone cannot usually be used to identify you.
Marketing
The technical storage or access is required to create user profiles to send advertising, or to track the user on a website or across several websites for similar marketing purposes.
Manage options Manage services Manage {vendor_count} vendors Read more about these purposes
Preferences
{title} {title} {title}