• Skip to primary navigation
  • Skip to main content
  • Skip to primary sidebar

A cook named Rebecca

  • Home
  • Favorite Cookbooks
  • Recipes
  • Travel
You are here: Home / Archives for Poultry

Poultry

1 of my favorites – the best oven fried chicken.

August 7, 2023 by Becky Spoon

Oven Fried ChickenJump to Recipe
Oven Fried Chicken
Oven Fried Chicken

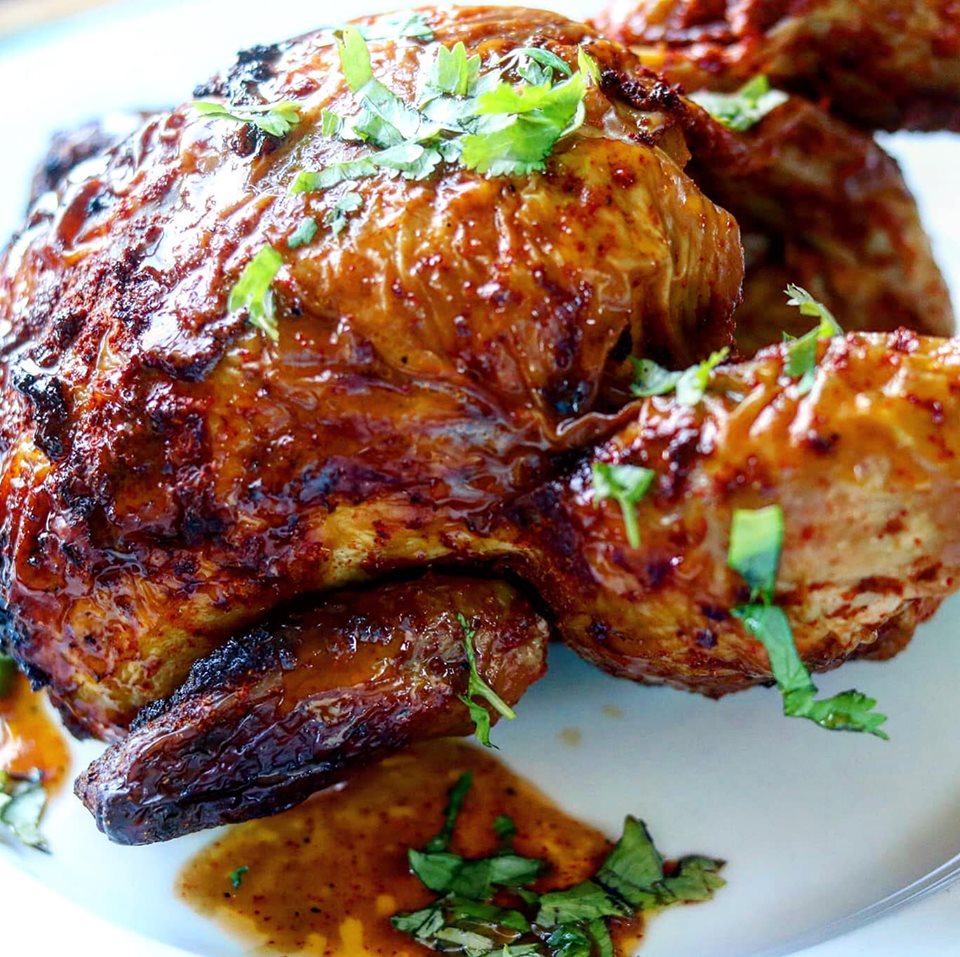
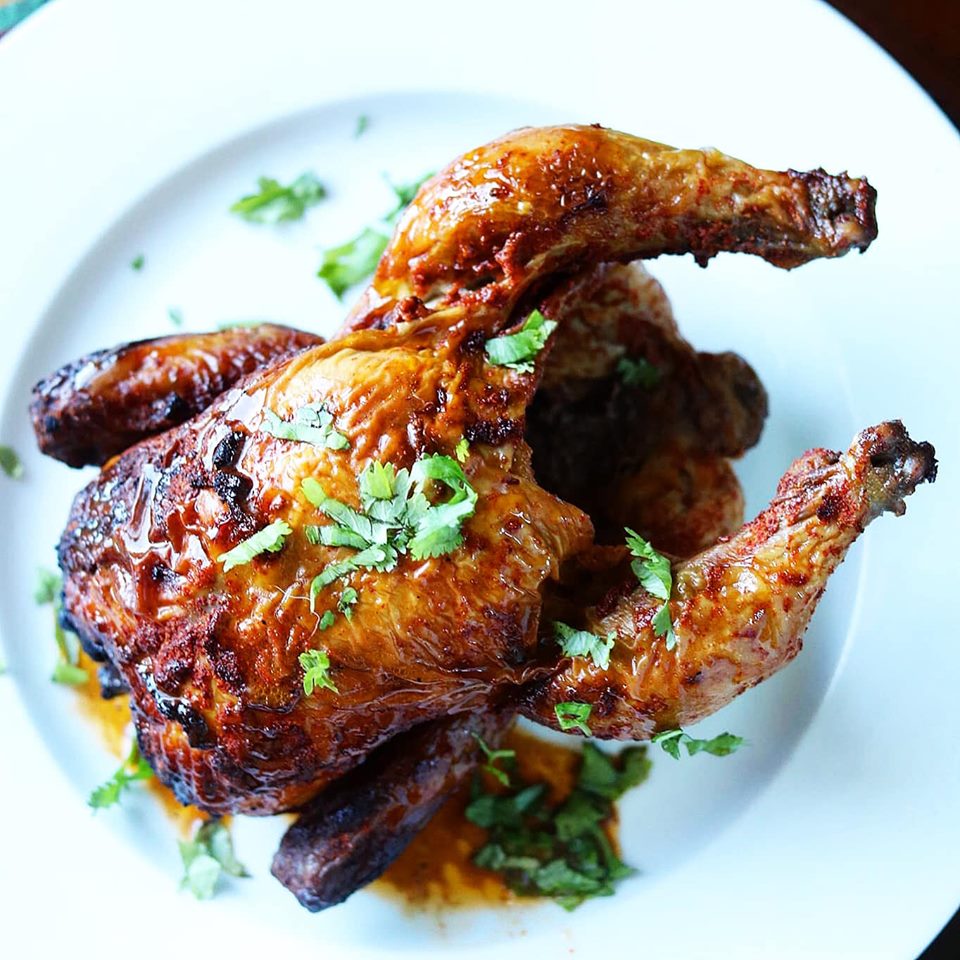
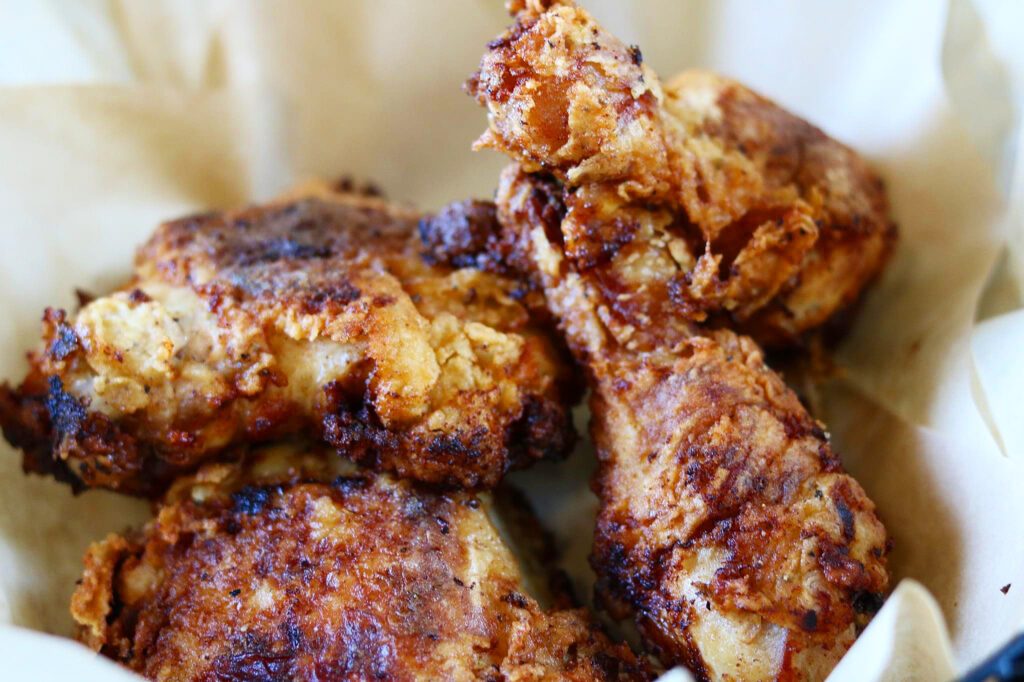
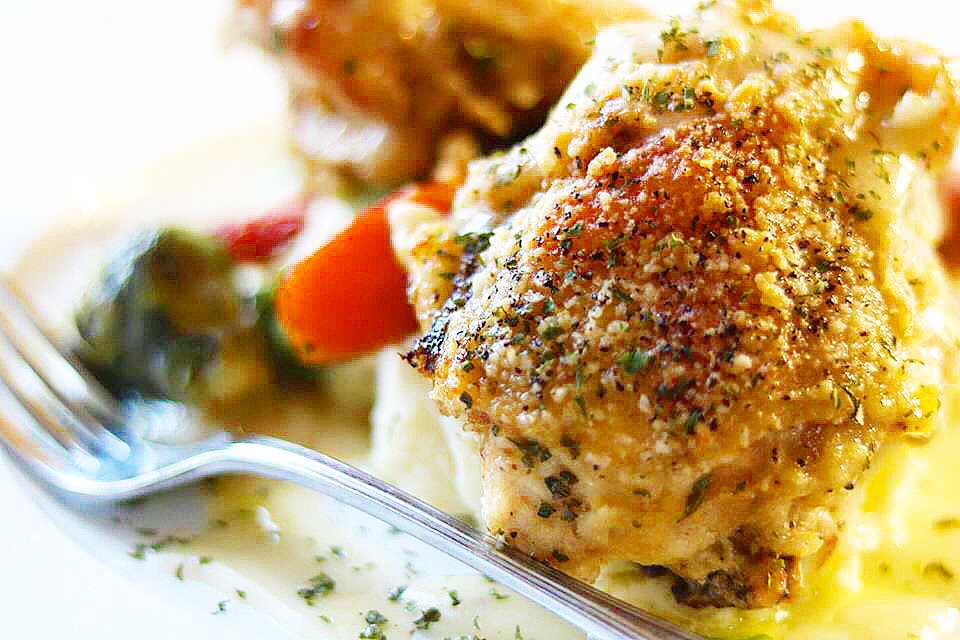
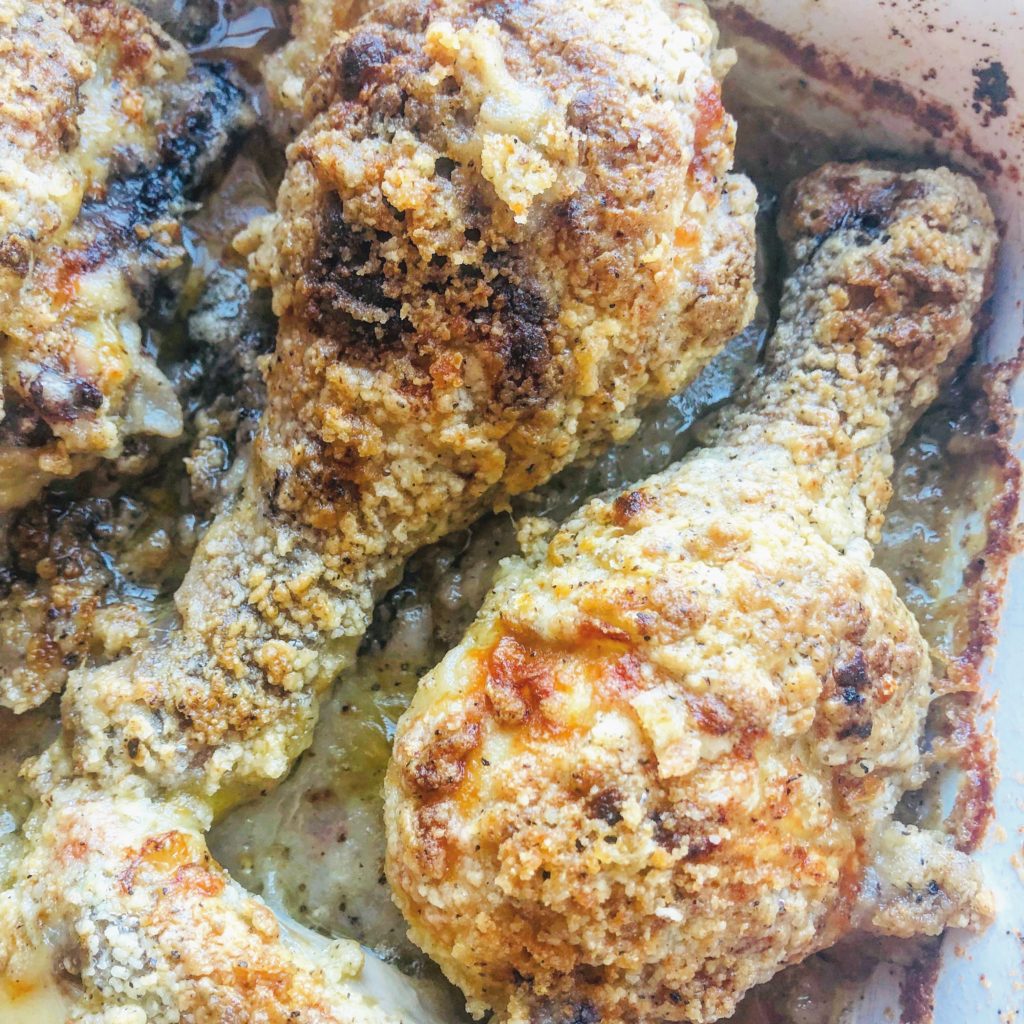
Oven fried chicken was a family favorite growing up! This was Moms go to recipe when the church or PTA was making a cookbook and everyone loved it! This was Allen’s favorite fried chicken and he would tell everyone about it! It really is delicious.

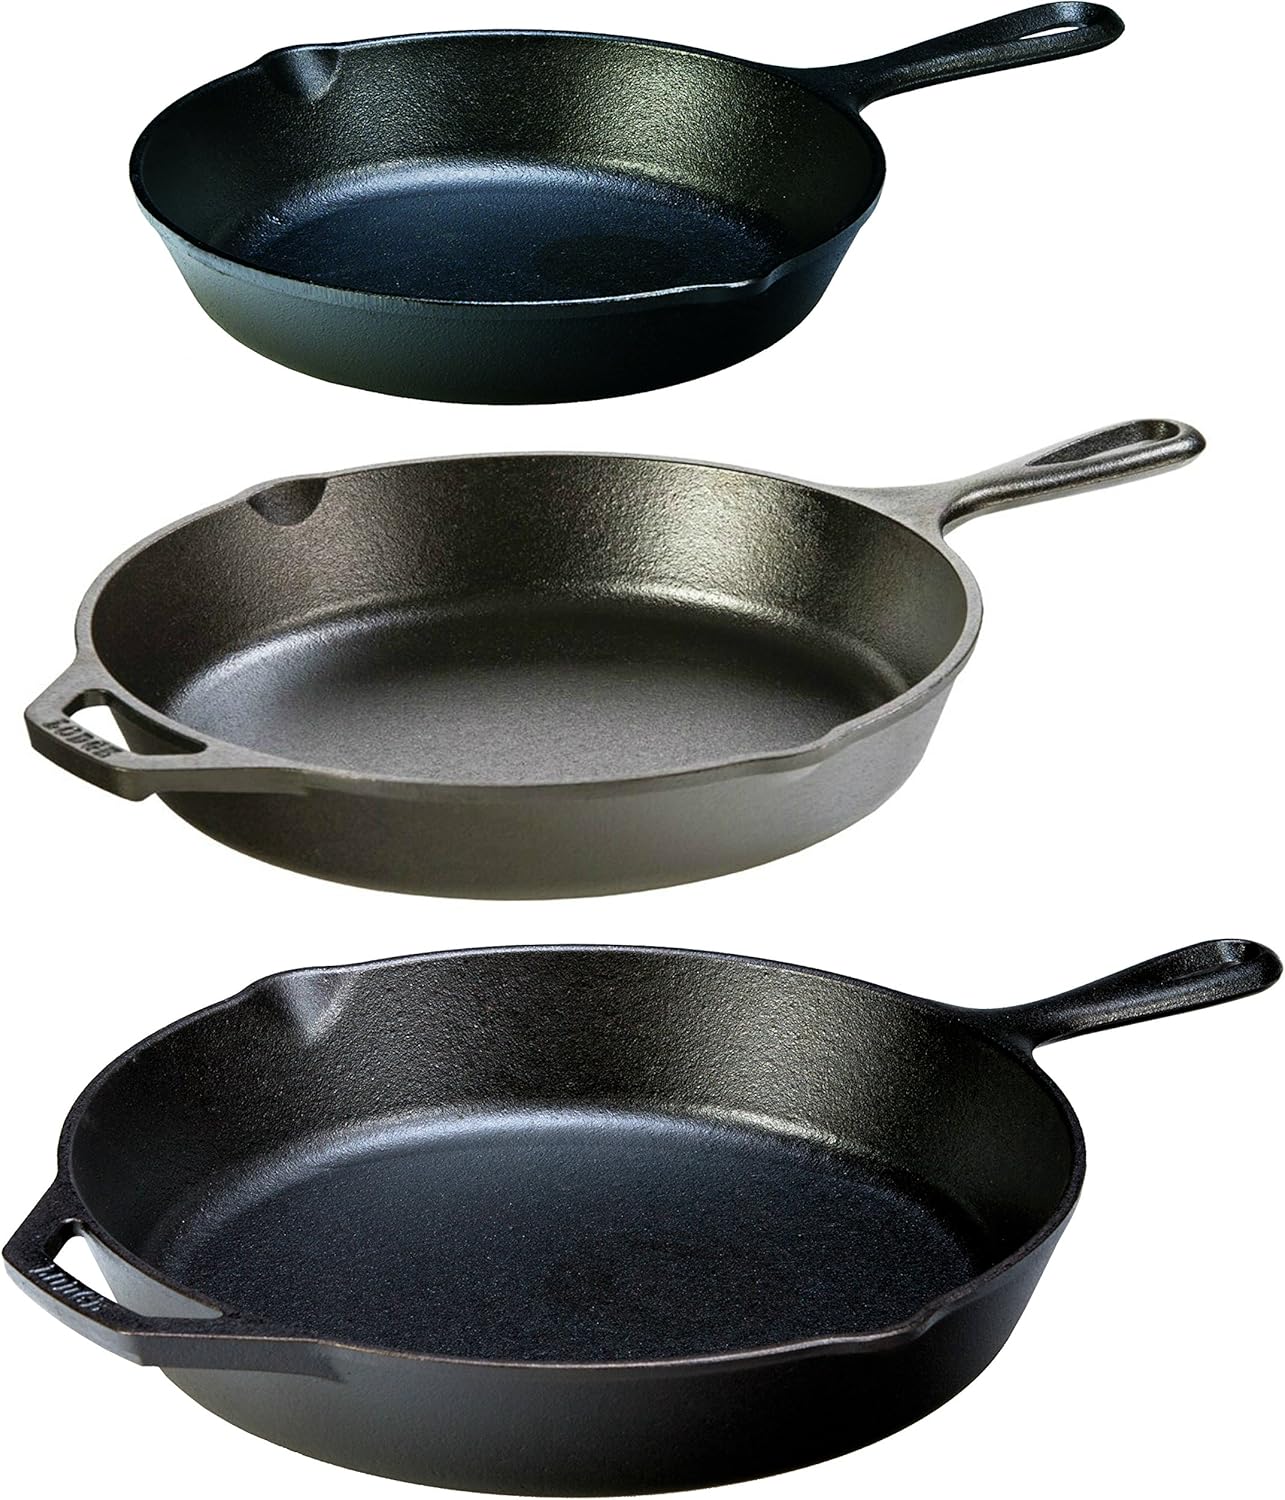
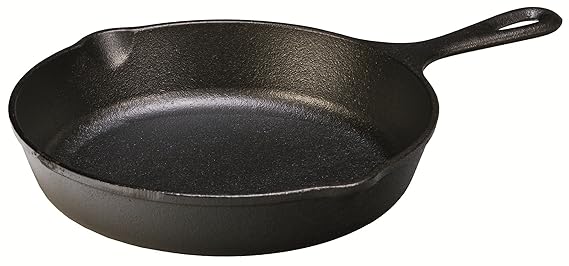
If you don’t have a cast iron skillet it is well worth the investment. They last for years and they are the perfect skillet for so many recipes! Here’s a link for a good cast iron skillet: https://amzn.to/2Rj.

Lodge Pre-Seasoned 9-Inch Skillet

the best. oven fried chicken.

Oven Fried Chicken
Oven Fried Chicken

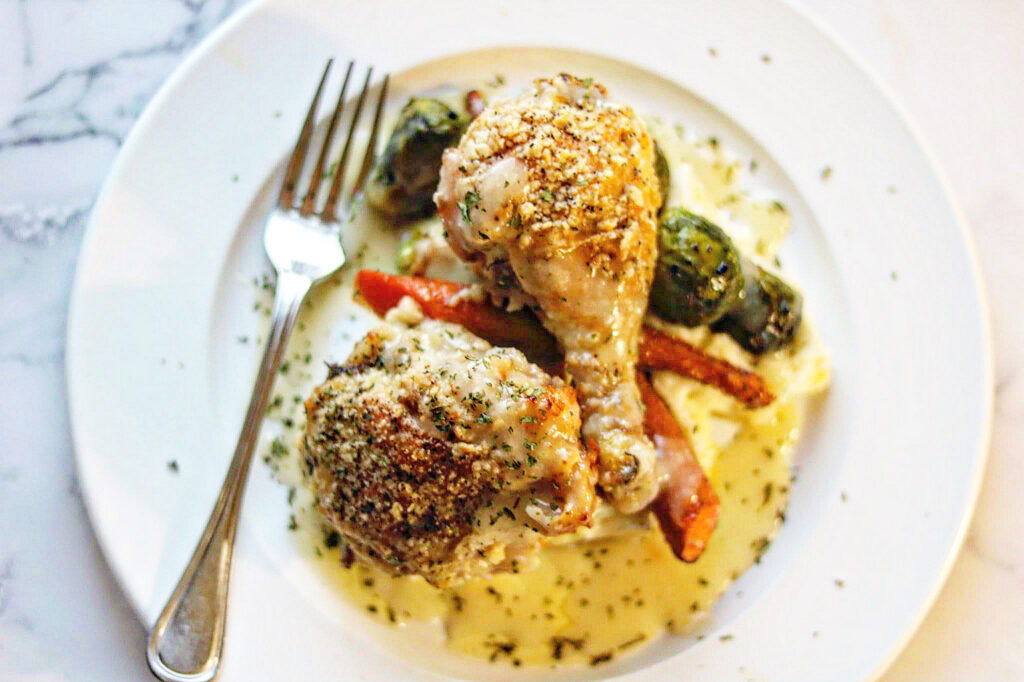
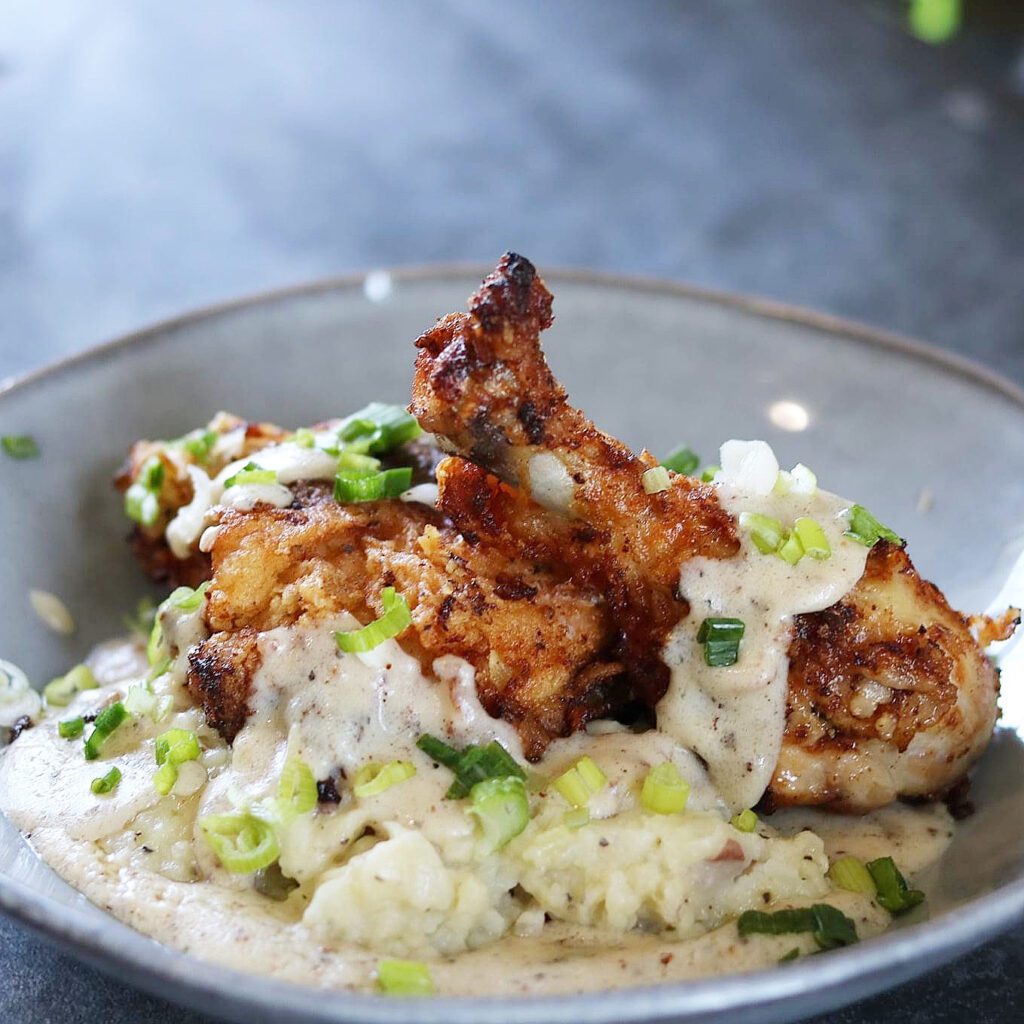
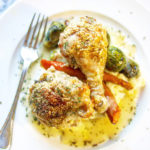
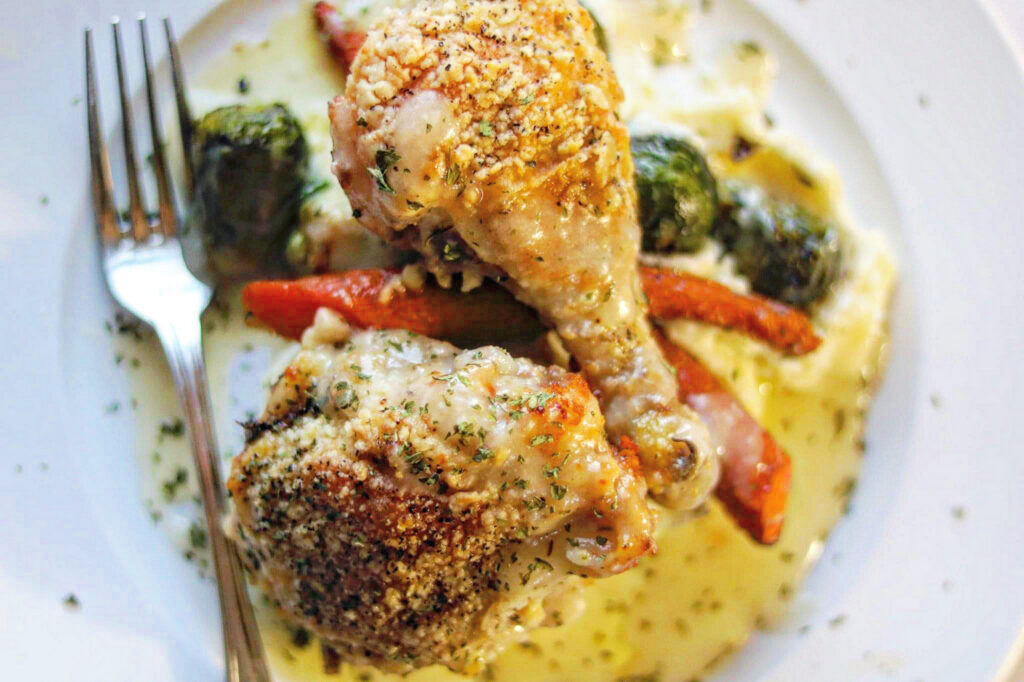
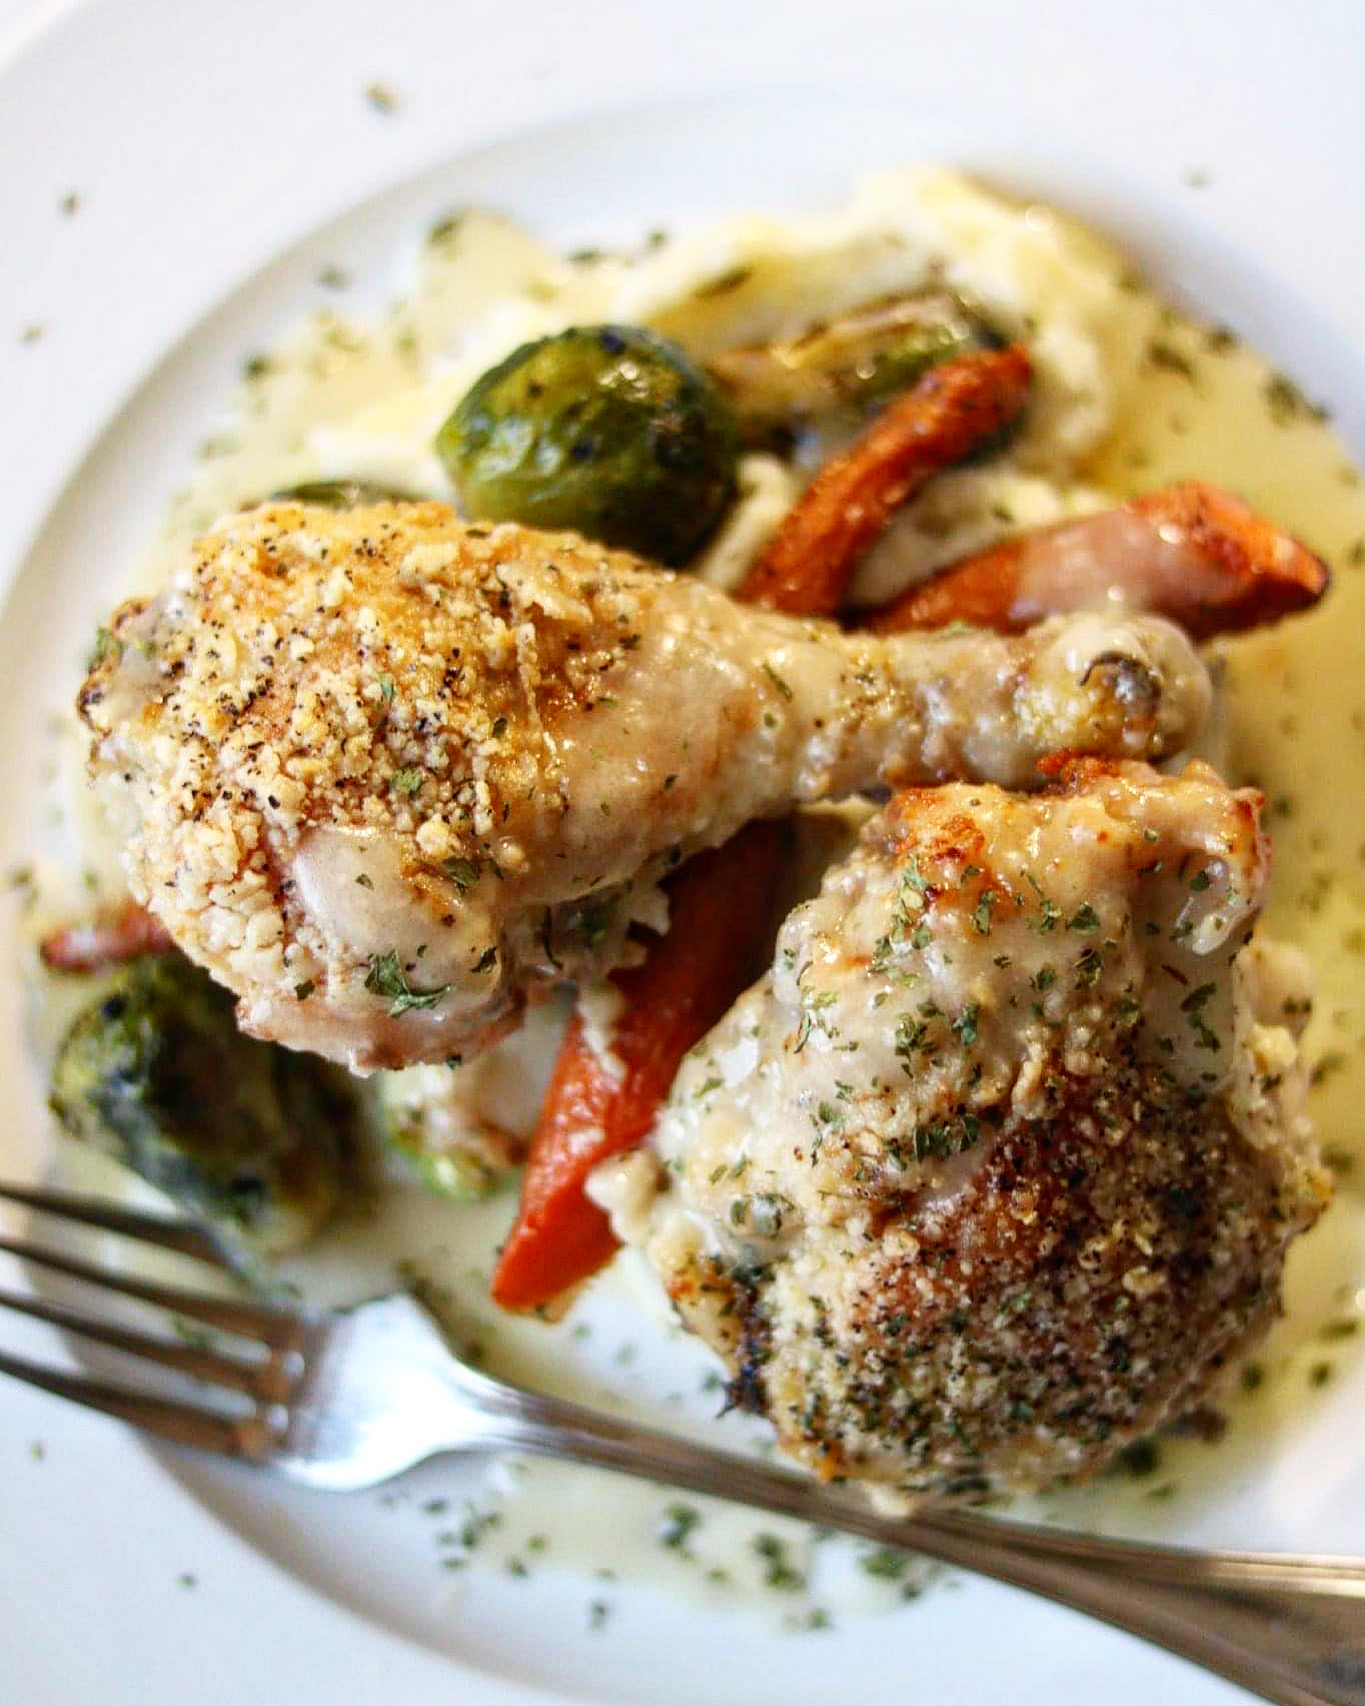
Perfect for Sunday lunch or any day for that matter, I made it this oven fried chicken this past Sunday with Creamy mashed potatoes and roasted carrots and Brussels sprouts. It is delicious! I made a quick pan gravy with the drippings left after baking and it was crazy good! For the Brussels sprouts and carrots I just placed them on a sheet pan, tossed them with olive oil and salt and pepper, then baked them at 400 degrees until tender.

Oven Fried Chicken
Oven Fried Chicken

how to make the recipe

This recipe starts by melting butter in the skillet. Then all purpose flour is seasoned with salt and pepper. You can add onion powder, garlic powder, or paprika if you like. You dredge the chicken in flour, then butter. and place in the skillet. You can double dredge in the flour if you like. That will take more butter, so you may have to melt a little more butter in a sauce pan and pour over the chicken before baking.

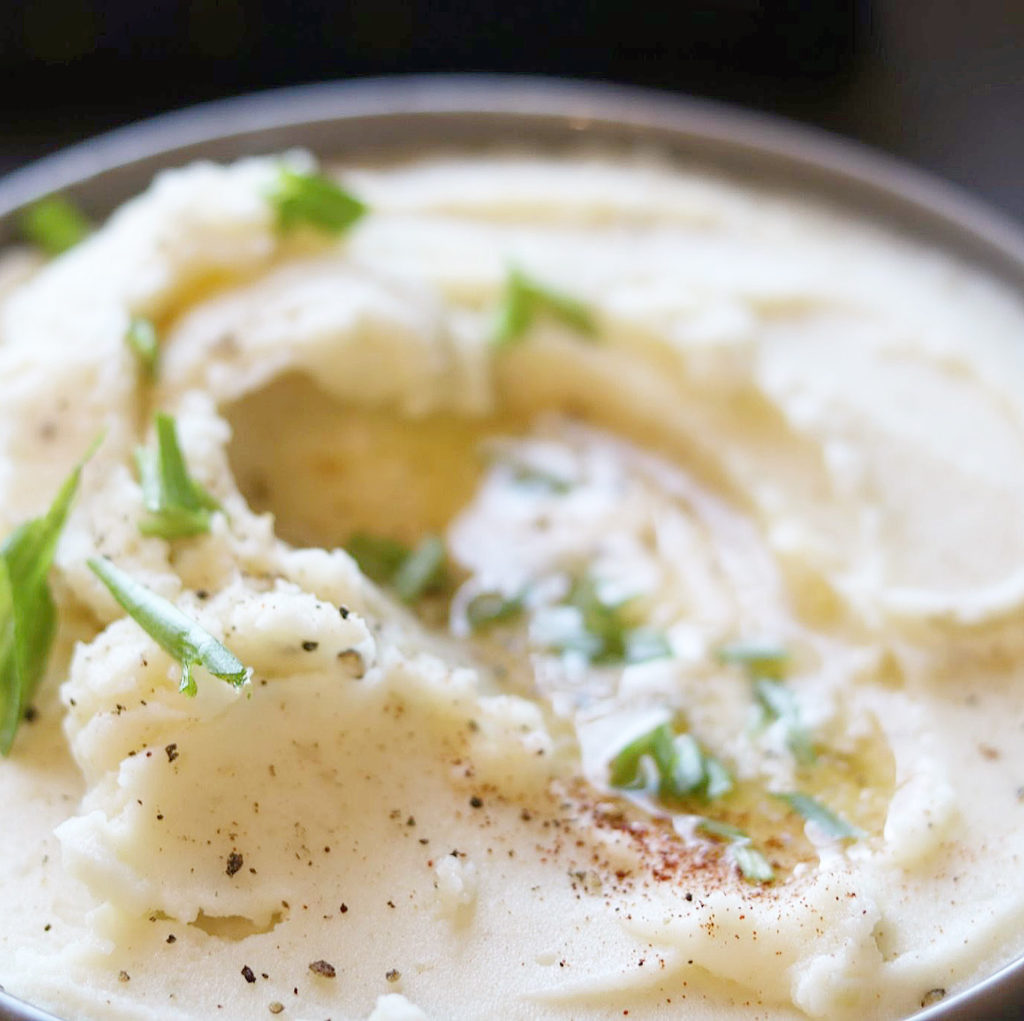
Here’s the recipe for my creamy mashed potatoes: https://the2spoons.com/delicious-buttery-mashed-potatoes/.

Creamy Mashed Potatoes

the best. oven fried chicken

Oven Fried Chicken
Oven Fried Chicken

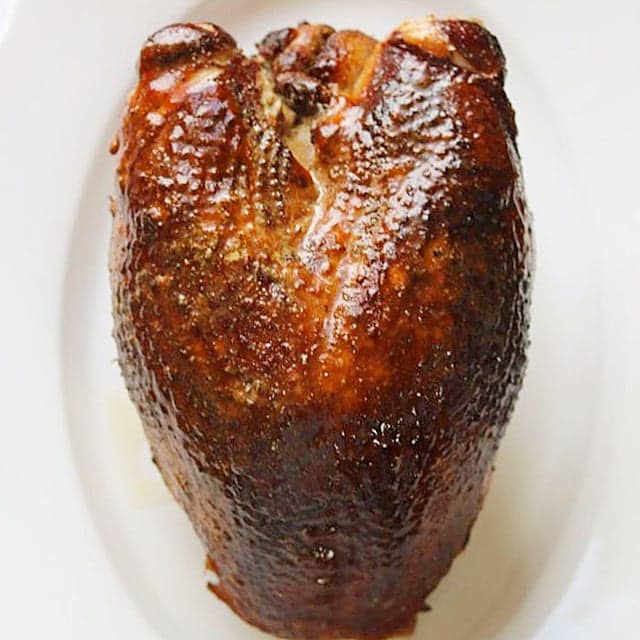
This recipe calls for a whole chicken that you cut up; however, it explains you can buy an already cut up or your favorite pieces. I have always bought a whole chicken and cut it up and everyone that cooks a lot should know how to cut up a whole chicken. I am certainly not an expert, but I find a whole chicken is less expensive, and I’m making sure all the pieces came from the same chicken. I do like to buy a chicken that is organic, or one that there are not added hormones that have those huge breast. Here is a quick video of how to cut a whole chicken into 8 pieces: https://foodchannel.com/…/how-cut-whole-chicken-8-pieces.

Need another chicken recipe? Try another favorite Best Fried Chicken

Here’s the recipe for this delicious chicken!

Oven Fried Chicken

Oven Fried Chicken

Print Recipe Pin Recipe
Prep Time 10 minutes mins
Cook Time 45 minutes mins
Total Time 55 minutes mins
Course: dinner, Lunch, Main Course
Cuisine: American
Ingredients Method

Ingredients
  

  • 1 4-5 lb chicken, cut up into 8 -10 pieces, if half the breast which I do
  • 2-3 cups flour
  • salt and pepper to taste
  • 2 sticks unsalted butter

Method
 

  1. Preheat oven to 375.
    Cut a whole chicken into about 8 pieces, or more if you cut your breast into smaller pieces.  You can buy an already cut up chicken or use your favorite pieces.
  2. Combine the flour in a dish and add a little salt and pepper. I always taste the flour because you want enough, but not too much salt, so add a little and check.   Melt 2 sticks of butter in an iron skillet.  Dredge each piece of chicken in the flour, then place in the butter in the skillet, turning over to coat. Continue until all pieces have been battered with the butter and flour. 
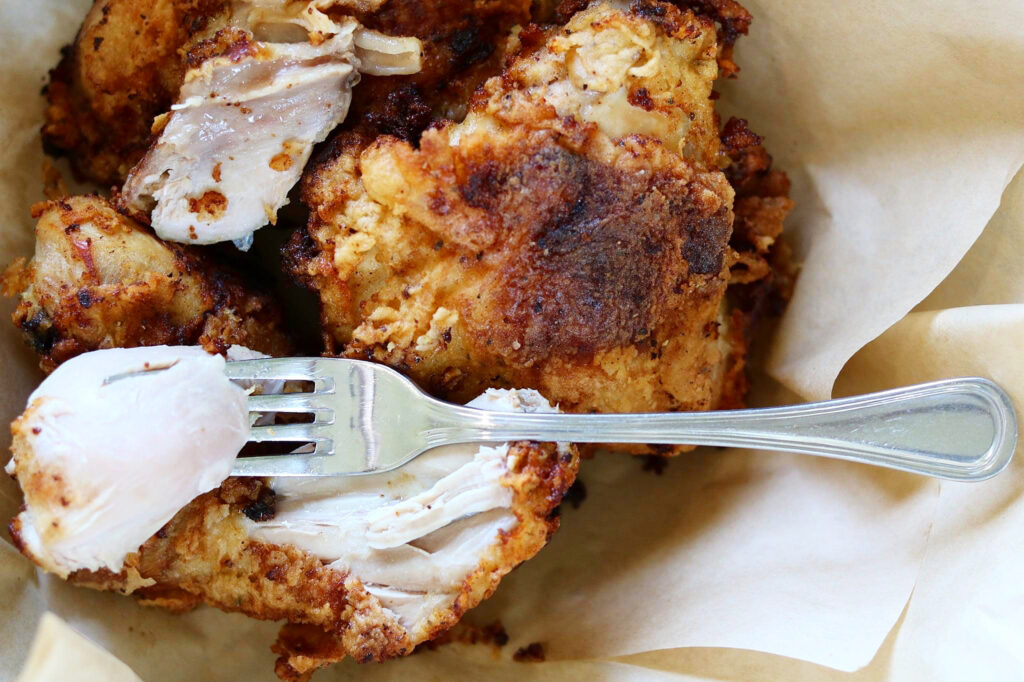
  3. Bake the chicken for 30-45 minutes until golden brown and the internal temperature is 165.   Enjoy! 
  • Click to share on Pinterest (Opens in new window) Pinterest
  • Click to share on Facebook (Opens in new window) Facebook
  • Click to email a link to a friend (Opens in new window) Email
  • Click to print (Opens in new window) Print
  • Click to share on X (Opens in new window) X
  • Click to share on Tumblr (Opens in new window) Tumblr
  • More
  • Click to share on Reddit (Opens in new window) Reddit

Filed Under: Poultry Tagged With: chicken, fried chicken, oven fried chicken, southern fried chicken

a great smoked turkey breast.

November 10, 2021 by Becky Spoon

Smoked Turkey BreastJump to Recipe
Smoked Turkey Breast

This Smoked Turkey Breast turned out juicy and delicious! Not the dry turkey breast we get sometimes, but loaded with flavor and so tender. I had this in my freezer and thought it’d be great to smoke and use it for sandwiches.

Smoked Turkey Breast

I smoked this on my Big Green Egg! Before smoking I injected the turkey with a mixture of butter, chicken stock and a little garlic powder. This is the injector I used is by  JY COOKMENT and I purchased it from Amazon. Here’s a link if you’re interested: https://amzn.to/2ubfaM9.

A Great Smoked Turkey Breast

You want to use a turkey breast that is not already loaded with added broth. A natural turkey or turkey breast works better since you are adding a liquid with butter. I did this while my smoker was getting ready. I didn’t brine overnight but you could. All I seasoned this with was I rubbed the outside with olive oil and seasoned with a mixture of salt, pepper and garlic powder.

Want more smoked meat recipes? Try my smoked brisket, always a favorite! https://the2spoons.com/the-best-awesome-smoked-brisket/.

Smoked Brisket
Smoked Brisket

After you smoke the turkey, try a recipe using the leftovers: Amazing! The Best Ever Smoked Turkey Sandwiches

Leftover Smoked Turkey Sandwich
Leftover Chili And Beef Queso Dip Burgers

Here’s the recipe for this Turkey Breast! Enjoy!

Smoked Turkey Breast

A Great Smoked Turkey Breast

Print Recipe Pin Recipe
Course: dinner, Lunch, Main Course, Sandwiches
Cuisine: American
Ingredients Method

Ingredients
  

  • 1 turkey breast (Natural preferred)
  • 1 stick butter
  • 1 cup chicken broth
  • granulated garlic
  • black pepper
  • salt
  • olive oil

Method
 

  1. Prepare you smoker with desired wood or charcoal. I use a combination of a hardwood charcoal with wood. I used Pecan wood this time.
  2. Melt the butter and add the chicken stock. Add about 1/2 teaspoon granulated garlic. Allow to cool down, then inject the turkey a dozen or so times with the solution.
  3. After injecting, rub the turkey all over with a little olive oil and season with salt, pepper and granulated garlic.
  4. Cook at about 250-300 degrees until the internal temperature reaches 160. Remove from the heat and allow to rest for at least 30 minutes before slicing.
  • Click to share on Pinterest (Opens in new window) Pinterest
  • Click to share on Facebook (Opens in new window) Facebook
  • Click to email a link to a friend (Opens in new window) Email
  • Click to print (Opens in new window) Print
  • Click to share on X (Opens in new window) X
  • Click to share on Tumblr (Opens in new window) Tumblr
  • More
  • Click to share on Reddit (Opens in new window) Reddit

Filed Under: Poultry Tagged With: Big green egg, big green egg smoked turkey, smoked turkey

So Yummy – Simple Beer Can Cornish Hens

October 28, 2021 by Becky Spoon

Beer Can Cornish Hen

These Beer Can Cornish Hen recipe is so YUMMY and simple! I marinated the hens overnight in the spicy rub, then finished then baked them in the oven! No need to light the grill if you don’t want to, because they work so well in the oven!

I was kind of watching either the Cooking Channel or Food Network the other day and happened to pay attention when I saw this recipe on Burgers, Brew and Que and it happened to be a restaurant in Dallas, the Rustic. Thought this looked so good, so I wrote the recipe down and the rest is history!

The spice rub has brown sugar, salt, ancho chile powder, smoked paprika, cumin, garlic powder and onion powder. After rubbing the hens on both sides, every nook and cranny, I stored them in the refrigerator overnight to allow those flavors to penetrante them. Then I poured about half of each beer and placed a hen on each can. Then baked them in a 350 degree oven until internal temperature reached 165!

Beer Can Cornish Hen

If you aren’t familiar with Cornish Hens, they are usually in the freezer section of your grocery store unless you are shopping at a store like Whole Foods or Central Market that have a fresh meat market where they are readily available. I bought mine from HEB and the brand was Tyson. Here’s a link for the hens I purchased: https://www.heb.com/product-detail/tyson-premium-twin-pack-rock-cornish-game-hen/87724.

Cornish game hen is the USDA-approved name for variety of broiler chicken, produced from a cross between the Cornish and White Plymouth Rock chicken breeds, that is served young and immature, weighing no more than two pounds ready to cook.

Beer Can Cornish Hen

I used a Texas Pilsner from Independence Brewing Company. You know, I live in Texas, I wanted to use a Texas made beer! But you can use any beer.

I served this with my Gruyere Au Gratin Potatoes. That was an excellent side dish for this recipe because they are so cheesy and the potatoes just soaked up the juices from the sauce on this chicken. Here’s the link for the potatoes if you want to serve them too: https://the2spoons.com/best-cheesy-au-gratin-potatoes/.

So Yummy – Simple Beer Can Cornish Hens

Here’s the easy recipe! Hope you make these.

Beer Can Cornish Hen

Beer Can Cornish Hen

Print Recipe Pin Recipe
Servings: 2 servings
Course: dinner, Lunch, Main Course, mexican
Cuisine: American, Mexican
Ingredients Method

Ingredients
  

For the Cornish Hen and Dry Rub
  • 2 Cornish Hens
  • 2 tbsp light brown sugar
  • 2 tbsp salt
  • 1 1/2 tbsp ancho chile powder
  • 1 tbsp hot smoked paprika
  • 1 tsp ground cumin
  • 1 tsp garlic powder
  • 1 tsp onion powder
  • 2 8 oz or 12 oz beer of your choice, I used a Texas Pilsner
For the Sauce
  • The remainder of the beer after cooking the hens
  • 1/2 stick butter at room temperature
  • 1 tsp ancho chile powder
  • 1 tbsp minced cilantro
  • 2 tsp fresh squeezed lime juice
  • salt and pepper to taste

Method
 

  1. Add all dry ingredients in a mixing bowl and stir with a wire whisk to evenly combine.  Coat each game hen evenly with the dry rub inside and out, making sure to push rub into any crevices and openings in the hens. Allow the game hens to brine in the refrigerator for 24 hours before cooking.
    Pop the top of each beer can, pour out about half of the beer and place the game hens aboard.  Cook in a 350 degree oven for 40 – 50 minutes, until the hens reach an internal temperature of 165 degrees.  Allow to rest for 10 minutes before serving.
  2. You can make the sauce two ways. If you are using a mild beer you can add the butter and lime juice through the beer can opening shaking a little to combine, then pour over the hens and serve topped with cilantro. I used a pretty strong pilsner and it was a little bitter to my liking for a sauce, so I poured the remaining beer content into a skillet, reduced it by about half to get rid of the bitterness, added the butter and lime juice then poured that over each hen before serving.
Cheesy Au Gratin Potatoes
Beer Can Cornish Hen
  • Click to share on Pinterest (Opens in new window) Pinterest
  • Click to share on Facebook (Opens in new window) Facebook
  • Click to email a link to a friend (Opens in new window) Email
  • Click to print (Opens in new window) Print
  • Click to share on X (Opens in new window) X
  • Click to share on Tumblr (Opens in new window) Tumblr
  • More
  • Click to share on Reddit (Opens in new window) Reddit

Filed Under: Poultry Tagged With: yummy beer can cornish hens

Chicken and Dumplings – ultimate comfort food.

July 29, 2021 by Becky Spoon

Chicken and Dumplings
Jump to Recipe

I love Chicken and Dumplings. I realize that this is not the time of the year; however, the other day I had chicken leftover, just enough for a soup or dumplings. I made the right decision because they hit the spot and made me happy. There’s a lot of truth in the statement “comfort food”. How amazing is it that that very thing we need to survive brings us so much comfort?

Chicken and Dumplings

Chicken and Dumplings – ultimate comfort food.

I had poached a chicken to use in tacos and I had some left over and the homemade chicken stock. I like to poach a chicken because the chicken remains tender and flavorful. Poaching is boiling that never boils! I just use a soup pot to poach a chicken. This is a great soup pot if you need one: https://amzn.to/3iY7e67. I have just a few pieces of All-Clad and I really love the product. I have a very small saucepan that I’ve used for even frying an egg and “IT DOESN’T STICK”. I love those products that foods don’t sticik.

I have another recipe on the blog Chicken and Dumplings – the Ultimate Comfort Food

Chicken and Dumplings

The difference in the above Chicken and Dumplings is that the dumpling recipe is different. For the dumplings I’m currently posting, they are made using self-rising flour and I love them. I was surprised! And they held up. you know how dumplings can dissolve? And, this recipe is so fast, yet so delicious!

Something that I do but not required is I add carrots, celery, onions and peas. I sauté the carrots, onions and celery until tender, the I add a little flour to form a roux. Not a lot of flour, but enough to insure you have a thickened sauce . It’s much easier to add more chicken stock if the sauce is too tight than to thicken the sauce after the dumplings are done. The dumplings will thicken the sauce some.

Chicken and Dumplings

Chicken and Dumplings – ultimate comfort food.

If you’d like a side dish I think Green Beans would be great, fried okra in Texas is a favorite, asparagus, or if you add the carrots and peas, you need nothing more. If you want something with crunch and is acidic, add a nice simple salad with some arugula and a mustardy vinaigrette!

Chicken and Dumplings

Chicken and Dumplings

I love Chicken and Dumplings. I realize that this is not the time of the year; however, the other day I had chicken leftover, just enough for a soup or dumplings. I made the right decision because they hit the spot and made me happy. There's a lot of truth in the statement "comfort food". How amazing is it that that very thing we need to survive brings us so much comfort?
Print Recipe Pin Recipe
Servings: 4 servings
Course: Main Course
Cuisine: American, Southern
Ingredients Method

Ingredients
  

  • 2 tbsp unsaltd butter
  • 1/4 onion, diced
  • 1 carrot diced or thinly sliced
  • 1 rib celery, thinly sliced
  • 1 heaping tbsp all purpose flour
  • 6 cups chicken stock (more if needed)
  • 2 cups chicken, cubed or shredded
  • 1 cup frozen pes
  • salt and pepper to taste
For the Dumplings
  • 2 cups self rising flour
  • 1/3 cup shortening or butter
  • 3/4 cups buttermilk

Method
 

  1. If you are cooking your chicken, place in 3 quarts of water with 4 tsps kosher salt, 1 medium onion, 2 cloves garlic and about 8 whole peppercorns. Bring these ingredients to a boil, lower the heat and simmer for about 15 minutes to flavor the water. Add the chicken pieces, allow to come back to a boil and immediately adjust the heat to the barest simmer. Allow the chicken to poach until the meat reaches an internal temperature of 165 degrees. As the pieces are done, remove from the pot, spoon a little of the broth over to keep moist and allow to cool. When you can handle the chicken shred or dice into bite-size pieces, discarding skin and bones. If you are refrigerating for later, ladle a little more broth and cover with saran wrap.
    Strain the broth and set aside for later or refrigerate.
For the Dumplings
  1. Cut the shortening or butter into the flour using a fork, pastry cutter or your hands until well distributed and in small pieces.
    Add the milk and mix with a fork until well mixed. Turn out onto a floured surface and knead a few times. Roll out to about 1/8 inch thick and cut into strips about 1.5 inches wide and what ever length you like. I like about 3 or 4 inch long dumplings. Set aside until ready to add to your broth.
To assemble and complete the dish
  1. Add the butter to a stock or soup pot. Add your diced onions, celery and carrots. Sauté a few minutes until the vegetables begin to soften a little. Add the flour and cook a few minutes. Add the stock, stirring to make sure sure there are no lumps. Bring to a boil, then reduce to a low boil. Add the dumpling strips, separating with a spoon or knife to allow to add more to the simmer broth, When all have been added cover and simmer about 20 minutes until the dumplings are set and cooked through.
    Add the chicken and peas and gently stir to combine. The pea will cook in the hot broth, so there is no need to continue cooking. You can turn off or keep warm if you are serving immediately.
    Enjoy!

  • Click to share on Pinterest (Opens in new window) Pinterest
  • Click to share on Facebook (Opens in new window) Facebook
  • Click to email a link to a friend (Opens in new window) Email
  • Click to print (Opens in new window) Print
  • Click to share on X (Opens in new window) X
  • Click to share on Tumblr (Opens in new window) Tumblr
  • More
  • Click to share on Reddit (Opens in new window) Reddit

Filed Under: Poultry Tagged With: chicken, chicken and dumplings, Comfort food, dinner, dumplings, homemade

Best Fried Chicken

July 23, 2021 by Becky Spoon

Jump to Recipe
Best Fried Chicken
Best Fried Chicken

This “Best Fried Chicken” lives up to it’s name! Not only is the batter well seasoned, but the chicken itself is loaded with flavor! This well seasoned chicken is because of two brining’s. One is a water brine loaded with spices and the second brine is with buttermilk, also loaded with spices.

Best Fried Chicken

“Full of Flavor” Best Fried Chicken

Fried Chicken is something my mother always made on Sundays; well, didn’t matter when, she made amazing fried chicken. I’m posting this recipe on Friday for your Sunday lunch because it takes a little time with brining and soaking and you still have plenty of time.

The first brine is water, kosher salt, sugar, onion powder, garlic powder, black pepper and bay leaves. The second brine, or soak is with buttermilk, salt, pepper, garlic powder, smoked paprika and hot sauce. After all this the chicken is dredged in flour that has been seasoned with salt, pepper, onion powder, garlic powder, and more smoked paprika.

“Full of Flavor” Best Fried Chicken

What’s the best oil to use? I used peanut oil, but you can use vegetable oil, corn oil or canola oil. I fry my chicken in a large iron skillet or a Dutch oven that is also cast iron. These are great cast iron skillets: https://affiliate-program.amazon.com/home#:~:text=https%3A//amzn.to/3kQZntS.

I love all of these sizes and use them all!

“Full of Flavor” Best Fried Chicken

Best Fried Chicken

Just look how juicy and delicious this chicken looks! I’m dying to make it again by just looking at these photos! I served this with chunky mashed potatoes. I just boiled Idaho potatoes, drained them, put them back into the pan with the heat still on and allowed the water to evaporate. Then I added butter, salt and pepper, and milk if needed. I made cream gravy which is kind of a must for fried chicken in the South. To serve, I piled the potatoes on a plate, topped with the chicken and some gravy, then sliced some green onions to scatter around. So delicious! This is another potato dish I love that would be perfect with this chicken: delicious smashed potatoes.

Smashed Potatoes
Smashed Potatoes

These garlic Green Beans would be a great addition: Perfect Green Beans with Garlic and Lemon in Browned Butter

Here is another wonderful recipe…and the recipe for the creamed gravy: the best – chicken fried pork steak with cream gravy.

Chicken Fried Pork Steak with Cream Gravy

and, don’t forget the bread for sopping up the delicious gravy! These rolls are delicious!My Best Dinner Rolls Yet!

Dinner Rolls
My Best Dinner Rolls Yet!

Here’s the recipe for this delicious fried chicken! Enjoy!

Best Fried Chicken

Best Fried Chicken

I wish you could taste this "Best Fried Chicken". Not only is the batter well seasoned, but the chicken itself is loaded with flavor! This well seasoned chicken is because of two brining's. One is a water brine loaded with spices and the second brine is with buttermilk, also loaded with spices.
Print Recipe Pin Recipe
Course: dinner, Lunch, Main Course
Cuisine: American
Ingredients Method

Ingredients
  

For the Brine
  • 3 quarts cold water
  • 1/3 cup kosher salt
  • 1/4 cup granulated sugar
  • 1 tbsp onion powder
  • 2 tsps black pepper
  • 2-3 bay leaves
Buttermilk Brine
  • 1 quart buttermilk
  • 1 tsp kosher salt
  • 1 tsp black pepper
  • 1 tsp garlic powder
  • 1/2 tsp smoked paprika
  • 1 tsp hot sauce
For the seasoned Flour
  • 3 cups all purpose flour
  • 1 tsp kosher salt
  • 1 tbp onion powder
  • 1 tbsp garlic powder
  • 1 tsp smoked paprika
  • 1 tsp freshly ground pepper
The Chicken
  • 8-10 pieces chicken (breast, thighs, legs)
  • 1 quart oil for frying

Method
 

  1. In a large stockpot, add 2 quarts water. Add the salt, sugar, onion powder, garlic powder, pepper, and bay leaves. Allow the mixture to come up to a rolling boil. Reduce the heat and simmer for about 10 minutes. 
  2. Remove the pot from the heat and pour in remaining 1 quart of water. Transfer the brine into the refrigerator to cool down completely. Once the brine is chilled, place the chicken pieces into a large bowl or container and proceed with the next step.
  3. Pour the brine over the chicken pieces and make sure all of the chicken pieces are fully covered. Transfer the container to the refrigerator and brine the chicken for at least 6 hours. Remove the chicken from the brine and discard the liquid.
  4. In a large bowl, combine the buttermilk, salt, pepper, garlic powder, paprika, and hot sauce together. Add chicken pieces into the buttermilk mixture. Make sure all pieces are in the mixture. Transfer the bowl to the refrigerator for at least 6 hours.
  5. After soaking in the buttermilk mixture, place the chicken pieces into a colander or other vessel to drain the chicken and then discard the buttermilk soak.
Frying the Chicken
  1. Heat a 10-inch or larger cast-iron skillet (or a heavy bottomed pot such as a dutch oven), over medium-high heat and pour in the oil. Allow the oil to reach a temperature of 350°F (using a deep fry thermometer will help to know when you achieve optimal frying time!). 
  2. While the oil is heating, prepare the seasoned flour dredge. In a large shallow bowl combine the flour, salt, onion powder, garlic powder, paprika, and black pepper.
  3. Dredge each piece of chicken in the seasoned flour, making sure to fully coat the chicken on all sides. Shake off any excess flour. Transfer the chicken to a baking sheet. Repeat this process until all of the chicken pieces are dredged.
  4. Once the oil has reached 350°F add a few pieces of chicken- making sure to not crowd the pan. Fry the chicken until an internal temperature reaches 160-165 and is golden brown.
  5. Transfer the fried chicken to a wire rack to drain and repeat the process until all of the chicken is fried. Serve with our favorite side dishes and enjoy!
  • Click to share on Pinterest (Opens in new window) Pinterest
  • Click to share on Facebook (Opens in new window) Facebook
  • Click to email a link to a friend (Opens in new window) Email
  • Click to print (Opens in new window) Print
  • Click to share on X (Opens in new window) X
  • Click to share on Tumblr (Opens in new window) Tumblr
  • More
  • Click to share on Reddit (Opens in new window) Reddit

Filed Under: Poultry Tagged With: best fried chicken, chicken, fried chicken, southern fried chicken

love these double-pork carnitas on homemade corn tortillas.

September 22, 2020 by Becky Spoon

Double-Pork Carnitas

These Double-Pork Carnitas are perfect for your Taco Tuesday! Double Pork, yes! These carnitas have a combination of boneless pork shoulder (Boston Butt) and pork belly. Yes pork belly. If you haven’t tried pork belly you must! I get my pork belly from the specialty meat market at my local HEB. Ask your meat department how you can get it because it is delicious.

I also made homemade tortillas to go with these. Of course you do not have to make homemade, but they sure make a huge difference. They were delicious. I’m still trying to perfect the art of tortilla making, because there is a a process. here’s a video I watched. https://www.youtube.com/watch?v=HzKuWBDDLPg.

If you don’t have a tortilla press, here’s the one I purchased. It just makes it so much easier and you can get a good consistency. This is the press I have: https://amzn.to/32SV8EH.

love these double-pork carnitas on homemade corn tortillas.

Double Pork Carnitas

I started the carnitas by cutting the pork shoulder into 1 1/2 inch pieces and cutting the pork belly into 1 inch pieces then adding them to a pot with the stock and salt and pepper. Bring this to a boil, then reduce the heat and simmer for about 2 hours.

Double-Pork Carnitas

Then I transfer the pork in batches along with some pan juices to a non-stick skillet and cook over high heat until the liquid evaporates and the pork begins to fry in its rendered fat.

I serve these with chopped white onion, lime wedges, dried oregano, cilantro, shredded cabbage and sometimes I serve with green pica de gallo!

Or, with my homemade salsa! I’ll share those recipes when I post them! But, until then these are perfect with chopped onions, cilantro, limes, and your favorite red or green salsa!

Heres my carne asada tacos, since were talking tacos! https://the2spoons.com/simple-favorite-red-chile-marinated-carne-asada-tacos/

Here’s the recipe for the carnitas! Enjoy!

Double-Pork Carnitas

Double-pork Carnitas

Print Recipe Pin Recipe
Course: dinner, Lunch, Main Course
Cuisine: Mexican
Ingredients Method

Ingredients
  

  • 3 Lbs Boneless pork shoulder (Boston butt) cut into 1 1/2 inch pieces
  • 1 Lb Pork belly cut into 1 inch pieces
  • 1 Cup Chicken stock or low sodium broth
  • 1 Tbsp Kosher salt
  • 1 Tsp Freshly ground pepper
  • warm tortillas, chopped white onion, limes, avocados, chopped cilantro, favorite salsa, chopped cabbage for serving

Method
 

  1. Place pork shoulder, pork belly, stock, salt, and pepper in a large heavy pot; cover and bring to a boil over medium-low. Reduce heat and simmer until pork is tender and shreds easily, about 2 hours. Uncover; cook 10 minutes to reduce liquid (but not completely). Remove from heat.
    Transfer half of pork and pan juices to a large skillet, preferably nonstick, and cook over high until liquid evaporates and pork begins to fry in its rendered fat. Fry, stirring occasionally and pressing on pork with spoon to break up, until browned and just beginning to crisp, 10–15 minutes. Most of the pieces should be bite-size with some smaller shredded and super-crisp bits in the mix. Using a slotted spoon, transfer to a paper towel–lined baking sheet. Cover with foil to keep warm and moist. Repeat with remaining pork.
    Serve carnitas with tortillas, onion, limes, avocado, herbs, and cabbage.
    Do Ahead: Pork can be braised (do not fry) 3 days ahead. Cover and chill.
  • Click to share on Pinterest (Opens in new window) Pinterest
  • Click to share on Facebook (Opens in new window) Facebook
  • Click to email a link to a friend (Opens in new window) Email
  • Click to print (Opens in new window) Print
  • Click to share on X (Opens in new window) X
  • Click to share on Tumblr (Opens in new window) Tumblr
  • More
  • Click to share on Reddit (Opens in new window) Reddit

Filed Under: Poultry Tagged With: carnita tacos, pork belly, pork shoulder

  • « Go to Previous Page
  • Page 1
  • Page 2
  • Page 3
  • Page 4
  • Interim pages omitted …
  • Page 7
  • Go to Next Page »

Primary Sidebar

Categories

  • Appetizer
  • Beans, Lentils, Grains, Rice
  • Beef
  • Bread
  • Breakfast/Brunch
  • Cocktails
  • Dessert
  • Dishes of Mexico, Tex Mex and New Mexico Red and Green Chile
  • Fish/Seafood
  • Ice Cream
  • Pasta
  • Pizza
  • Pork
  • Poultry
  • Salad Dressings
  • Salads
  • Salsas
  • Sandwiches/Burgers/Hot Dogs
  • Sauces, Compound Butters, Condiments
  • Side dish
  • Soups/Stews/Gumbo//Chili
  • Stocks, Broths, Gravies
  • Vegetables

Copyright © 2025 The 2 Spoons on the Foodie Pro Theme

Manage Cookie Consent
We use cookies to optimize our website and our service.
Functional Always active
The technical storage or access is strictly necessary for the legitimate purpose of enabling the use of a specific service explicitly requested by the subscriber or user, or for the sole purpose of carrying out the transmission of a communication over an electronic communications network.
Preferences
The technical storage or access is necessary for the legitimate purpose of storing preferences that are not requested by the subscriber or user.
Statistics
The technical storage or access that is used exclusively for statistical purposes. The technical storage or access that is used exclusively for anonymous statistical purposes. Without a subpoena, voluntary compliance on the part of your Internet Service Provider, or additional records from a third party, information stored or retrieved for this purpose alone cannot usually be used to identify you.
Marketing
The technical storage or access is required to create user profiles to send advertising, or to track the user on a website or across several websites for similar marketing purposes.
Manage options Manage services Manage {vendor_count} vendors Read more about these purposes
Preferences
{title} {title} {title}