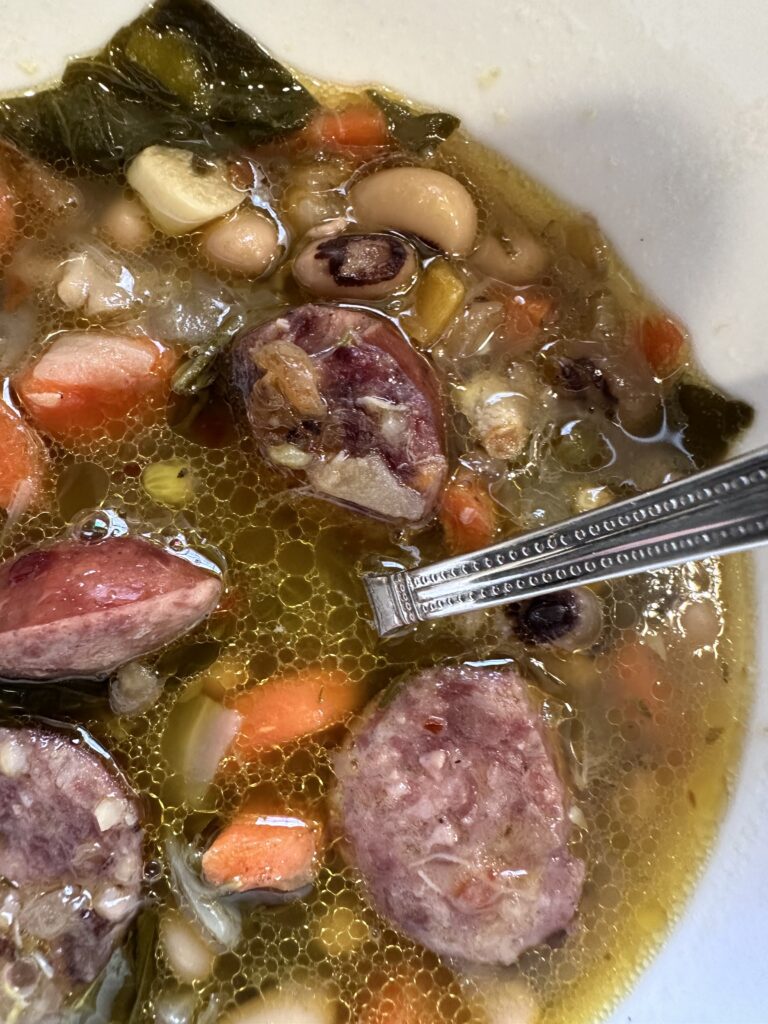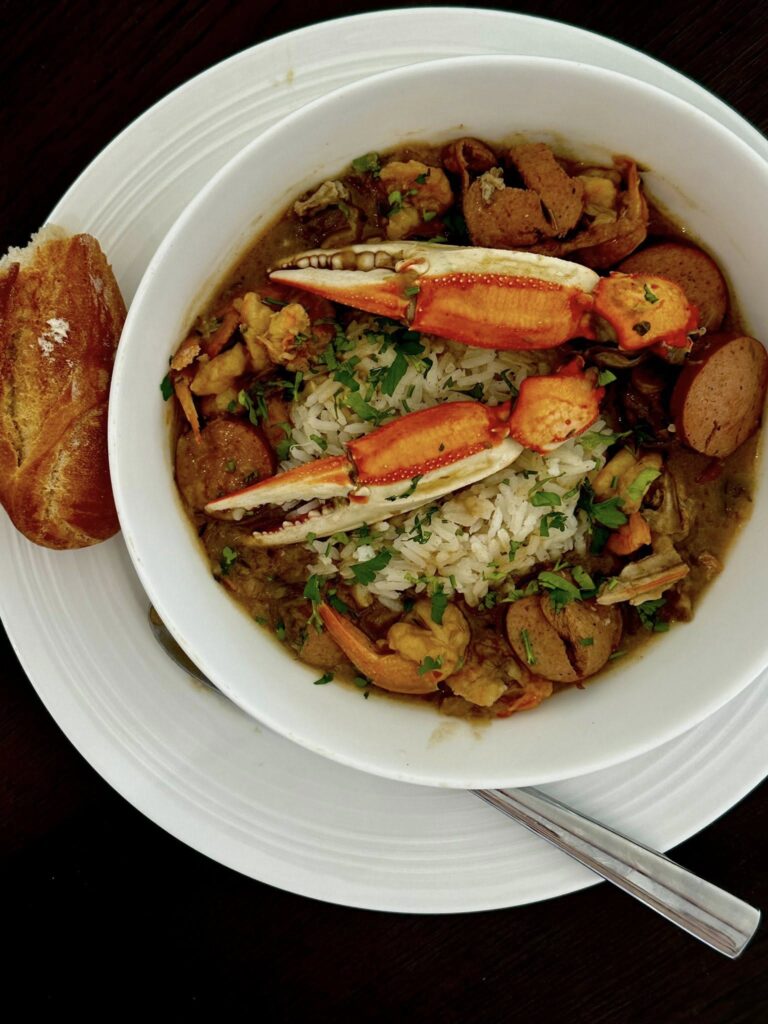
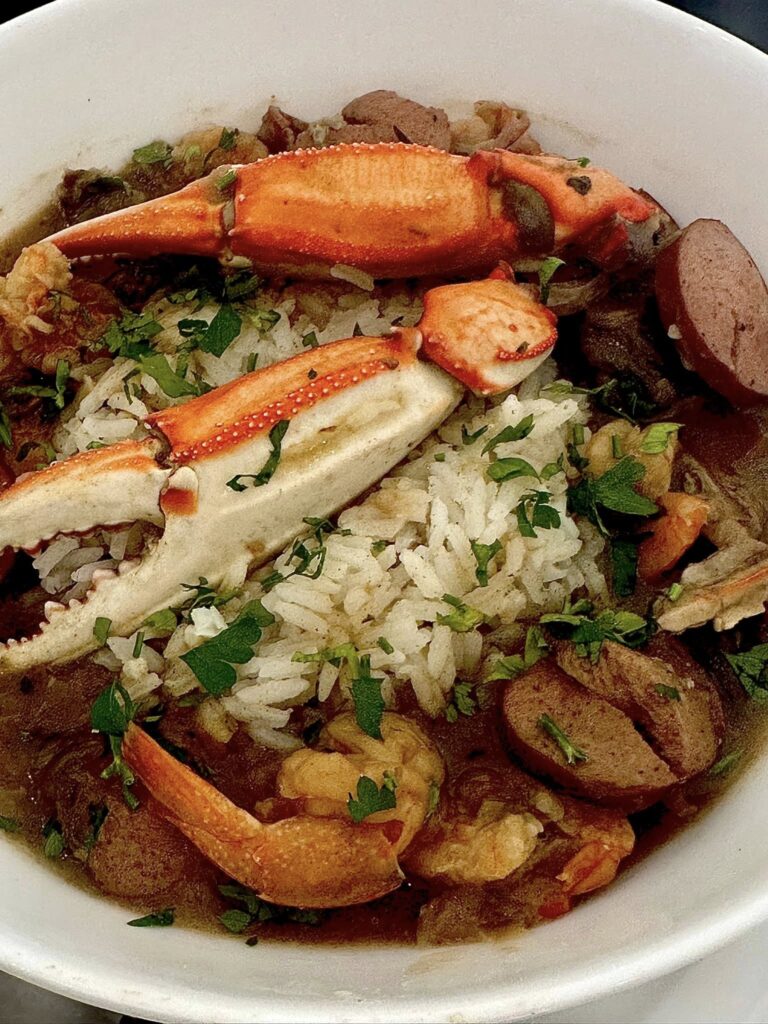
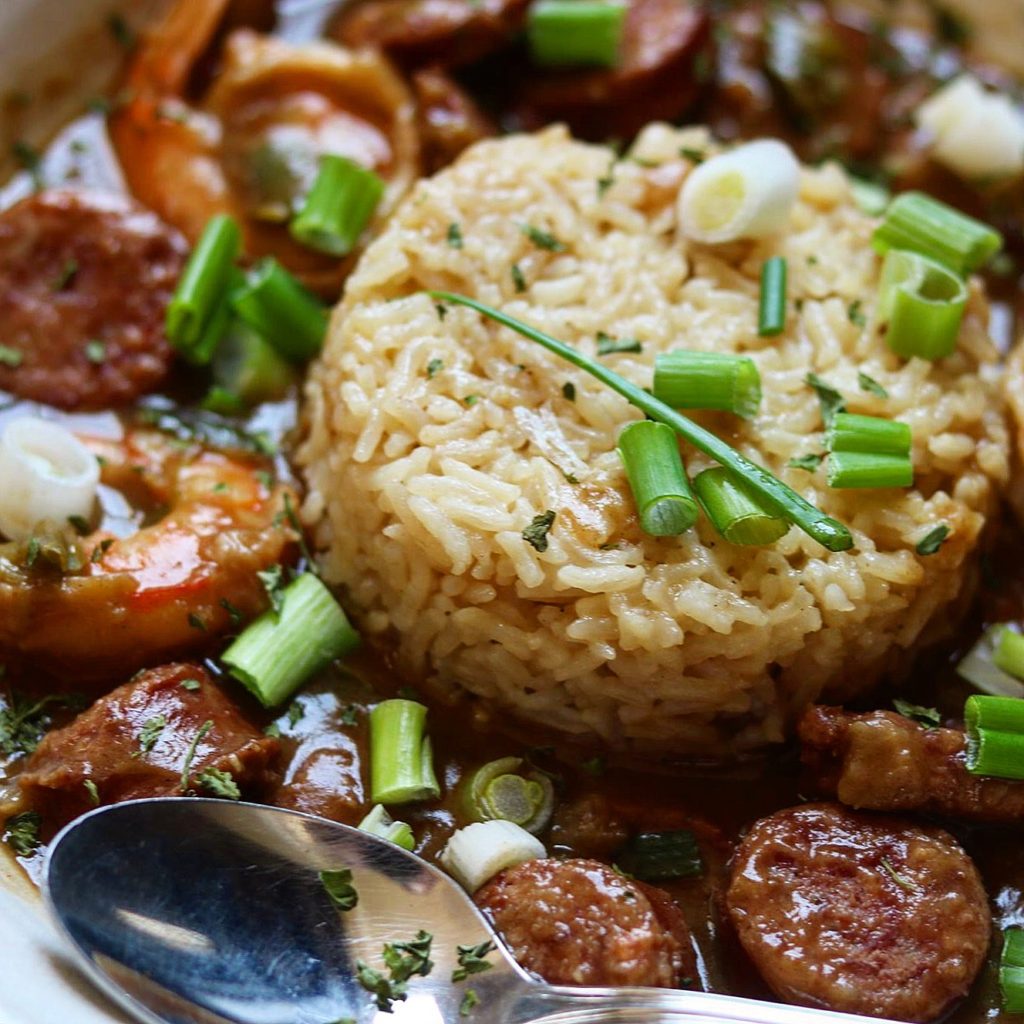
This Seafood Gumbo is fantastic! My version includes shrimp, sausage, and crab. Oysters would also make a wonderful addition. As for okra, it’s definitely a great ingredient. While this recipe includes okra, it’s still tasty even without it for those who aren’t fans of it.
To truly appreciate this Seafood Gumbo, it’s essential to understand its roots and the culinary traditions of Louisiana. The dish is a melting pot of cultures, influenced by French, Spanish, African, and Native American cooking techniques and ingredients. This fusion is what makes gumbo so unique and flavorful. As you savor each spoonful, you can taste the essence of what makes Louisiana cuisine so celebrated around the world.
Every trip to New Orleans feels like a culinary adventure, with street vendors and local restaurants offering the best of Creole and Cajun dishes. From the bustling French Market to the historic French Quarter, the aromas of spices and freshly cooked seafood fill the air, enticing you to stop and try something new. Don’t miss out on the chance to enjoy a bowl of gumbo from a local chef who has perfected the art over generations.
Making seafood gumbo….
When making your gumbo, consider the importance of layering flavors. Start with the holy trinity of Cajun cooking: onions, bell peppers, and celery. This aromatic base sets the stage for deeper flavors. As the vegetables soften, add garlic and spices like thyme, bay leaves, and cayenne pepper to elevate the dish. Each ingredient plays a pivotal role in building that signature gumbo flavor profile.
I actually love all the flavors of Louisiana, Louisiana Creole Cuisine and I especially love to go to New Orleans and taste those amazing flavors. Those folks can cook! Creole food for breakfast, lunch,
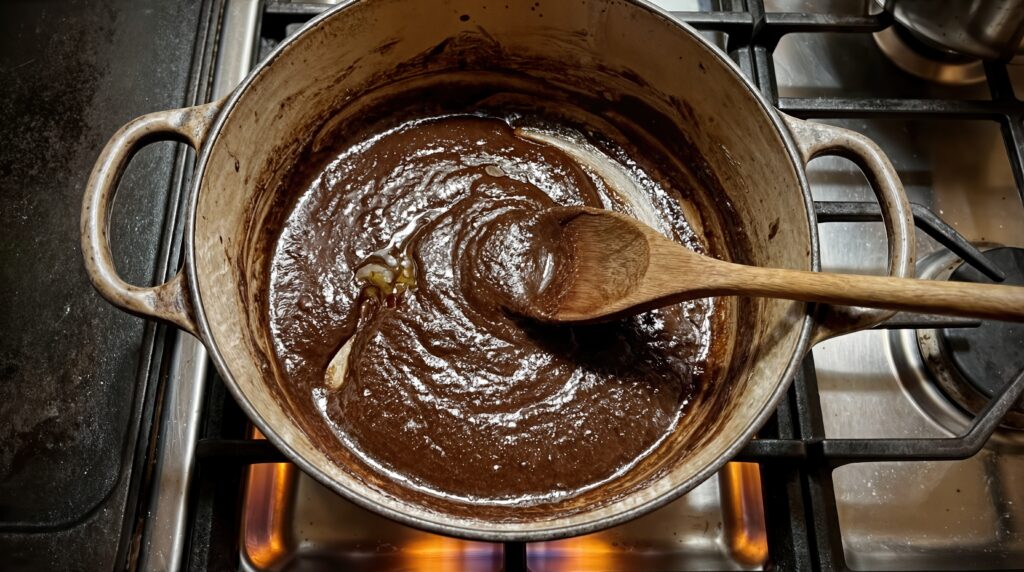
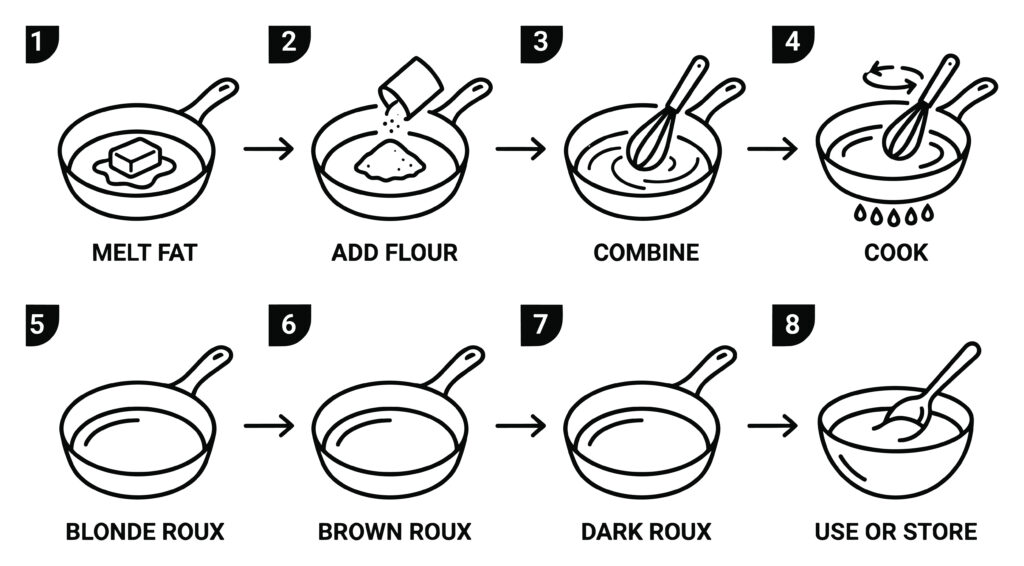
Be patient with your roux; it’s the heart of your gumbo. Achieving the perfect color is not just about aesthetics; it influences the flavor greatly. A darker roux adds a nutty taste, while a lighter roux offers a more subtle base. Experimenting with different roux colors can yield various results, so don’t hesitate to adjust based on your preference and the specific flavor you are aiming for.
If you decide to use store-bought roux, make sure it’s of high quality to maintain the integrity of your gumbo. However, there’s nothing quite like the satisfaction of making it from scratch. When you master your roux, you’ll unlock the possibility of creating various other dishes that require this essential component, like etouffee or even certain sauces.
The vibrant spices and fresh ingredients truly bring the dishes to life. Each bite tells a story of the rich cultural heritage and culinary traditions of the region. I can’t resist trying new variations whenever I visit, whether it’s jambalaya or a classic po’ boy. The lively atmosphere of the local eateries adds to the overall experience, making every meal unforgettable. I always leave craving more of that authentic southern flavor!
If you’ve attempted creole cooking, especially a gumbo you know it takes a while to develop flavors. The roux does take a few minutes to get to the desired color, and you have to remember not to have your burner cranked to high because this roux can scorch easily and you’ll have to start over. Don’t skimp on time on this task because the darker the roux without burning the better flavor your gumbo will have.
Gathering the right ingredients is crucial for this Seafood Gumbo. Besides fresh seafood, consider adding fresh herbs like parsley and green onions as garnishes to enhance the presentation and flavor. Pairing your gumbo with some rice or a side of cornbread can make it a hearty meal that’s perfect for family gatherings or special occasions.
You definitely don’t want to leave while you’re making your roux because a fairly constant stir is required. I cook mine on a medium-low until I am right there stirring constantly and I’ll increase the heat, then lower a little again. Do what suits you. I actually saw a jar of already made roux in the grocery store the other day. I’ve never tried it, but I think I will so I can report about the store bought roux.
What you need for this seafood gumbo
Serving gumbo can also be a delightful experience. Imagine a large pot in the center of the table, filled to the brim with steaming gumbo, surrounded by bowls of rice, hot sauce, and crusty French bread. Encourage your guests to serve themselves and customize their bowls with their favorite toppings. This communal aspect of the meal allows everyone to bond over delicious food and creates a memorable dining experience.
After enjoying your gumbo, think about the possibility of leftovers. Gumbo often tastes even better the next day, as the flavors continue to meld. Just be sure to store it properly and reheat it gently to preserve the seafood’s texture. Additionally, consider experimenting with what you do with leftovers; you could make a gumbo pasta or even a gumbo pizza for a fun twist on the classic dish.
For those interested in exploring more about this cuisine, joining a cooking class in New Orleans can provide hands-on experience and insider tips from local chefs. Learning from experts can enhance your skills and deepen your appreciation for the art of cooking gumbo and other Louisiana specialties.
To complement your newly acquired gumbo skills, try making a side dish that pairs well, such as a zesty coleslaw or a refreshing cucumber salad. These sides can balance the richness of the gumbo and provide a delightful contrast in textures and flavors, ensuring a well-rounded meal.
In addition to the following list, a high-quality seafood stock is crucial for this recipe. As mentioned in my Shrimp & Grits recipe, a flavorful seafood stock is key. I prepare my Basic Shrimp Stock and store it in freezer bags until I’m ready to use it. I also keep several homemade stocks in my freezer; it’s a great practice that saves time. The Instant Pot is an excellent device for creating stocks in just an hour that have the depth of flavor you’d expect from an 8-hour cooking process. Here’s a link for my basic seafood stock: http://basic seafood stock

- For the Gumbo
- 1 cup lard
- 1 cup flour
- 2 large onions, diced
- 3-6 blue crabs
- 1 lb spicy smoked sausage links, sliced 1/2 inch thick
- 1 stalk celery, diced
- 1 green pepper, seeded and diced
- 2 cloves garlic, minced
- 1 cup sliced fresh okra ( leave out if you some that don’t like okra)
- 3 qts Basic Seafood Stock
- Basic Creole Spices
- 2 tbsp celery salt
- 1 tbsp sweet paprika
- 1 tbsp coarse sea salt
- 1 tbsp freshly ground black pepper
- 1 tbsp onion powder
- 2 tsps cayenne pepper
- 1 tsp ground allspice
- For the Basic Louisiana White Rice
- 1 tbsp chicken fat, extra-virgin olive oil, or butter
- 1 small onion, minced
- 1 1/2 cups long grain white rice
- 3 cups chicken stock
- 1 bay leaf
- 1-2 pinches salt
Ultimately, making Seafood Gumbo is not just about preparing a meal; it’s about celebrating the vibrant culture and history of Louisiana. Each ingredient, each technique tells a story, and by cooking and sharing this dish, you’re part of that ongoing narrative. So gather your friends and family, and enjoy the delicious journey of creating and savoring this wonderful Seafood Gumbo.
Louisiana Seafood Gumbo
This is another recipe I got from John Besh’s Cookbook – “My New Orleans” the cookbook. Here’s the link:https://amzn.to/4kzPGg0.

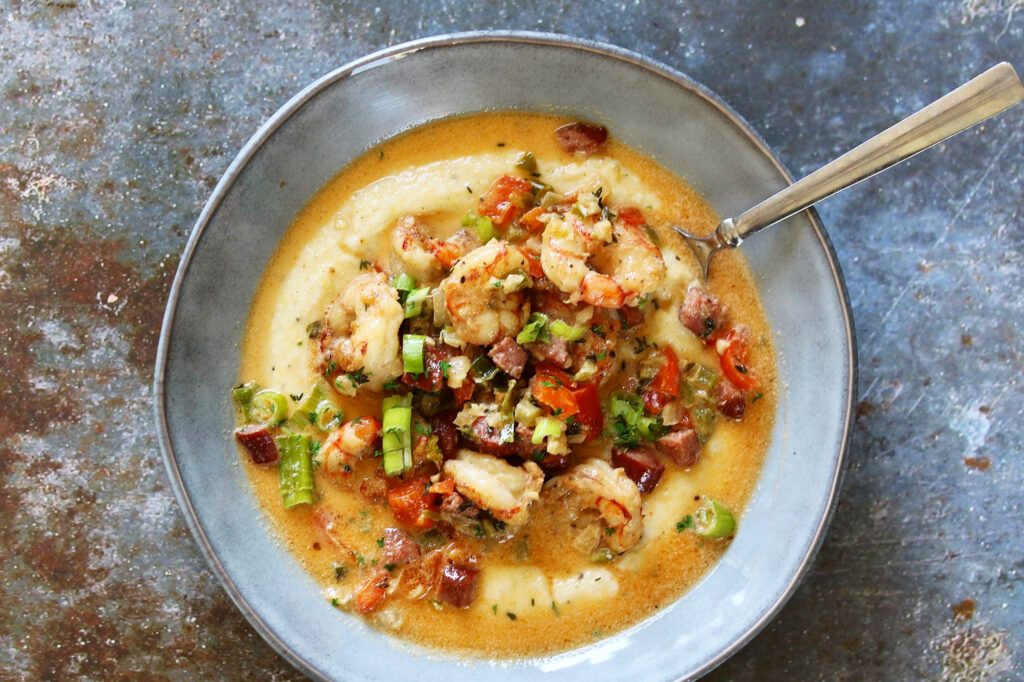
My Shrimp & Grits. Here’s the link!this is amazing – louisiana shrimp and grits.
A side note is that if I have a lot of the sauce leftover, I strain and freeze the leftover sauce for the next time I want to make gumbo.
Delicious Louisiana Seafood Gumbo
Ingredients
For the Gumbo
- 1 cup lard
- 1 cup flour
- 2 large onions, diced
- 3-6 blue crabs
- 1 lb spicy smoked sausage links, sliced 1/2 inch thick
- 1 stalk celery, diced
- 1 green pepper, seeded and diced
- 2 cloves garlic, minced
- 1 cup sliced fresh okra ( leave out if you some that don't like okra)
- 3 qts Basic Seafood Stock
Basic Creole Spices
- 2 tbsp celery salt
- 1 tbsp sweet paprika
- 1 tbsp coarse sea salt
- 1 tbsp freshly ground black pepper
- 1 tbsp onion powder
- 2 tsps cayenne pepper
- 1 tsp ground allspice
For the Basic Louisiana White Rice
- 1 tbsp chicken fat, extra-virgin olive oil, or butter
- 1 small onion, minced
- 1 1/2 cups long grain white rice
- 3 cups chicken stock
- 1 bay leaf
- 1-2 pinches salt
Instructions
For the Basic Creole Spices
Using this spice blend is truly the easiest way to consistently achieve the flavors of Louisiana. Once combined, the spices will last for six months in an airtight container. (this recipe is for several dishes, you'll just add in "pinches" to this recipe until you get your desired flavor.
For the Basic Louisiana White Rice
- The recipe will work with most long-grain rices, including Popcorn Rice. Save some of the fat skimmed from your chicken stock to perfume the rice with many wonderful flavors.Put the fat, oil, or butter and the onions into a medium saucepan and sweat the onions over moderate heat until they are translucent, about 5 minutes. Pour the rice into the pan and stir for 2 minutes. Then add the chicken stock and bring to a boil. Add the bay leaf and salt.Cover the pan with a lid, reduce the heat to low, and cook for 18 minutes. Remove the pan from the heat, fluff the rice with a fork, and serve
For the Gumbo
- Prepare shrimp stock, if using (recipe below. Prepare homemade Basic Creole Spices, if using (recipe below). Make sure all of your vegetables are cut, diced, chopped, minced and ready to go before beginning the roux. You must stand at the stove and stir the roux continuously to prevent it from burning. In a large cast-iron or heavy-bottomed pan, heat the lard or beef tallow over high heat. Whisk the flour into the hot oil – it will start to sizzle. Reduce the heat to moderate, and continue whisking until the roux becomes deep brown in color, about 15 minutes. Add the onions. Switch to a wooden spoon and stir the onions into the roux. Reduce the heat to medium-low, and continue stirring until the roux becomes a glossy dark brown, about 10 minutes. Add the blue crabs and smoked sausage and stir for a minute before adding the celery, bell peppers, garlic, and okra. Increase the heat to moderate and cook, stirring, for about 3 minutes. Add the thyme, shellfish stock, and bay leaves. Bring the gumbo to a boil, stirring occasionally. Reduce the heat to medium-low and simmer, uncovered, for 45 minutes. Stir occasionally, skimming off the fat from the surface of the gumbo every so often. Add the shrimp, oysters, crabmeat and green onions to the pot and cook for 15 minutes. Make sure everything is ready to serve before adding the shellfish to the gumbo. DO NOT OVERCOOK your shellfish. Season with salt and pepper, Creole Spices, Worcestershire, and Tabasco. Serve in bowls over the rice.