• Skip to primary navigation
  • Skip to main content
  • Skip to primary sidebar

A cook named Rebecca

  • Home
  • Favorite Cookbooks
  • Recipes
  • Travel
You are here: Home / Home

Super Bowl Game Day Food! Classic Shrimp Cocktail

January 30, 2020 by Becky Spoon

Classic Shrimp CocktailJump to Recipe
Classic Shrimp Cocktail

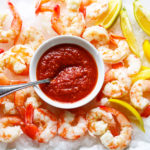
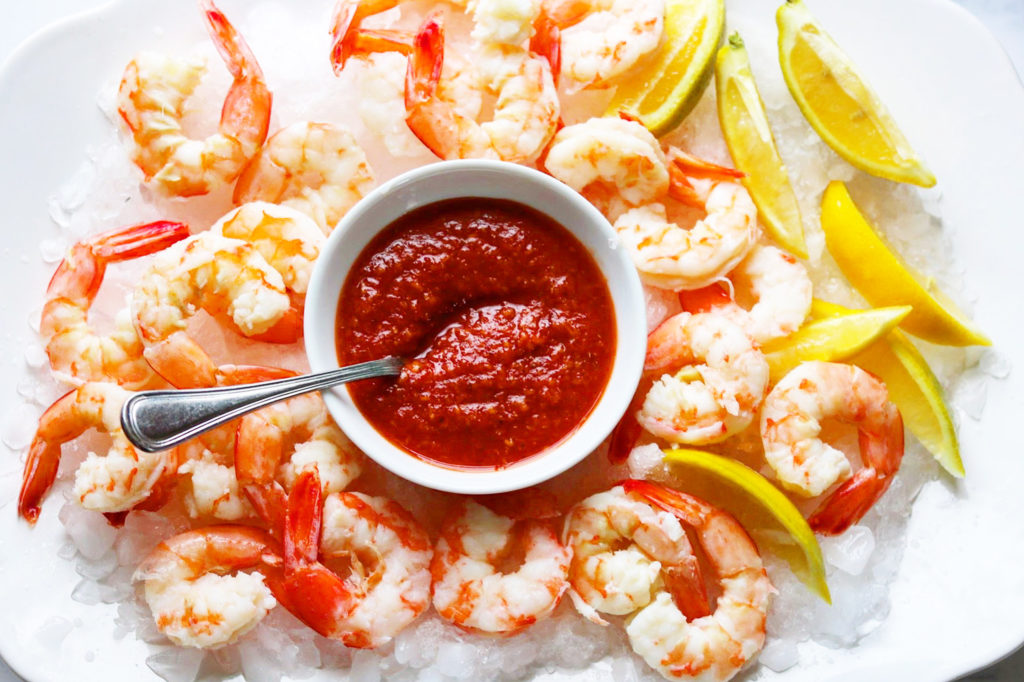
You can never go wrong with a Classic Shrimp Cocktail for you Super Bowl Game Day food, or for that matter any game, party or just at home with your family! Shrimp, cocktail sauce, lemon, chilled to perfection – what’s not to love!

Classic Shrimp Cocktail

Super Bowl Game Day Food! Classic Shrimp Cocktail

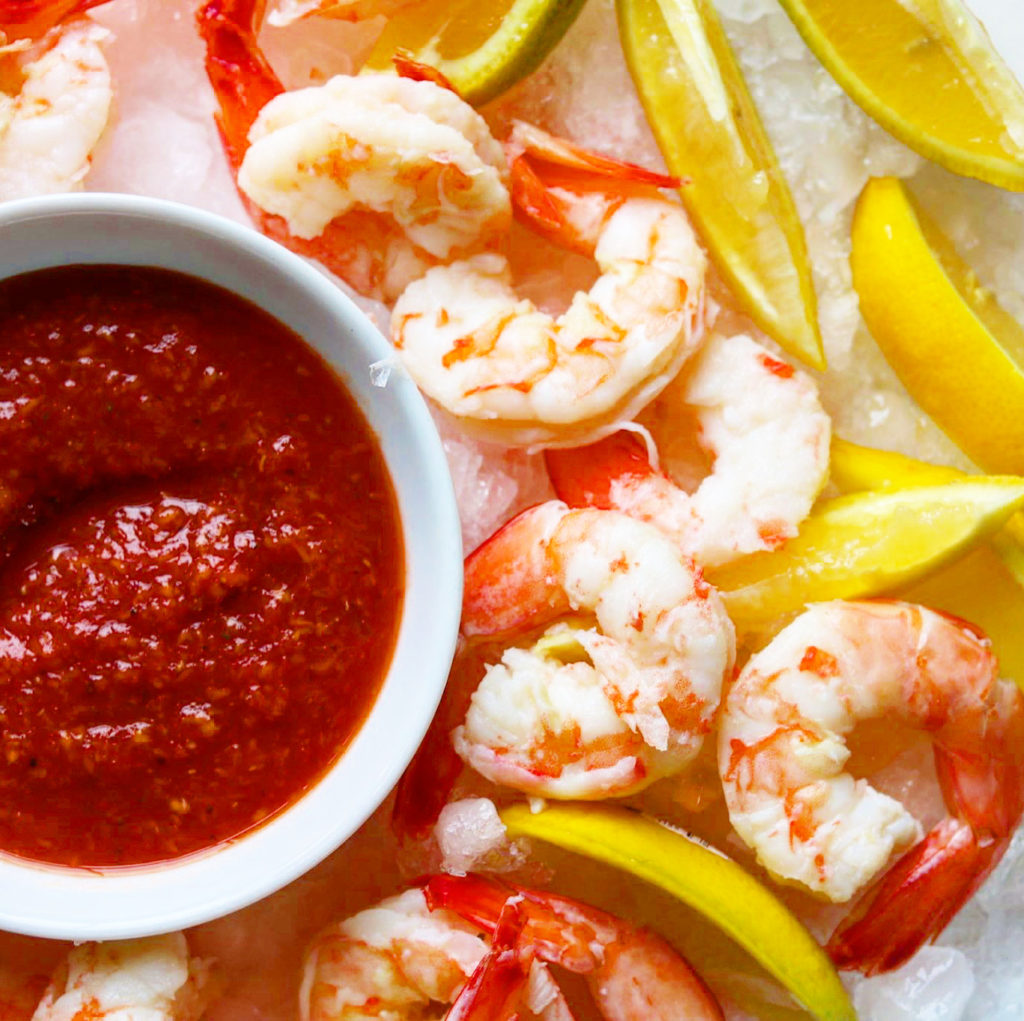
You can do this in advance. The shrimp can be poached and peeled the day before and keep it chilled in the refrigerator. You can make the sauce the day before also, keeping it chilled. The day of your get together, layer a large platter with ice, add your shrimp with some lemon wedges, the beautiful cocktail sauce! Voila! A scrumptious, always a favorite appetizer staged in a few minutes!

I buy the large head on shrimp that I get from HEB because I like to keep the heads and shells for making stocks. Here’s the link for my shrimp that I buy: https://www.heb.com/product-detail/previously-frozen-raw-texas-white-head-on-farm-raised/546265. They are actually on sale this week. I usually pay $7.47 a pound for the head on and those that the head has been removed are double that price. Another reason to buy the head on!

You want to devein the shrimp before cooking. Here’s a tool to easily complete that task:https://amzn.to/2u6z1fl.

Super Bowl Game Day Food! Classic Shrimp Cocktail

Here’s another recipe for your game day! My Tandoori Chicken Wings: https://the2spoons.com/perfect-for-game-day-tandoori-chicken-wings/.

Here’s the simple recipe for the Classic Shrimp Cocktail!

Classic Shrimp Cocktail

Print Recipe
CourseAppetizer
CuisineAmerican
Keywordappetizer, cocktail sauce, game day food, party foods, seafood, shrimp, shrimp cocktail

Ingredients

For the Shrimp

  • 2 tbsp kosher salt
  • 1/4 cup sugar
  • 2 lemons
  • 1 lb jumbo shell on shrimp, deveined

Cocktail Sauce and Assembly

  • 1 cup chili sauce (preferably Heinz)
  • 3/4 tsp finely grated lemon zest
  • 2 tbsp fresh lemon juice
  • 2 tbsp prepared horseradish
  • 2 cups freshly ground black pepper
  • 3/4 tsp hot sauce (I use Tabasco)
  • Lemon Wedges for serving

Instructions

Shrimp

  • Scoop 8 cups ice into a large bowl; set aside. Combine salt, sugar, and 6 cups water in a large saucepan. Cut lemons in half, squeeze juice into pot, and toss in lemon halves. Bring liquid to a boil, stirring to dissolve salt and sugar, then remove pot from heat. Add shrimp and poach, uncovered, 3½ minutes.

  • Immediately add reserved ice to saucepan to rapidly chill the liquid and stop the cooking. Let shrimp sit in ice bath 10 minutes. Drain, pat dry, and peel. Pat dry again. Cover and chill until ready to serve.

  • Do Ahead: Shrimp can be poached and peeled 1 day ahead. Keep chilled.

Cocktail Sauce and Assembly

  • Mix chili sauce, lemon zest, lemon juice, horseradish, pepper, and hot sauce in a small bowl. Cover and chill until ready to serve.

  • Serve shrimp on cracked ice with lemon wedges and cocktail sauce alongside.

  • Do Ahead: Sauce can be made up to 1 day ahead. Keep chilled.

Filed Under: Appetizer Tagged With: classic shrimp cocktail, shrimp cocktail

Essential Easy Homemade Beef Bone Stock

January 26, 2020 by Becky Spoon

Homemade Beef Bone BrothJump to Recipe
Homemade Beef Bone Stock

I love to make all of my stocks/ broth from scratch like this Homemade Beef Bone Stock. After I make them I store them in freezer bags flat so that when I have a recipe requiring a particular stock, I have them on hand.


The Difference Between Stock and Broth

Stock and broth share a lot of similarities, but they are actually two different things. There are three important factors that differentiate stock and broth: the ingredients, cook time, and the presence (or lack) of seasoning.

What Is Stock?

Stock is made by simmering a combination of animal bones (which typically contain some scraps of meat), mirepoix (a mixture of onions, carrots, and celery), and aromatics in water. Stock always involves bones, although not necessarily meat. Often the bones are roasted first, which makes for a richer, more deeply colored stock, although this step is not essential to the process.

Stock is cooked for anywhere from two to six hours on the stovetop. This length of cooking means stock doesn’t typically yield a thick or gelatinous texture, nor is it likely to gel when chilled. Stock is always left unseasoned. 

Stock is typically used for sauces, gravies, braises, stews, and soups, another many other recipes.

What Is Broth?

Technically speaking, broth is any liquid that has had meat cooked in it. It is made my simmering meat (which can contain bones, but does not have to), mirepoix, and aromatics in water for a relatively short amount of time, usually under two hours. Unlike stock, broth is typically seasoned. It finishes as a thin, flavorful liquid that does not gel when chilled, and is used in all the same ways you’d use stock, including soups, sauces, and braises. And since it’s seasoned, it is flavorful and delicious sipped on its own. 

The easiest homemade broth: Poaching chicken breast with a mixture of aromatics and salt will leave you with a light and flavorful chicken broth — not to mention tender chicken ideal for salads and soups.

Homemade Beef Bone Stock

I started this stock by roasting the beef bones with onions, garlic and carrots until golden brown. These bones were meaty, and I’ll used the stock and the meat for homemade vegetable beef soup. Here’s the link for my soup: https://the2spoons.com/comforting-easy-homemade-vegetable-beef-soup/.

Homemade Vegetable Beef Soup
Homemade Beef Bone Broth

Essential Easy Homemade Beef Bone Stock

Here’s the recipe! Oh, and did I mention I made this in my Instant Pot? Yes! What could take a 24 hour process took about 6 hours in the instant pot!

Homemade Beef Bone Broth

Print Recipe
CuisineAmerican
Keywordbeef broth, beef stock, bone broth, homemade, homemade beef broth
Servings8 cups of broth

Equipment

  • Instant Pot or pressure cooker or 6 quart stockpot or large slow cooker

Ingredients

  • 4 pounds beef bones, preferably a mix of marrow bones and bones with a little meat on them such as short ribs, knuckle bones, or soup bones
  • 2 medium unpeeled carrots, cut into 2 inch pieces
  • 1 medium leek, end trimmed, cut into 2 inch pieces
  • 1 medium onion, quartered
  • 1 garlic head, halved crosswise
  • 2 stalks celery, cut into 2 inch pieces
  • 2 bay leaves
  • 2 tbsp black peppercorns
  • 1 tbsp cider vinegar

Instructions

  • Preheat oven to 450°F. Place beef bones, carrots, leek, onion, and garlic on a roasting pan or rimmed baking sheet and roast for 20 minutes. Toss the contents of the pan and continue to roast until deeply browned, about 20 minutes more.
  • Srape the roasted bones and vegetables into the Instant Pot along with the juices. Add water to the recommended level on your pressure cooker or Instant Pot .Set the Instant Pot for 2 hours. After the two hours do a quick release and remove the bones, leaving the other ingredients. When the bones are cool enough to handle, remove the meat from the bones and reserve for making Vegetable Beef Soup. Then add the bones back to the broth and vegetables in the Instant Pot and set for another 4 hours. At the end, allow the pot to release on it's on.
    If using a stockpot:
    Fill a large (at least 6-quart) stockpot with 12 cups of water (preferably filtered) . Add celery, bay leaves, peppercorns, and vinegar. Scrape the roasted bones and vegetables into the pot along with any juices. Add more water if necessary to cover bones and vegetables.
    Cover the pot and bring to a gentle boil. Reduce heat to a very low simmer and cook with lid slightly ajar, skimming foam and excess fat occasionally, for at least 8 but up to 24 hours on the stovetop. (Do not leave on stovetop unattended, simply cool and continue simmering the next day.) The longer you simmer it, the better your broth will be. Add more water if necessary to ensure bones and vegetables are fully submerged. Alternately, you can cook the broth in a slow cooker on low for the same amount of time.

    Remove the pot from the heat and let cool slightly. Strain broth using a fine-mesh sieve and discard bones and vegetables. Let continue to cool until barely warm, then refrigerate in smaller containers overnight. Remove solidified fat from the top of the chilled broth.


Filed Under: Stocks, Broths, Gravies Tagged With: bone broth, homemade beef broth, homemade stock

Yes! Crazy Good Salmon Rice Bowl!

January 25, 2020 by Becky Spoon

Salmon Rice BowlJump to Recipe
Salmon Rice Bowl
Salmon Rice Bowl

Oh, my gosh! If you aren’t having a Salmon Rice Bowl in your menus, you are truly missing out! So light, so simple, so amazingly fresh and delicious!

Salmon Rice Bowl
Salmon Rice Bowl

Delicious fresh wild salmon that is not overcooked in this dish is the star ingredient me! I got this recipe idea from Food and Wine Magazine. They used a Japanese tea, Gen Maicha, a green tea with roasted brown rice tea bags for the broth. https://amzn.to/2uBQVpZ.

I steeped a tea bag in boiling water and I went a step further. I added one of the spice packets that you find in ramen noodles! Yes they are always a great spice to add to rice bowls or other dishes like ramen, even Pho.

The rice I used was sushi rice which I love. I keep it on hand for making sushi of course, or I love to use it in Asian dishes, either as a side dish for a stir fry or in a rice bowl. Here’s a link for the rice. https://amzn.to/2GjNxTo.

One more ingredient you may not keep on hand unless you are making Japanese or other Asian dishes is Nori. https://amzn.to/2tOh4lq Nori is the shredded green in the bottom of the bowl. Nori is roasted seawood and it is:

  • a Low calorie Superfood
  • Packed with vitamins, minerals and amino acids

I keep Nori in the pantry for shushi or for making a broth for ramen.

Yes! Crazy Good Salmon Rice Bowl!

Salmon Rice Bowl

Here’s this easy recipe!

Salmon Rice Bowl

Print Recipe
Coursebrunch, dinner, Lunch, Main Course
CuisineAsian, Japanese
Keywordrice, rice bowl, salmon, salmon rice bowl, sushi rice
Servings2 servings

Ingredients

  • 2 cups water
  • 3 single serving Gen Maicha (japanese green tea with roasted brown rice) tea bags, see link in post
  • 1 seasoning packet from a pack of ramen noodles
  • 1/2 tsp salt, divided
  • 1 1/2-2 cups hot cooked sushi rice (see link in post)
  • 2 4 oz salmon fillets, pan fried, skin discarded and flesh flaked
  • olive oil for cooking the salmon
  • sprinkling of salt and pepper over the salmon
  • Sliced scallion, shredded roasted nori, pickled ginger, black and white sesame seeds, wasabi paste (options for topping) I used all of these as my toppings

Instructions

  • Bring 2 cups water to a boil in a teapot or small saucepan over high heat; remove from the heat. Add the tea bags and 1/4 tsp salt and the ramen noodle seasoning pack. Cover and let steep 2 to 3 minutes.
  • Meanwhile, heat a skillet to medium high. Dry the salmon and salt and pepper on both sides. Add a little olive oil, about 1 tablespoon, to the pan and add the salmon filet. Cook about 4 minutes skin side down or until easily moves in the pan. Flip over and cook on the other side for about 2 minutes for medium rare. Remove from pan and set aside.
  • Divide rice between 2 bowls. Remove and discard the tea bags. Pour the tea over the rice. Add the flaked salmon filet to each bowl. Sprinkle evenly with the remaining 1/4 teaspoon salt. Serve with the desired toppings above. Enjoy!

Filed Under: Fish/Seafood Tagged With: japanese cooking, Rice, rice bowl, salmon

Super Greens Breakfast Tacos

January 24, 2020 by Becky Spoon

Super Greens Breakfast TacosJump to Recipe
Super Greens Breakfast Tacos
Don’t want a smoothie? No problem. Start your day with these Super Greens Breakfast Tacos. My super greens were a blend of organic baby spinach, mizuna, baby chats and baby kale! After I cooked the other ingredients I just threw a big handful of greens into the mixture and turned the heat off! It makes me feel good to know I started my day eating foods that are essential.
Super Greens Breakfast Tacos

Don’t want a smoothie? No problem. Start your day with these Super Greens Breakfast Tacos. Eating your super greens does not have to be boring, honestly, you can add a handful to homemade soups, tacos and so much more! My super greens were a blend of organic baby spinach, mizuna, baby chard and baby kale! After I cooked the other ingredients I just threw a big handful of greens into the mixture and turned the heat off! It makes me feel good to know I started my day eating foods that are essential.

Super Greens Tacos

Loaded with protein from the eggs, the super food avocado, fresh tomatoes, the super greens, all wrapped in a corn tortilla is a great way to start the day! Very little fat, just a splash to brown the hash browns brown a little and from the breakfast sausage which really was minimal. Don’t want to use pork breakfast sausage? Use a turkey or chicken breakfast sausage. There is nothing bad for you in these breakfast tacos! Contrary to what you would think because we are talking tacos, but actually lots of great good for you things going on in these tacos! Yay!

Super Greens Breakfast Tacos

I used the Potatoes O’Brien Simply Potatoes from the hash browns. They are really good, have a few more ingredients than just potatoes and they add great flavor to the tacos. Here’s a link for the potatoes if you aren’t familiar. I love these, keep them in my refrigerator at all times. http://goto.walmart.com/c/2049504/568835/9383?veh=aff&sourceid=imp_000011112222333344&prodsku=172659154&u=https%3A%2F%2Fwww.walmart.com%2Fip%2FSimply-Potatoes-O-Brien-Hash-Browns-20-Oz%2F172659154.

Super Greens Breakfast Tacos

Super Greens Breakfast Tacos

I have many breakfast recipes on my blog. Here is a few more for you to try: https://the2spoons.com/best-10-minute-breakfast-fried-egg-quesadilla/.

Fried Egg Quesadilla

More breakfast recipes: Delicious Entomatadas https://the2spoons.com/delicious-entomatadas-for-breakfast-or-anytime/.

Entomatadas with Fried Egg

Here’s the recipe for my Super Greens Breakfast Tacos! Enjoy and start your morning getting a jump-start on your daily requirements!

Super Greens Breakfast Tacos

Print Recipe
CourseBreakfast, brunch, dinner, Lunch, Main Course
CuisineMexican, Texmex
Keywordbreakfast, breakfast tacos, corn tortillas, eggs, mexican food, super greens, tacos
Servings2 servings

Ingredients

  • 2 slices or servings of your favorite breakfast sausage
  • 1 1/2 – 2 cups hash browns ( I used Simply Potato Potatoes O'Brien)
  • splash of oil in your skillet for browning your hash browns
  • 4 eggs, beaten to scramble
  • 1 tbsp butter
  • 1/2 cup cheddar cheese, grated
  • salt and pepper
  • handful or two of super greens (I used baby greens, spinach, kale, mizuna and chard)
  • 4 corn tortillas
  • Cilantro, chopped
  • limes for squeezing on (optional)
  • 1-2 avocados, diced
  • your favorite salsa

Instructions

  • In a large skillet add your breakfast sausage and cook breaking up with a spoon or fork. When there is no more pink, push to one side, add a little oil and add your potatoes. Let the potatoes brown on the first side, then flip over. Let them brown on the other side. Push these aside, in the same skillet with your sausage.
  • Beat your eggs in a separate dish and add a little salt and pepper. In the empty side of your skillet, add the butter and pour your eggs in. Let them sit for just a minute until they begin to set on the bottom. Add the cheddar cheese to the top of the eggs. Then with a spatula, start moving them around until they are done to your liking. I like soft scrambled eggs, and you don't want to overcook them because they will continue to cook. Add your super greens, toss or just fold all the ingredients together.
  • Heat your tortillas in a separate skillet. Place the tortillas on a plate and divide the egg mixture among the tortillas. Top with chopped cilantro, fresh avocado, lime juice and your favorite salsa. Enjoy!

Filed Under: Breakfast/Brunch Tagged With: breakfast, Breakfast Tacos, brunch, cheese, sausage, super greens, tacos, tortillas

The Best Chili Mac

January 23, 2020 by Becky Spoon

Chili MacJump to Recipe
Chili Mac

Remember the Texas Chili I made the other day? Well, this Chili Mac is from the leftover chili! Most recipes you find for this recipe are with ground beef and I can never differentiate them from Goulash. It just seems so many of the ingredients are what you put in goulash??!! Chili Mac to me says Chili and Macaroni! Isn’t that what you think? Like Cincinnati Chili and Spaghetti? Yes, Exactly. That’s what it should be.

Chili Mac

The chili recipe is at this link: https://the2spoons.com/i-love-this-instant-pot-texas-chili/.

Texas Chili
Texas Chili

This recipe is so easy, loaded with macaroni and cheese, this is the ultimate casserole, ready and on the table in about 30 minutes! Also great for using up leftover chili well worth making straight from scratch!

Chili Mac

The Best Chili Mac

I added sautéed onions and bell peppers along with diced tomatoes. I used Mutti tomatoes because they have a great flavor. Here’s a link if you’re not familiar https://amzn.to/37qBRKI.

Here’s the recipe! Enjoy!

Chili Mac

Print Recipe
Coursedinner, Lunch, Main Course
CuisineAmerican
Keywordcasserole, cheese, chili, chili mac, dinner, leftovers, lunch, macaroni and cheese, maccaroni, supper, tomatoes

Ingredients

  • 1/2 onion, diced
  • 1/2 green pepper, diced
  • 2 tbsp olive oil
  • 1 tbsp chipotle chili powder or regular chili powder
  • 1 14.5 oz cans diced tomatoes
  • 1/2-1 lb macaroni
  • leftover homemade chili, or a good quality store bought chili
  • 1 cup cubed Velveeta cheese
  • 1 – 1 1/2 cup medium cheddar cheese, grated
  • salt and pepper to taste
  • fresh parsley, chopped to garnish

Instructions

  • Preheat the oven to 350 degrees F. Cook your macaroni according to package directions. Drain and set aside.
  • Heat the olive oil in a skillet then add the onions and peppers. Saute until the onions are translucent. Add a little salt and pepper and the chili powder. Add the tomatoes and combine. Add the leftover chili, stir to combine and heat through. If you think it's not juicy enough, add a little water, tomato juice or beef stock to loosen the mixture. Remove from the heat and add 1/2 cup of the cheddar cheese.
  • Add the macaroni to the chili mixture and toss to combine, but don't over stir. . Butter a casserole dish and add the mixture. Dot the dish with the cubed Velveeta. Top with the remaining cheddar cheese and cook until bubbly and the cheese has melted. Enjoy!

Filed Under: Beef Tagged With: cheese, chili, chili mac, dinner, leftover chili, leftovers, lunch, macaroni, macaroni and cheese, tomatoes

Taco Tuesday – Easy Tacos Al Carbon

January 21, 2020 by Becky Spoon

Tacos Al CarbonJump to Recipe
Tacos Al Carbon

Taco Tuesday could not be any more simple than these Tacos Al Carbon! Paper thin strips of steak tossed on the grill that are ready in minutes! Throw some onions slices on, make a quick Pico de Gallo with avocado and you have a delicious taco!

I have friends that live in Cabo and this is how they make tacos. They buy steak or beef and have the butcher cut it very, very thin. Just seasoned with salt and pepper, they throw it on the grill and it just takes a few minutes to cook. It is not cooked medium rare like we cook beef in the states, but they cook to well done and a little charred. Absolutely delicious! They then dice it into cubes! Perfection. They also throw onions on the grill or wrap in foil and place that on the grill.

Tacos Al Carbon

Taco Tuesday – Easy Tacos Al Carbon

I used ribeye this time because I was at the store and they had ribeye steak cut paper thin. You know like you’d get for a Philly Cheese Steak Sandwich! Love those! Need to add those to my blog! Anyway, back to this recipe, they had a top round that was sliced super thin too.

Tacos Al Carbon
Tacos Al Carbon

I used flour tortillas. I used the fresh made flour tortillas from my local HEB. They are delicious! Here’s a link for those: https://www.heb.com/product-detail/h-e-b-select-ingredients-flour-tortillas/465326.

I topped it with a simple Pico de Gallo that I added avocado. Here’s the link for the pico. https://the2spoons.com/pico-de-gallo-with-avocado/.

Pico de Gallo
Pico de Gallo

Taco Tuesday – Easy Tacos Al Carbon

Here’s the easy recipe!

Tacos Al Carbon

Print Recipe
Coursedinner, Lunch, Main Course
CuisineMexican
Keywordal carbon, pico de gallo, Steak Tacos, taco tuesday, tacos, tacos al carbon
Servings2 servings

Ingredients

  • 1 1b paper thin steak (ribeye, top round, sirloin)
  • extra virgin olive oil
  • salt and pepper
  • 1 onion, sliced in thick slices
  • Pico de Gallo
  • 4 flour tortillas

Avocado Pico de Gallo

  • Tomatoes
  • Purple Onions
  • Jalapeno
  • Cilantro
  • Salt
  • Lime Juice

Instructions

  • I didn't add amounts because you can use this recipe to make any amount. Dice the tomato, onions, jalapeno, cilantro and toss. Dice the avocado and add to the mixture. Add the lime juice and a little salt. Start with one lime and a little salt, then adjust as needed or to your taste.   This won't keep a long time because all the ingredients are fresh but it won't last anyway…it is addictive!!
  • Start your gas grill, get your charcoal grill ready, whatever method you are using. Add a little olive oil to the onion slices and salt them. Place them on the grill, or an alternative is to wrap it in foil and place it on the grill.
  • Add a little extra virgin olive oil to the beef slices. Sprinkle with salt. Heat the grill you are using, charcoal or gas. When hot add the steak and cook until no red is showing, flip and cook the other side. This literally takes minutes. When done remove from the heat and tent with foil and allow to rest.
  • Cut the beef into cubes, or small bites. Heat your tortillas on a hot griddle or skillet. Place flour tortillas on a plate, add the grilled onions, top with the Avocado Pico de Gallo. Serve with lime wedges and your favorite salsa if you like!
    Enjoy!

Filed Under: Beef Tagged With: al carbon, authentic mexican food, mexican food, Pico de Gallo, ribeye steak, tacos

  • « Go to Previous Page
  • Page 1
  • Interim pages omitted …
  • Page 27
  • Page 28
  • Page 29
  • Page 30
  • Page 31
  • Interim pages omitted …
  • Page 65
  • Go to Next Page »

Primary Sidebar

Categories

  • Appetizer
  • Beans, Lentils, Grains, Rice
  • Beef
  • Bread
  • Breakfast/Brunch
  • Cocktails
  • Dessert
  • Dishes of Mexico, Tex Mex and New Mexico Red and Green Chile
  • Fish/Seafood
  • Ice Cream
  • Pasta
  • Pizza
  • Pork
  • Poultry
  • Salad Dressings
  • Salads
  • Salsas
  • Sandwiches/Burgers/Hot Dogs
  • Sauces, Compound Butters, Condiments
  • Side dish
  • Soups/Stews/Gumbo//Chili
  • Stocks, Broths, Gravies
  • Vegetables

Copyright © 2026 The 2 Spoons on the Foodie Pro Theme

Rate This Recipe

Your vote:


A rating is required
A name is required
An email is required