• Skip to primary navigation
  • Skip to main content
  • Skip to primary sidebar

A cook named Rebecca

  • Home
  • Favorite Cookbooks
  • Recipes
  • Travel
You are here: Home / Home

Perfect Sesame Roasted Asparagus with Whipped Herbed Boursin Cheese

May 19, 2019 by Becky Spoon

Please follow and like us:
onpost_follow
fb-share-icon
Tweet
Roasted asparagus
Roasted asparagus

Want to jazz up your roasted asparagus a little? I saw this recipe from Halfbaked Harvest and I had to try it! Absolutely delicious. Tieghen’s recipe used whipped feta, but I had some harlic and herb Boursin Cheese I needed to use and it was perfect.

Roasted asparagus

Asparagus is a go to vegetable for me because it seems to always be available. I’ve always wanted to attempt to grow it, but I never have. If you’re interested here’s a link to give you some information. http://www.almanac.com/plant/asparagus

Sesame Roasted Asparagus with Whipped Herbed Boursin Cheese

This recipe is lemony, loaded with garlic and gets a kick from the red pepper flakes. It is also a really pretty dish to serve. I served it alongside a roasted chicken for a Sunday dinner. https://the2spoons.com/lemon-and-garlic-roast-chicken/

Here’s the recipe!! Enjoy!!

Sesame Roasted Asparagus with Whipped Boursin Cheese

Print Recipe
Courseeasy side dish
CuisineAmerican
Servings4 Servings

Ingredients

  • 1 cup croutons
  • 1/4 cup extra virgin olive oil
  • 1 large bunch asparagus, ends trimmed
  • 2 tbsps sesame seeds, raw
  • zest of one lemon
  • 2 cloves garlic, smashed
  • 1 pinch red pepper flakes
  • kosher salt and black pepper
  • 2 tbsp apple cider vinegar
  • 1 tsp honey

Whipped Boursin Cheese

  • 5.2 oz boursin cheese
  • 1/4 cup plain Greek yogurt
  • 2 tbsp extra virgin olive oil

Instructions

  • Preheat the oven to 425 degrees F.
    In a 9×13 inch baking dish, toss together the 1/4 cup olive oil, asparagus, sesame seeds, lemon zest, garlic, crushed red pepper flakes, salt and pepper. Transfer to the oven and roast for 20-25 minutes or until the asparagus is lightly charred. Remove from the oven and remove the asparagus from the baking dish.
    Let the oil cool slightly in the dish, then add the vinegar and honey. Reserve this oil mix for serving over top. 
    Meanwhile, make the cheese. In a food processor, combine the boursin cheese, greek yogurt, and olive oil. Pulse until completely smooth and creamy, scraping down the sides if needed, about 3 minutes. Add a pinch of pepper. Pulse to combine. The cheese mixture can be kept in the fridge for up to 3 days. 
    To serve, spread the cheese mixture out onto a large serving plate or shallow bowl. Spoon the asparagus over top and then drizzle on the reserved oil mix. Top with croutons. Serve warm or at room temp. 
Roasted asparagus
  • Share on Pinterest (Opens in new window) Pinterest
  • Share on Facebook (Opens in new window) Facebook
  • Email a link to a friend (Opens in new window) Email
  • Print (Opens in new window) Print
  • Share on X (Opens in new window) X
  • Share on Tumblr (Opens in new window) Tumblr
  • More
  • Share on Reddit (Opens in new window) Reddit

Filed Under: Vegetables

The Best Enchiladas Con Carne

May 6, 2019 by Becky Spoon

Enchiladas con Carne
Please follow and like us:
onpost_follow
fb-share-icon
Tweet
Jump to Recipe
Enchiladas con Carne
Enchiladas Con Carne

If you love Tex-Mex as much as we do, this is the enchilada recipe for you. This is a from-scratch Enchiladas Con Carne that will bring back memories of the best enchiladas you have had!

Growing up, Mom would make wonderful enchiladas using a can of store-bought chili like Hormel or Wolf. http://www.hormel.com/Recipes. They were delicious. She’d put onions and cheese in the tortillas that she had softened in oil, roll them up then smother them in the chili. So good.

Now I kind of would rather make an enchilada sauce from scratch rather than adding a can of store-bought chili, so this is my answer. A plus is that all the recipes that you can make with a can of chili can be made with this chili con carne!

Enchiladas Chili Con Carne

I served my Guacamole and chips with this dish, and of course, I had my refried beans and rice. The guacamole was delicious! Here’s the recipe: https://the2spoons.com/easy-homemade-guacamole/

Can’t wait for you to make this!

Enchiladas con Carne

Enchiladas Chili Con Carne

Print Recipe
Coursedinner, Lunch, Main Course
CuisineMexican, Texmex
KeywordEnchiladas Con Carne

Ingredients

For the Chili Con Carne

  • 1/2 cup All purpose flour
  • 2 tbsp neutral oil, like canola
  • 1 lb ground beef like chuck that is 20 percent fat
  • salt and pepper to taste
  • 1 medium white onion, peeled and chopped
  • 2 cloves garlic, peeled and minced
  • 1 jalapeno pepper or more to taste, seeds removed if yu want it less spicy, stemmed and chopped
  • 1 cup chopped or canned crushed tomatoes
  • 3 tbsp chile powder
  • 1/2 tsp ground cumin
  • 1/2 tsp dried oregano, ideally Mexican
  • 2 cups chicken stock, ideally homemade

For the Enchiladas

  • 1/2 cup neutral oil, like canola
  • 12 corn tortillas
  • 3 cups shredded cheese, 1 1/2 cups cheddar and 1 1/2 cups velveeta
  • 1 medim size white onion, peeled and chopped

Instructions

  • Prepare the chili con carne: Put flour in a large sautĂ© pan set over medium-high heat. Cook, stirring frequently, until it begins to turn golden brown and smell nutty, then pour it onto a plate to cool.
    Wipe out sauté pan and return it to high heat with 2 tablespoons oil. When the oil is hot and shimmery, add ground beef to pan, and cook, breaking it up with a fork and stirring, until it is well browned about 12 to 15 minutes. Season with salt and pepper, then use a slotted spoon to remove meat to a bowl, leaving drippings behind.
    Add onion, garlic, and jalapeño to pan and cook, stirring to scrape up any browned bits of meat, for 10 to 12 minutes, or until vegetables are soft. Stir in tomatoes and cook until their liquid has evaporated, then add chile powder, cumin, and oregano and stir to combine. After a minute or so, when the mixture begins to turn fragrant, return browned meat to the pan, along with toasted flour, and stir well to combine.
    Lower heat to medium-high and slowly stir in chicken stock, 1/2 cup at a time until mixture has thickened and started to simmer. Lower heat again and allow chili to cook slowly for 45 minutes to 1 hour until meat is tender. Add more stock or water if needed. Use immediately, or let cool, cover and refrigerate for up to a few days.
    When you are ready to cook the enchiladas, heat oven to 425 degrees. In a medium sauté pan set over medium-high heat, heat 1/2 cup neutral oil until it begins to shimmer. Using tongs or a wide spatula, place a tortilla in the hot fat; it should start to bubble immediately. Heat tortilla for about 10 seconds a side, until soft and lightly browned. Remove tortilla and set on a rack set over a baking pan, or just on a baking pan if you don’t have a rack. Repeat with remaining tortillas, working quickly.
    Assemble the enchiladas: Using a ladle put about 1/2 cup chili in the bottom of a 9-by-13-inch baking pan and spread it out a little. Roll a few tablespoons of cheese into each tortilla, along with a tablespoon or so of chili, then place it seam-side down in the pan, nestling each one against the last. Ladle remaining chili over top of rolled tortillas and sprinkle with remaining cheese.
    Transfer to oven and bake until sauce bubbles and cheese is melted about 10 to 15 minutes. Sprinkle chopped onions over the top, if using, and serve immediately.
Enchiladas con Carne
Enchiladas Con Carne
Homemade Guacamole
Homemade Guacamole
  • Share on Pinterest (Opens in new window) Pinterest
  • Share on Facebook (Opens in new window) Facebook
  • Email a link to a friend (Opens in new window) Email
  • Print (Opens in new window) Print
  • Share on X (Opens in new window) X
  • Share on Tumblr (Opens in new window) Tumblr
  • More
  • Share on Reddit (Opens in new window) Reddit

Filed Under: Beef

Amazing and Delicious Guacamole

May 6, 2019 by Becky Spoon

Homemade Guacamole
Please follow and like us:
onpost_follow
fb-share-icon
Tweet
Jump to Recipe
Guacamole

I’ve been posting so many recipes for game day lately and I realized I had not posted a guacamole recipe! You have to have this on game day! Did you know they say there will be 65 Million avocados used on Super Bowl Game Day? Wow, that’s a lot of avocados!

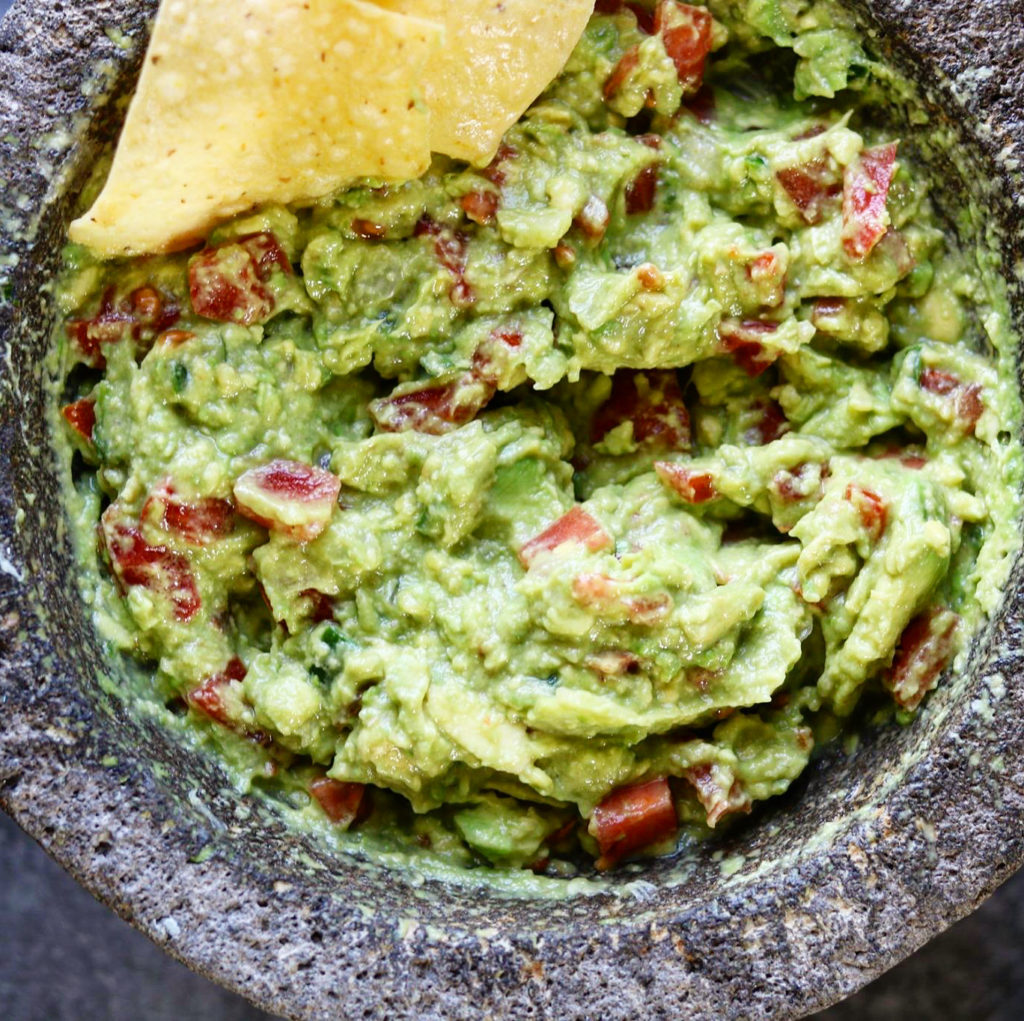
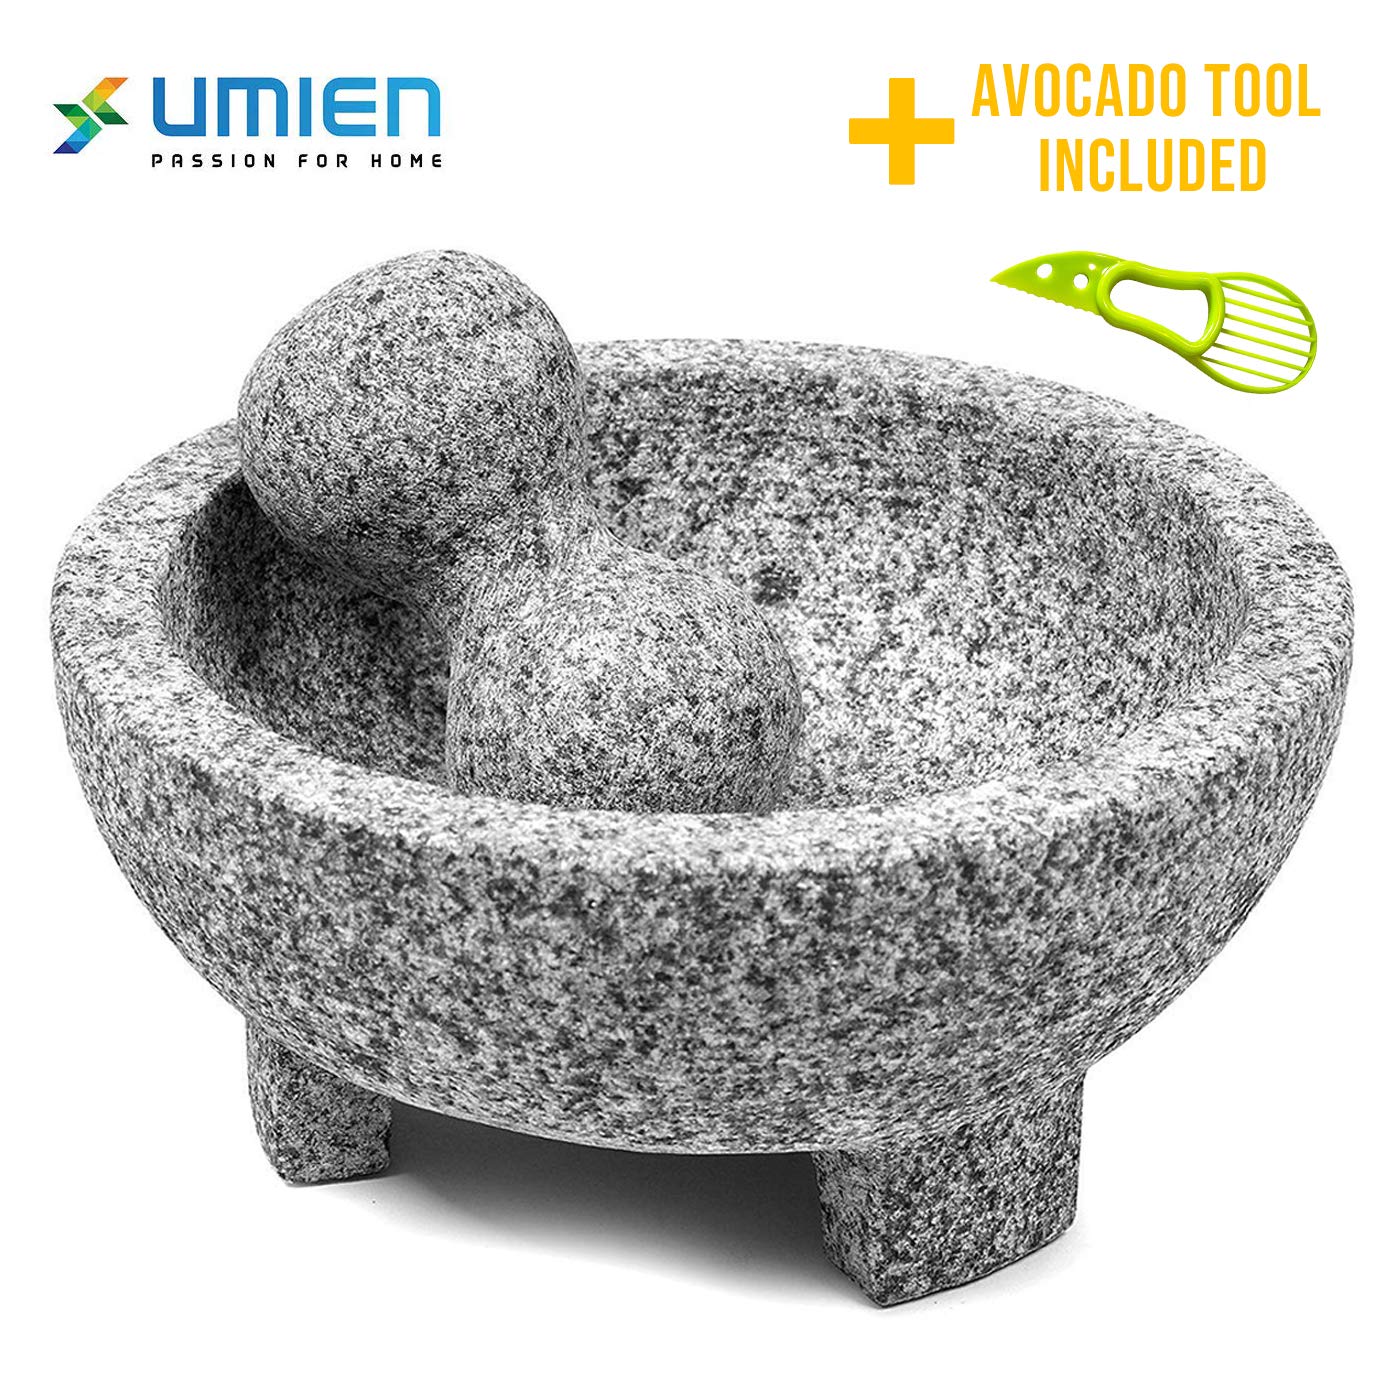
I used a Molcajete for this homemade recipe, but if you don’t have one, you can mince the jalapeno, onions and garlic very fine. The Molcajete works really well though so if you can get one, you really should. You are able to grind the peppers and garlic with salt that really adds to the flavor.

Here’s a link for a Molcajete: https://amzn.to/2Seeu0g

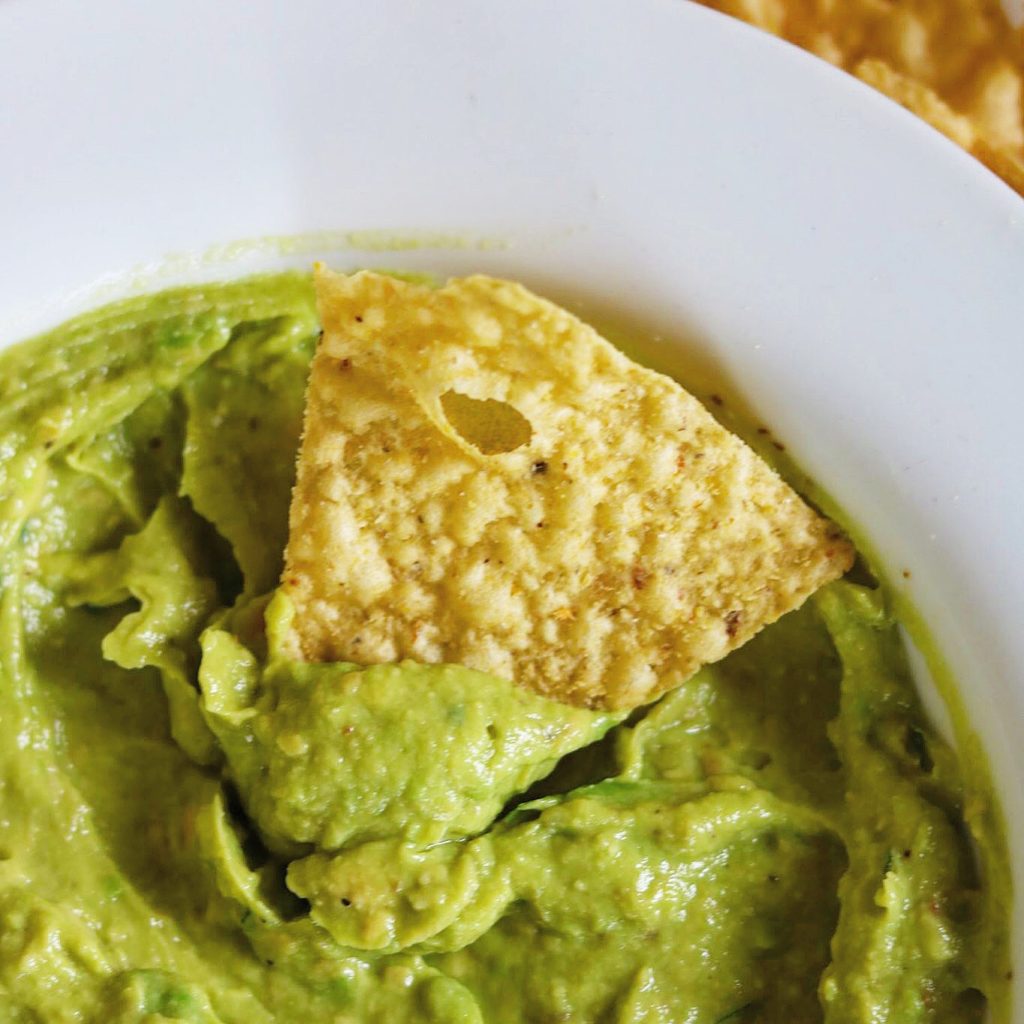
We love guacamole, as I’m sure you probably do too. Sometimes, I just add lots of lemon with lots of salt and that is as simple as you can possibly get, but still a good to dip some chips in or to top your tacos!

Easy Guacamole

However, when I want to make a special guacamole, or add a lot more punch I dig out my Molcajete and start grinding fresh serrano or jalapenos, white onions and garlic until a paste forms. Then I add lemon juice and some chopped tomatoes, season well and there you go! A delicious dip!

Easy Homemade Guacamole

Love this recipe and it went so fast!! I wish I had a trick to keeping guacamole fresh longer, but I have learned when I use a container that the guacamole fits into the brim and you put the lid on tight, it last longer. I think the tightness of the ingredients in the container with a tight lid keeps air from coming in. Anyway, here’s my easy recipe!! Sereve this with some of my breakfast tacos or on some of my enchiladas like https://the2spoons.com/new-mexico-hatch-red-and-green-chile-enchiladas/

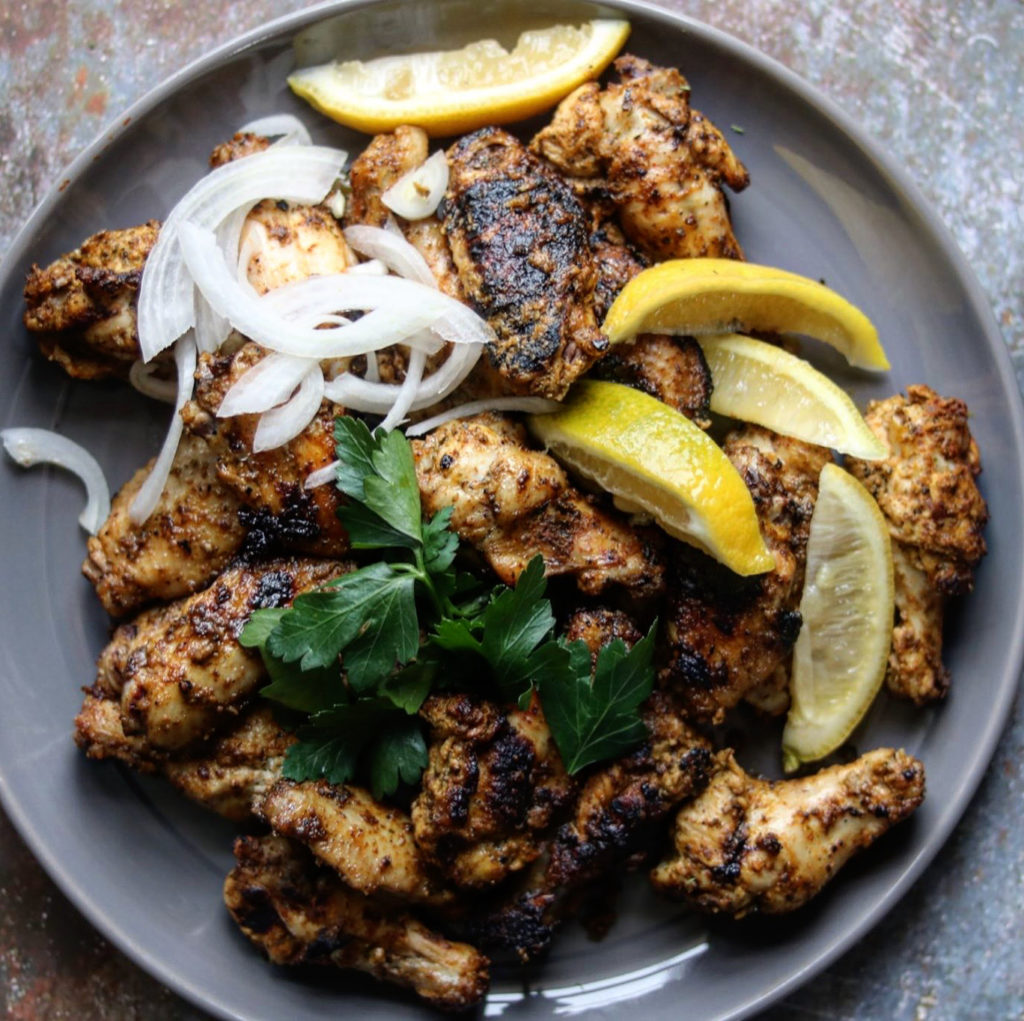
Here’s some more Game Day recipes: Frank’s RedHot Buffalo Wings, https://the2spoons.com/perfect-for-game-day-tandoori-chicken-wings/, Tandoori Chicken Wings.

Frank’s RedHot Buffalo Wings
Tandoori Chicken Wings

Easy Homemade Guacamole

Here’s the recipe! Enjoy

Homemade Guacamole

Easy Homemade Guacamole

Print Recipe
CourseAppetizer
CuisineMexican, Texmex
Servings4 servings

Ingredients

  • 3 or 4 avocados
  • 1-2 serrano or jalapeno chile, seeded and finely chopped
  • 2 tbsp diced white onion
  • 2 garlic cloves
  • juice of 1/2 to 1 lemon (I just taste after I add a little)
  • 1 roma tomato diced
  • salt to taste
  • fresh ground pepper (optional)

Instructions

  • If using a molcajete, place your chile, garlic and a little salt in the bottom and grind until the desired consistency of your chile and onions. Add your avocado and mash.  At this point, it is pretty much done but you want to add your lemon and salt to taste.  After you get your seasoning and lemon as you want it, add the tomatoes and combine.  Store refrigerated until ready to use.  
  • Share on Pinterest (Opens in new window) Pinterest
  • Share on Facebook (Opens in new window) Facebook
  • Email a link to a friend (Opens in new window) Email
  • Print (Opens in new window) Print
  • Share on X (Opens in new window) X
  • Share on Tumblr (Opens in new window) Tumblr
  • More
  • Share on Reddit (Opens in new window) Reddit

Filed Under: Dishes of Mexico, Tex Mex and New Mexico Red and Green Chile, Appetizer Tagged With: appetizer, avocado, easy, Game Day, game day food, guacamole

Yummy! Roast Chicken Thighs with Peas & Mint

April 28, 2019 by Becky Spoon

Roast Chicken Thighs with Peas and Mint
Please follow and like us:
onpost_follow
fb-share-icon
Tweet
Roast Chicken Thighs with Peas and Mint

I think these roast chicken thighs just look like spring and they sure have springtime ingredients. Peas, scallions and mint are essential spring ingredients. Oh, and I forgot the leeks! After tasting these leeks in this dish I wonder why I don’t cook with them more often! They have such a mild flavor, yet so delicious!

This is another recipe I got from the Bon Appetit April 2019 issue. I pretty much followed the recipes as I had the ingredients, but I did soak the chicken overnight in buttermilk, something the recipe did not call for. The buttermilk just makes chicken even more juicy and tender. https://thekitchenadvisor.com/good-soak-chicken-buttermilk/

Yummy! Roast Chicken Thighs with Peas & Mint

I served this dish with chunky garlic mashed potatoes: https://the2spoons.com/chunky-garlic-mashed-potatoes-with-scallions/ This was a perfect combination!

Can’t wait for you to try this too!! It is so yummy!! My cowboy loves it too!!

Roast Chicken Thighs with Peas and Mint

Roast Chicken Thighs with Peas & Mint

Print Recipe
Coursedinner, Main Course
CuisineAmerican
KeywordRoast Chicken Thighs

Ingredients

  • 6 Skin-on, bone in chicken thighs
  • 1 Tbsp Coriander
  • Kosher salt
  • 2 Tbsps Extra virgin olive
  • 3 Large leeks, white and pale green parts only, sliced 1/2 inch thick
  • 4 Garlic cloves, thinly sliced
  • 5 Strips lemon zest
  • 2 Bay leaves
  • 1/3 Cup Dry white wine
  • 1 1/2 Cups Chicken broth
  • 1 Cup Fresh or frozen peas
  • 1 Cup Mint leaves, torn if large

Instructions

  • Preheat oven to 350°. Pat chicken thighs dry; sprinkle flesh side with coriander. Season generously all over with salt.
    Heat oil in a large high-sided or cast-iron skillet over medium. Cook chicken, skin side down, undisturbed, until thighs release easily from pan, about 4 minutes. Continue to cook, scooting chicken around occasionally for even browning, until golden brown, about 5 minutes more. Transfer chicken to a plate, skin side up.
    Pour out all but 2 Tbsp. fat from skillet and return to medium heat. Add leeks and garlic and cook, stirring occasionally, until slightly softened, about 3 minutes. Add lemon zest and bay leaves and cook, stirring, until fragrant, about 20 seconds. Pour in wine, scraping up any brown bits stuck to bottom of pan with a wooden spoon. Cook until wine is almost completely evaporated, about 3 minutes. Add broth and bring to a simmer. Return chicken to skillet, arranging skin side up. Transfer skillet to oven; roast chicken until cooked through and juices run clear when poked with a paring knife, 15–20 minutes. Transfer chicken to a plate.
    If using fresh peas, cook in same skillet over medium heat until tender and bright green, about 3 minutes. If using frozen, cook just until warmed through, about 1 minute. Toss in mint; season with more salt if needed. Arrange vegetables and chicken in a large shallow bowl or on a platter.
Roast Chicken Thighs with Peas and Mint
Garlic Mashed Potatoes
  • Share on Pinterest (Opens in new window) Pinterest
  • Share on Facebook (Opens in new window) Facebook
  • Email a link to a friend (Opens in new window) Email
  • Print (Opens in new window) Print
  • Share on X (Opens in new window) X
  • Share on Tumblr (Opens in new window) Tumblr
  • More
  • Share on Reddit (Opens in new window) Reddit

Filed Under: Poultry

Easy – Chunky Garlic Mashed Potatoes with Scallions

April 28, 2019 by Becky Spoon

Please follow and like us:
onpost_follow
fb-share-icon
Tweet
Garlic Mashed Potatoes

I purposely made these garlic mashed potatoes a little chunky because I was serving them with a chicken dish and I wanted them to not just melt away. They are still soft, but when I say chunky it’s only because I used a hand potato masher rather than whipping them with a mixer.

Garlic Mashed Potatoes

I think they just look so springtime with the scallions! I used heavy cream; however, I usually don’t, but I decided today I would. I have found an alternative to milk with lactose that I use when cooking for my mother, and I can’t tell the difference in it and regular whole milk. Here’s the link, it’s really good if you haven’t tried: https://fairlife.com

Not only are these delicious but they are so easy and quick!! I served these as a side dish for my Roast Chicken Thighs with Peas and Mint! Perfect side dish for the chicken. https://the2spoons.com/springtime-roast-chicken-thighs-with-peas-mint/

Garlic Mashed Potatoes

Easy – Chunky Garlic Mashed Potatoes with Scallions

Print Recipe
Courseeasy side dish, Side Dish, Vegetable
CuisineAmerican
Prep Time20 minutes minutes
Cook Time20 minutes minutes
Total Time40 minutes minutes
Servings2 Servings

Ingredients

  • 3 Cups Diced potatoes
  • 2 Cloves garlic, peeled
  • Salt and pepper
  • 3 Tbsps Butter
  • 1 Green end of a green onion sliced
  • 1/4 Cup Milk or cream

Instructions

  • Boil your potatoes and garlic in salted water until tender. Drain and add butter. Mash by hand or mixer, check for salt and pepper. Add your cream or milk a little at a time until you reach the right consistency. Place in a serving bowl and add sliced green onion tops. 
Roast Chicken Thighs with Peas and Mint
  • Share on Pinterest (Opens in new window) Pinterest
  • Share on Facebook (Opens in new window) Facebook
  • Email a link to a friend (Opens in new window) Email
  • Print (Opens in new window) Print
  • Share on X (Opens in new window) X
  • Share on Tumblr (Opens in new window) Tumblr
  • More
  • Share on Reddit (Opens in new window) Reddit

Filed Under: Vegetables

wonderful – flaky buttermilk biscuits.

April 28, 2019 by Becky Spoon

Homemade Buttermilk Biscuits
Please follow and like us:
onpost_follow
fb-share-icon
Tweet
Jump to Recipe
Buttermilk Biscuits
Buttermilk Biscuits

This morning I really wanted homemade buttermilk biscuits and sausage gravy. I kept putting it off, thinking I probably shouldn’t, but you know, sometimes you just have to! You know, my Southern roots win over sometimes, and biscuits and gravy is something I grew up with. There probably isn’t a southern restaurant open for breakfast in Texas that doesn’t have biscuits and gravy on the menu.

Buttermilk Biscuits

I’ve posted my biscuits recipe before, but this recipe is worth posting over and over again and again. Honestly, I think they take me 5 minutes to throw together! To make these biscuits from scratch is probably as quick to make as it is to open a can or cook from a frozen state! If you haven’t made homemade before and you make these, you will probably never buy a can of biscuits again!

Always perfect for breakfast, they are equally good for dinner with southern fried chicken or chicken fried steak and a skillet of cream gravy!

My Easy Buttermilk Biscuits

I make these biscuits with cold butter that I always grate with a box grater. I grate the butter over the flour mixture and then I work into my dry ingredients. You can use a pastry cutter if you like. This is the pastry cutter I have and sometimes use. https://amzn.to/3g7TgeN.

Buttermilk Biscuits

The key to a flaky biscuit is to fold it several times. After you dump the scrappy dough onto a floured surface, bring it together, pat or roll it out into a rectangle and fold it like a piece of paper for an envelope. Turn it and do that at least 2 more times. Every time you fold it creates layers to your biscuit. I was much more careful to do this today when baking and they turned out to be the most tender delicious biscuits I’ve made!

In addition to the above, I chill my biscuits before baking. Here are the benefit of chilling:

  • Tenderness. Chilling relaxes the gluten, resulting in more tender biscuits. 
  • Shape and rise.The butter hardens during chilling, so it takes longer to melt while baking, giving the biscuits more time to rise and keep their shape. 
  • Fat consistency. Chilling firms up the fat in the dough, which prevents the biscuits from spreading too much in the oven.  

An additional tip is:

Ingredient temperature. It’s important to use cold butter and buttermilk, as warm ingredients can result in layer-less biscuits.


A good biscuit cutter is essential too. You want a cutter that you don’t have to twist when you are cutting them. You just want a cutter that cus and you can lift. Here’s the one I use https://amzn.to/31xvtz2.

Another item I use that I find essential is parchment paper. I line my pan with parchment paper for more even browsing on the bottom and to insure they don’t brow n too much. https://amzn.to/38jdyzy

Here’s the link for the Sausage Gravy: https://the2spoons.com/flaky-buttermilk-biscuits-with-sausage-gravy/. So delicious and I know your family will love this.

Buttermilk Biscuits and Sausage Gravy

Here’s another recipe for biscuits and gravy with hash which is amazing too: https://the2spoons.com/potato-smoked-sausage-hash-biscuits-gravy/

Potato & Smoked Sausage Hash & Biscuits & Gravy

Here’s the recipe! Enjoy!

Buttermilk Biscuits

Print Recipe
CourseBread, Breakfast, brunch, dinner, Lunch
CuisineAmerican
Keywordbiscuits, bread, breakfast, brunch, buttermilk biscuits, Easy, homemade, homemade biscuits

Ingredients

  • 2 1/2 Cups All purpose flour (spoon and leveled)
  • 1.5 Tsp Salt
  • 1/2 baking soda
  • 2 Tsp Baking powder
  • 1/2 Cup Butter, cold and grated or shortening
  • 1 Cup plus 2 tablespoons cold buttermilk
  • 2 tsps honey or sugar
  • melted butter for brushing

Instructions

  • Preheat the oven to 425 degrees F. Add the flour, salt, and baking powder to a large bowl. Grate the cold butter into the dry ingredients and with a pastry cutter, two forks or my favorite, your hands, cut the butter into the flour until coarse crumbs form. Make a well in the center of the mixture and add the buttermilk and the honey. Stir just to combine. Do not overwork.
    Turn the dough out onto a lightly floured work surface and gently mold it into a rough looking rectangle using your hands. Fold one side into the center, then the other side. Turn the dough so it’s long horizontally. Gently flatten. Repeat the folding again. Turn the dough so it’s long horizontally once more. Gently flatten. Repeat the folding one more time.Gently roll the dough out with a rolling pin until it’s 1 inch thick. Cut into 3-inch circles. Re-roll any scraps until you have 9-12 biscuits. Arrange in a 10-inch cast iron skillet or close together on a parchment paper-lined baking sheet. (Make sure they’re touching.)Brush the tops with a little buttermilk. I place my biscuits in the refrigerator for about 30 minutes or in the freezer for about 10 minutes before baking. This allows the butter to get very cold gain
    Bake for 15 minutes or until biscuits are golden brown on top.
    Brush the tops with butter. Enjoy warm! Place the leftover biscuits in a zip lock back or air tight container and store in the refrigerator for 4 or 5 days.

  • Share on Pinterest (Opens in new window) Pinterest
  • Share on Facebook (Opens in new window) Facebook
  • Email a link to a friend (Opens in new window) Email
  • Print (Opens in new window) Print
  • Share on X (Opens in new window) X
  • Share on Tumblr (Opens in new window) Tumblr
  • More
  • Share on Reddit (Opens in new window) Reddit

Filed Under: Breakfast/Brunch Tagged With: biscuits, buttermilk biscuits, homemade, Homemade buttermilk biscuits

  • « Go to Previous Page
  • Page 1
  • Interim pages omitted …
  • Page 46
  • Page 47
  • Page 48
  • Page 49
  • Page 50
  • Interim pages omitted …
  • Page 66
  • Go to Next Page »

Primary Sidebar

Categories

  • Appetizer
  • Beans, Lentils, Grains, Rice
  • Beef
  • Bread
  • Breakfast/Brunch
  • Cocktails
  • Dessert
  • Dishes of Mexico, Tex Mex and New Mexico Red and Green Chile
  • Fish/Seafood
  • Ice Cream
  • Pasta
  • Pizza
  • Pork
  • Poultry
  • Salad Dressings
  • Salads
  • Salsas
  • Sandwiches/Burgers/Hot Dogs
  • Sauces, Compound Butters, Condiments
  • Side dish
  • Soups/Stews/Gumbo//Chili
  • Stocks, Broths, Gravies
  • Vegetables

Copyright © 2026 The 2 Spoons on the Foodie Pro Theme

Rate This Recipe

Your vote:


A rating is required
A name is required
An email is required