• Skip to primary navigation
  • Skip to main content
  • Skip to primary sidebar

A cook named Rebecca

  • Home
  • Favorite Cookbooks
  • Recipes
  • Travel
You are here: Home / Home

Delicious Homemade Chorizo with Eggs, Hashbrowns, and Refried Beans

June 25, 2019 by Becky Spoon

Homemade Chorizo
Please follow and like us:
onpost_follow
fb-share-icon
Tweet
Jump to Recipe
Homemade Chorizo
Homemade Chorizo

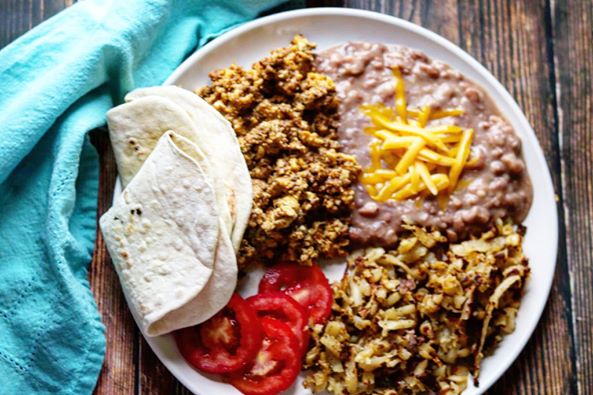
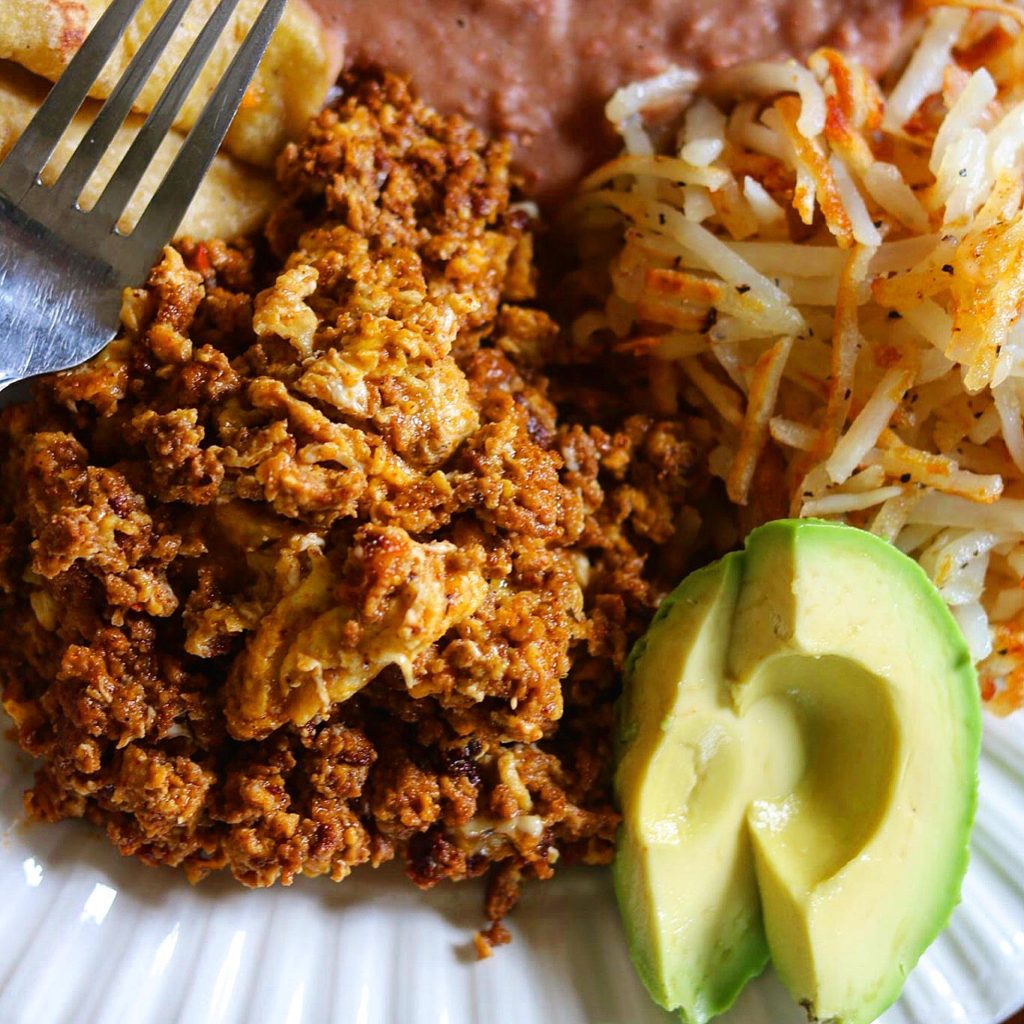
This Homemade Chorizo with Eggs, Hashbrowns and Refried Beans is one of Allen’s favorite breakfast! Mine too for that matter because we love all things Mexican food. When we go to a Mexican restaurant for breakfast, this is a menu item that we love to order. Just delicious! Add your favorite salsa, sliced avacados or guacamole and you’re set!

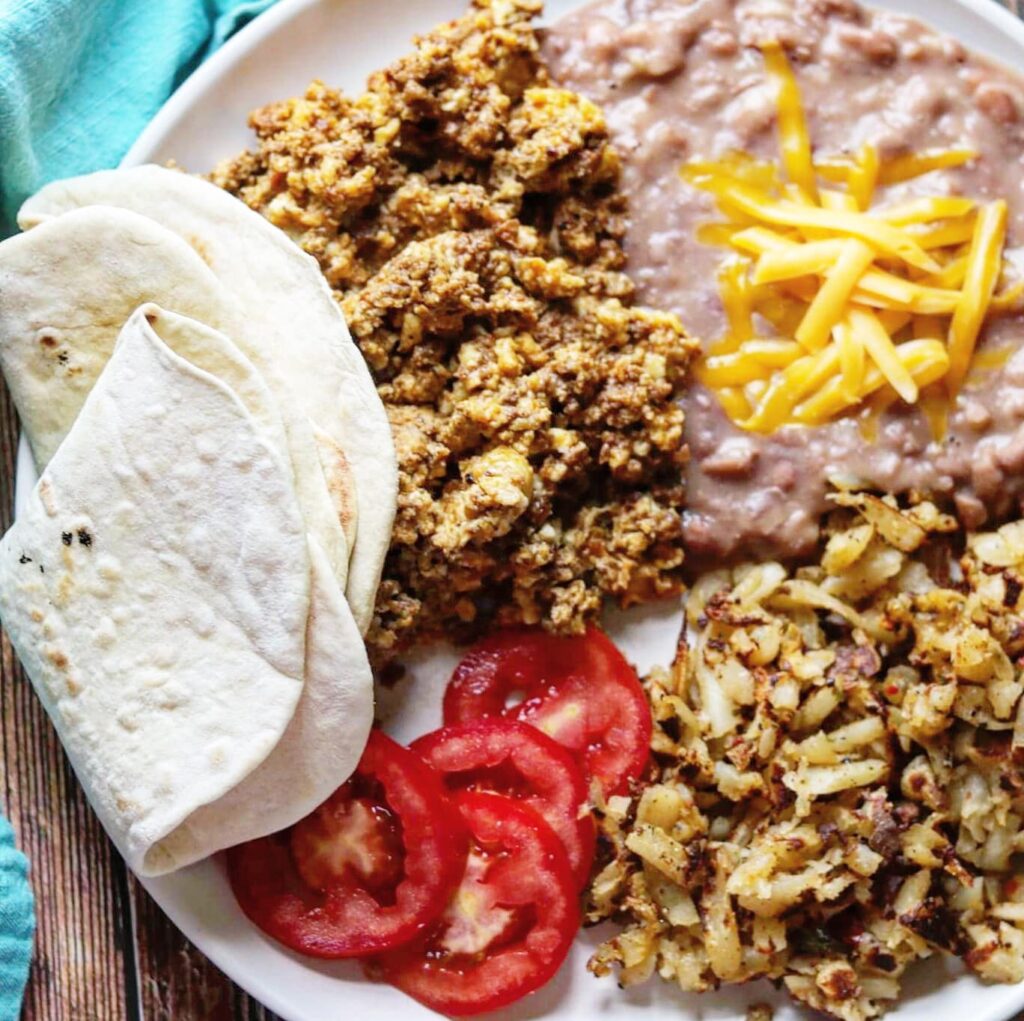
This is how Allen likes to eat this breakfast. Sometimes if it’s just me, I’ll just make breakfast tacos with the same ingredients and just fold them in a tortilla.

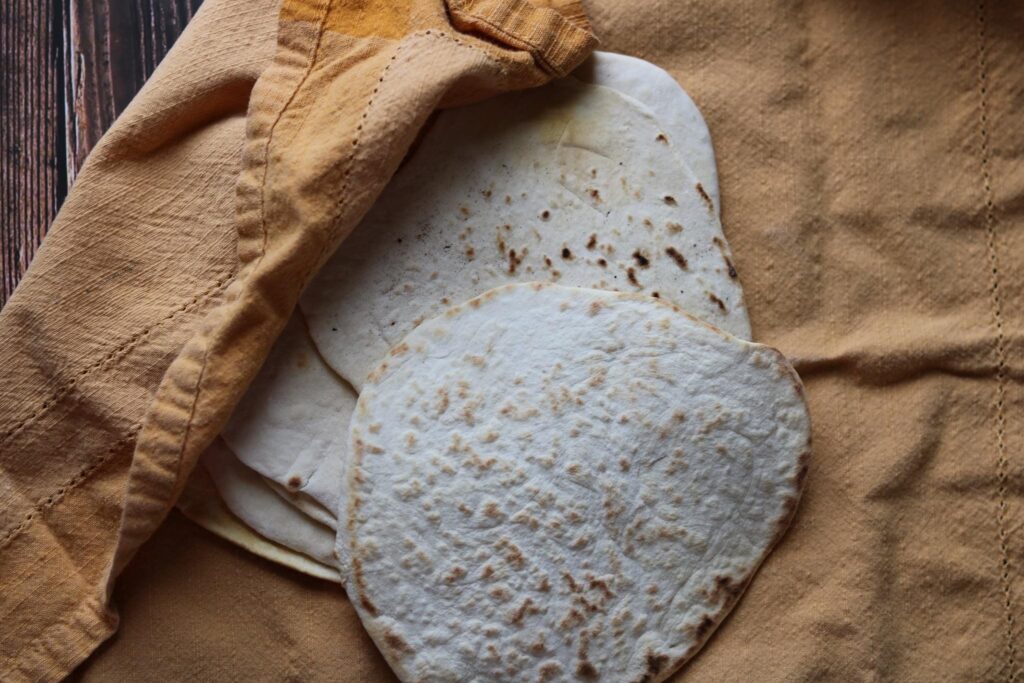
I made homemade flour tortillas this time, but I don’t always. Wow! I can’t tell you how much difference it makes with homemade. They are very simple! For 12 tortillas I used 2 cups all purpose flour, 1/2 teaspoon salt, 1 teaspoon baking powder, 1 tablespoon lard (yes, you need to use lard) and about 3/4 cup warm water. I made mine in a food processor but you can knead by hand.

After you combine your dry ingredients, combine your lard and mix together using your fingers or processor until your flour resembles cornmeal. Add the water and mix until the dough comes together. If you are kneading on your countertop, just add a little flour and knead several times. Divide into 12 equal pieces and roll each piece into a ball. Preheat a large skillet. Using a well floured rolling pin roll each ball into a round tortilla. They do not have to be perfectly shaped!

If you don’t want to make completely from scratch, the prepared tortilla mix that you just add flour is great also. This is the brand I have used and it is delicious!

Homemade Flour Tortillas

Delicious Homemade Chorizo with Eggs, Hashbrowns, and Refried Beans

I started making homemade Mexican chorizo because it seemed the chorizo I bought from the store had good flavor but it was very greasy! It seemed like after cooking some of it and draining, there was hardly any left! This homemade chorizo is loaded with those same flavors but not greasy at all! It is delicious! You can make this recipe with beef, pork or even ground turkey or chicken!

Don’t confuse the Mexican Chorizo that is uncured with Spanish Chorizo that is cured. In Texas we mostly find Mexican Chorizo and only find Spanish chorizo in finer grocery stores. Spanish Chorizo will come in a casing, it is firm, and you have to dice it to cook it. Delicious as it is, it is different than the Mexican Chorizo we are used to in Texas.

Homemade Chorizo with Eggs, Hashbrowns, and Refried Beans

After you make this chorizo you will never want to buy store bought again, unless you can finda a really good brand you like! I just make it and freeze it in half a pound portions. When i get ready for it I just let it thaw overnight, then I’m ready for my breakfast or other recipe. There are so many uses for Mexican chorizo. you can make the Cowboy Beans or Charro Beans and it is a great ingredient in a spicy pasta dish. Here’s some other uses from the Cooking Channels website: https://www.cookingchanneltv.com/devour/2013/07/25-ways-to-use-chorizo

Delicious Homemade Chorizo with Eggs, Hashbrowns and Refried Beans

Homemade Chorizo

The refried beans are essential to this dish in my opinion! You can purchase the prepared in a can which are good. If you do purchase, buy a good brand. I always heat them by adding a little oil to a skillet, adding the beans and if they need to be thinned a little, I will add just enogh water to do so. I really like to make them from scratch though because they’re just so much better. Here’s my recipe for the beans: https://the2spoons.com/pinto-beans-for-refried-beans/

Hope you enjoy this recipe!! Great for breakfast any day of the week!!

Homemade Chorizo with Eggs, Hashbrowns, and Refried Beans

Print Recipe
Course Breakfast
Cuisine Mexican

Ingredients
  

For the Chorizo

  • 1 lb 80/20 ground beef or chuck, pork, or turkey will work too
  • 1/4 cup cider vinegar
  • 2 tbsp chili powder
  • 1 tbsp paprika (I used smoked)
  • 1 tsp ground cumin
  • 1 tsp salt
  • 1 tsp garlic powder
  • 1/2 tsp ground coriander
  • 1/2 tsp dried oregano, crushed
  • 1/4 tsp red pepper flakes
  • 1/8 tsp ground cloves
  • 1/8 tsp ground black pepper

For the Refried Beans

  • See the link below or
  • 1 can your favorite refried beans

For the Eggs and Chorizo

  • 1 lb chorizo
  • 6-8 extra large eggs, beaten
  • grated cheddar cheese (optional)

For the Hashbrowns

  • 1 20 OZ PKG Simply Potato Brand Hashbrowns, or your favorite homemade hashbrowns

Heated Corn or Flour Tortillas for serving

Instructions
 

For the Chorizo:

  • Combine chili powder, paprika, cumin, salt, garlic powder, coriander, oregano, red pepper flakes, ground cloves and black pepper in mixing bowl and stir until well combined.
    Add cider vinegar and stir until dry ingredients are moistened.
    Add ground meat and knead until spice mixture is well incorporated into the meat.
    You can use the chorizo immediately, but for best flavor development, place chorizo mixture in an airtight container and store overnight in fridge.
    If I'm only using a portion, I divide in freezer bags and store for the next use.

To make the breakfast:

  • Brown your hashbrowns in a skillet with a little oil until lightly browned. Heat your refried beans in a saucepan.
  • Break your eggs into a bowl and whisk to combine. Brown your chorizo in a skillet with a little oil. When done, lightly browned, add your eggs and cook over medium high heat until the eggs are cooked through and set, like making scrambled eggs. Add grated cheese if you desire.
  • Serve in a plate with the hashbrowns and refried beans with plenty of corn or flour tortillas to scoop it up and eat it with! Have plenty of salsa on hand and avocado or guacamole if desired. Enjoy!

Notes

Pinto Beans for Refried Beans
Keyword chorizo, homemade, homemade chorizo, Homemade Chorizo with Eggs, Hashbrowns, and Refried Beans, homemade mexican chorizo, mexicanfood
  • Click to share on Pinterest (Opens in new window) Pinterest
  • Click to share on Facebook (Opens in new window) Facebook
  • Click to email a link to a friend (Opens in new window) Email
  • Click to print (Opens in new window) Print
  • Click to share on X (Opens in new window) X
  • Click to share on Tumblr (Opens in new window) Tumblr
  • More
  • Click to share on Reddit (Opens in new window) Reddit

Filed Under: Breakfast/Brunch Tagged With: breakfast, Chorizo, chorizo with eggs, chorizo with eggs hashbrowns and refried beans, hashbrowns, homemade, homemade chorizo

the best instant pot – pot roast.

June 25, 2019 by Becky Spoon

Beef Pot Roast
Please follow and like us:
onpost_follow
fb-share-icon
Tweet
Jump to Recipe
Pot Roast
Pot Roast

We love a pot roast! One of the reasons I made this roast over the weekend was because I knew I could make several meals from one roast for my husband and this is another opportunity to show others struggling with meals during these difficult times, recipes using the leftovers.

Beef Pot Roast
Beef Pot Roast

I used a chuck roast because I just love that they are well marbled and so tender. Of, course a pot roast of any kind is a slow cook or braised and takes a couple of hours or you can cook in the Instant Pot like I did. Here are other roast you can use:

  • Chuck roast
  • Chuck center roast
  • Chuck eye roast
  • 7-bone chuck roast
  • Arm roast
  • Blade roast
  • Shoulder roast

If you don’t have an Instant Pot, and if you can afford it, here’s a link from Walmart for one of the choices. https://goto.walmart.com/c/2049504/568839/9383?veh=aff&sourceid=imp_000011112222333344&prodsku=696895054&u=https%3A%2F%2Fwww.walmart.com%2Fip%2F696895054

The good thing is you can order this online! Honestly, my Instant Pot saves me hours!

The Best Instant Pot – Pot Roast

So, we know cooking a delicious tender pot roast can take hours, that’s why I love making my roast in the Instant pot. I do most things the same as I would cooking a roast in the oven or stove top, so I start with salt and peppering my roast, then lightlly coating in flour, then sear in oil on the saute mode on your Instant Pot.

After I brown the roast, I added onions, celery and carrots for aromatics along with a bayleaf, fresh thyme and fresh parsley. To this about 4 pound roast I added a little tomato sauce and beef stock which immediately adds richness to your pot roast.

The vegetables I cooked with the pot roast become part of the gravy, so I cook potatoes and carrots separately. When tender, I remove the roast then strain the broth mashing the very soft carrots, onions and celery through my strainer to help thicken the gravy and add so much flavor.

Usually, depending on the size, you can cook a pot roast in 45 minutes in the Instant Pot.

The Best Instant Pot – Pot Roast

One of my favorite uses of the leftovers is hash! Here’s my link for a delicious hash! https://the2spoons.com/easy-leftover-prime-rib-roast-hash/ This is with prime rib roast, but just substitute the chuck roast.

Rib Roast Hash

Also, I love to make a Beef Pot Pie with the leftovers! Delicious! Here’s that link:https://the2spoons.com/easy-beef-pot-pie/

Beef Pot Pie
Beef Pot Pie

Here’s the recipe for my this roast! Enjoy!

Beef Pot Roast

The Best Instant Pot – Pot Roast

Print Recipe Pin Recipe
Servings 6 servings

Ingredients
  

For the Chuck Roast

  • 3-4 lb chuck roast, marbled well
  • 2-3 tbsp extra virgin olive oil for browning the roast
  • Salt and Pepper
  • 1 bay leaf
  • a couple of thyme sprigs, rosemary and parsley
  • a quartered onion, couple of carrots and a celery stick
  • 4 tbsp cups beef broth plus 1 tbsp tomato paste

For the additional potatoes and carrots for serving

  • 6-8 red potatoes, peeled, halfed or quartered if large
  • enough water to top of potatoes
  • 3-4 carrots, peeled and quartered
  • drizzle of extra virgin olive oil
  • 1 sprig of rosemary
  • salt and pepper

For the Gravy

  • 2 tbsp oil
  • 1 tbsp flour
  • the reserved strained broth

Instructions
 

For the Pot Roast:

  • Put your instant pot on sauté. Salt and pepper both sides of the roast and dust each side with flour pressing in so the flour will adhere to the roast. This will help in the browning of your roast. Add the oil and when heated, add the roast and brown on both sides. When browned, toss in the onions, carrots and celery along with the fresh herbs. In a separate bowl, combine the beef broth and tomato paste, then pour over your roast. Set your mode on the instant pot for Meat/Stew for 45 minutes. When the time has lapsed, I unplug the Instant Pot and allow it to release the steam naturally.
    Note 1: If you want to get perfectly sliced pot roast, cook the day before and refrigerate. When ready to use, slice and reheat in the microwave or in the oven covered with foil in about a 200 degree oven.
    Note 2: If you don't have an instant pot, brown in a heavy pot, follow the other steps and place in a 350 degree oven until tender.
  • Remove the roast from the pot, cover and set aside. Strain the broth in a large strainer, pressing with a spoon the vegetables though your strainer, scraping the bottom into your bowl. This makes your gravy extra delicious and you won't waste those delicious ingredients.

For the Gravy:

  • In a saucepan, heat the oil and add the flour to make a roux. Cook for a minute or so, whisking, then add your reserved strained broth, continuing to whisk to keep from having lumps. Cook until the gravy has thickened, and keep warm until ready to serve.

For the potatoes and carrots to serve:

  • Place your peeled potatoes in the Instant pot along with your quartered carrots. Add about 2 cups of water or so to the pot. Drizzle with olive oil, lightly salt and pepper and add a sprig of rosemary. Set the pressure cook timer to 5 minutes. When time has lapsed, do a quick steam release.
  • To serve add the pot roast with potatoes and carrots on a plate and drizzle with the gravy. Serve with more gravy for passing. Enjoy!
  • Click to share on Pinterest (Opens in new window) Pinterest
  • Click to share on Facebook (Opens in new window) Facebook
  • Click to email a link to a friend (Opens in new window) Email
  • Click to print (Opens in new window) Print
  • Click to share on X (Opens in new window) X
  • Click to share on Tumblr (Opens in new window) Tumblr
  • More
  • Click to share on Reddit (Opens in new window) Reddit

Filed Under: Beef Tagged With: beef, chuck roast, Instant Pot Sunday Pot Roast, main course, pot roast, sunday pot roast

Big Green Egg Smoked Bbq Chicken

June 22, 2019 by Becky Spoon

Big Green Egg Smoked Bbq Chicken
Please follow and like us:
onpost_follow
fb-share-icon
Tweet
Jump to Recipe
Big Green Egg Smoked Bbq Chicken

This Big Green Egg Smoked Bbq Chicken is the best! I finally bought a Meat Injector from Home Depot! I injected this with melted butter that I added bbq sauce and when the cooking had finished, the juices were almost pouring out of this chicken!! Yes! Crazy good! Use the BBq sauce of your choice.

Big Green Egg Smoked Bbq Chicken

Big Green Egg Smoked BBQ Chicken

I don’t know if it’s because we’re from Texas but I really like some of the Texas BBQ sauces out there. I love the BBQ sauce from Salt Lick in Driftwood, Texas, just southwest of Austin. I love the BBQ sauce that Louis Mueller uses. It’s very thin and vinegar based. I love the BBQ sauces Aaron Franklin makes. That’s what I used in this recipe was the original sauce from Franklin’s bbq in this recipe. You can buy it online if you don’t have it in your area, but our Texas-based HEB carries it and that’s where I buy it. Here’s their link so you can see what I buy. https://www.heb.com/product-detail/franklin-barbecue-texas-style-barbecue-sauce/1639566

Big Green Egg Smoked Bbq Chicken

I smoked this chicken in my Big Green Egg, but you could smoke it in the smoker of your choice. If you don’t have a smoker you can cook this on your gas grill or charcoal grill as long as you cook it over hot coals. You would need to set it to the side away from the hot coals.

There are so many side dishes that would be great with this chicken! I always love a baked potato with bbq chicken for some reason. I love to make Texas Toast with BBQ chicken. My potato salad is an excellent side dish. Here’s the link if you decide to make potato salad: https://the2spoons.com/super-good-southern-potato-salad/

Big Green Egg Smoked BBQ Chicken

Enjoy the recipe!

Big Green Egg Smoked BBQ Chicken

Print Recipe
Course dinner, Lunch, Main Course
Cuisine American, bbq
Servings 6 servings

Ingredients
  

  • 1 whole chicken, wings tucked behind and legs tied
  • 8 tbsp butter melted
  • 1/4 cup bbq sauce of your preference, plus more for basting
  • oilive oil for coating the outside of the chicken
  • salt and pepper

Instructions
 

  • Combine the melted butter and bbq sauce. Inject the chicken all over with the mixture., under the skin around the breast, trying to make sure there's added moisture in all the areas that tend to be drier than others of the chicken.
  • Pat the outside dry with a paper towel. Apply a thin coat of extra virgin olive oil on the chicken, front and back and salt and pepper all over, including the cavity.
  • Place the chicken on your prepared grill or smoker. I usually want my smoker temperature about 350 degrees when I'm smoking a chicken, because a slow smoke is not necessary. I don't add bbq sauce at this time. When the chicken starts to brown and the skin starts to crisp a little, I start brushing bbq sauce on the chicken, and continue every 15 minutes or so until the chicken reaches an internal temperature of 165. I like to check the area between the leg quarter and breast because for me that seems to be the area that takes longer to cook.
  • Remove the chicken from the grill and allow to rest 15 to 30 minutes. Slice and enjoy with your favorite sides.
Keyword bbq, bbq chicken, big green egg, big green egg smoked chicken
Big Green Egg Smoked Bbq Chicken
Southern Potato Salad
  • Click to share on Pinterest (Opens in new window) Pinterest
  • Click to share on Facebook (Opens in new window) Facebook
  • Click to email a link to a friend (Opens in new window) Email
  • Click to print (Opens in new window) Print
  • Click to share on X (Opens in new window) X
  • Click to share on Tumblr (Opens in new window) Tumblr
  • More
  • Click to share on Reddit (Opens in new window) Reddit

Filed Under: Poultry Tagged With: bbq chicken, chicken, summer grilling

Country Style Fresh Green Beans and New Potatoes

June 21, 2019 by Becky Spoon

Fresh Green Beans and New Potatoes
Please follow and like us:
onpost_follow
fb-share-icon
Tweet
Fresh Green Beans and New Potatoes

I cooked these Fresh Green Beans and New Potatoes in my Instant Pot and it literally took 15 minutes! I sautéed onion and bacon ends first, then I added my beans and potatoes, a little water along with seasonings, and set the pressure cooking time for 15 minutes! They were perfectly cooked! Oh, I forgot to mention that these potatoes were fresh from a garden. They were at our church grown by the youth group who are raising money for camp! There’s just something about some local grown new potatoes.

Country Style Fresh Green Beans and New Potatoes

I love green beans! Sometimes I make them crispy with lemon and garlic, but sometimes I want the country style like these, super tender in a delicious bacon flavored-broth, the kind I remember my Mom making growing up.

You can always find fresh green beans in the grocery store, probably year around. They are inexpensive and really have some health benefits. Check out the information in this link for some benefits of green beans. https://www.organicfacts.net/health-benefits/vegetable/green-beans.html

Country Style Fresh Green Beans and New Potatoes

This is a perfect side dish for so many different entrees! Click this link for my green beans with lemon which are also very delicious, just cooked crisper: https://the2spoons.com/perfect-browned-butter-and-garlic-green-beans/

Hope you try this very simple recipe!

Country Style Fresh Green Beans and New Potatoes

Print Recipe
Course Side Dish
Cuisine American

Ingredients
  

  • 1 1/2-2 lbs fresh green beans, ends trimmed and washed
  • 4-6 new potatoes, depending on the size
  • 2-3 strips bacon, or bacon ends, cut in 1 inch pieces
  • 1/2 onion, diced
  • 2 tbsp extra virgin olive oil
  • 1 tsp salt
  • fresh black pepper
  • 1-2 sprigs fresh thyme or about 1/2 teaspoon dried crushed
  • water or vegetable stock

Instructions
 

  • I cooked the green beans and new potatoes in my instant pot, but the same instructions apply if you are cooking them stovetop, except for the cooking time.
    Trim your beans and wash them. You can either completely peel your potatoes or you can cut a strip around like I did. If they are small, leave them whole, but large I'd half or quarter, so you have a uniform potato size so they will cook evenly.
  • Add the extra virgin olive oil to your pan or instant pot. Add the bacon and onions and sauté until the bacon fat has rendered and the onions begin to very lightly brown.
  • Add your beans and potatoes and enough water or vegetable stock to almost the top of the beans, maybe 3/4 way. They do not have to be completely covered because they are quickly going to cook down and you don't want too much liquid.
  • Add your salt and thyme, and set your Instant Pot to pressure cook for 15 minutes, or bring your stovetop pan to a boil, then reduce to a simmer and cook 30 minutes or so until the green beans and potatoes are tender.
  • When the cooking has finished, check for salt and add fresh cracked black pepper. Serve with almost any entrée. Enjoy these country style green beans.
Keyword country style fresh green beans, country style fresh green beans and new potatoes, fresh, fresh green beans, green beans, new potatoes
  • Click to share on Pinterest (Opens in new window) Pinterest
  • Click to share on Facebook (Opens in new window) Facebook
  • Click to email a link to a friend (Opens in new window) Email
  • Click to print (Opens in new window) Print
  • Click to share on X (Opens in new window) X
  • Click to share on Tumblr (Opens in new window) Tumblr
  • More
  • Click to share on Reddit (Opens in new window) Reddit

Filed Under: Side dish, Vegetables Tagged With: country style grean beans, fresh grean beans, grean beans, side dish, vegetable

Quick Chicken Thighs Under a Brick with Pesto Verde

June 20, 2019 by Becky Spoon

Chicken Thighs Under a Brick
Please follow and like us:
onpost_follow
fb-share-icon
Tweet
Jump to Recipe
Chicken Thighs Under a Brick

I saw this Chicken Thighs Under a Brick in the June/July issue of Bon Appetite and I had to make it!

I’ve made chicken under a brick many times with a whole chicken cutting out the back bone, but doing this with just the thighs was so quick and easy! The added pesto verde is a delicious addition to this crispy and juicy chicken!

Chicken Thighs Under a Brick

I use two bricks that I wrap in foil. If you done have bricks you can use a heavy skillet like an iron skillet. You would place a piece of foil over the chicken, skin side down and top with the skillet. Here’s a quick “how to” if you aren’t familiar http://www.dartagnan.com/how-to-make-chicken-und…

Quick Chicken Thighs Under a Brick with Pesto Verde

These would be great with potatoes or even rice pilaf would be delicious. Here’s my recipe for my Cheesy Potatoes Gratin https://the2spoons.com/cheesy-potatoes-gratin/.

Chicken Thighs Under a Brick

Print Recipe
Course dinner, Lunch, Main Course
Cuisine American
Servings 4 Servings

Ingredients
  

  • 4 skin on, chicken thighs
  • 1 tsp kosher salt
  • freshly ground black pepper
  • 5 tbsp extra virgin olive oil
  • 1 oil packed anchovy filet, finely chopped
  • 1 garlic clove, finely chopped
  • 1/4 cup finely chopped parsley
  • 1 tbsp sherry vinegar or red wine vinegar
  • 3 scallions, white and pale green parts only, thinly sliced

Instructions


  • Wrap 2 bricks with foil (if you don’t have any bricks lying around, use a heavy skillet). Season chicken on both sides with salt and pepper. Pour oil into a medium cast-iron skillet. Place chicken in pan skin side down (it’s okay if the pieces touch, but make sure they don’t overlap). Heat pan over medium-high and place a prepared brick on top of each piece (or, place a sheet of foil over chicken, then set a second cast-iron skillet on top). Cook chicken, checking halfway through to make sure skin isn’t taking on color too quickly and reducing heat to medium if needed, until skin is deep golden brown and crisp and flesh is almost completely cooked through, about 10 minutes.


  • Pesto Verde and Assembly
    While chicken is cooking, place anchovy, garlic, and 1 tsp. salt in a mortar and use pestle to pound to a paste, about 1 minute. Add parsley and continue to pound until completely pulverized, about 2 minutes. (Alternately, grate garlic and finely chop anchovy and parsley, then mix together in a medium bowl.) Mix in oil, vinegar, mustard, and red pepper flakes with pestle, then add scallions. Taste and season with more salt, if needed.
  • Carefully remove bricks (foil will be greasy) and check chicken. There should be only a hint of medium-rare flesh on the thickest part of the thigh. Using a thin spatula, release chicken skin from pan and turn onto flesh side. Remove from heat and let sit to finish cooking through, about 1 minute.
  • Spoon some pesto verde onto a platter. Top with chicken, skin side up, and spoon more pesto over (but don’t cover up all that beautiful crisp skin you just created!).
Keyword chicken, chicken thighs under a brick, Roast Chicken Thighs
Chicken Thighs Under a Brick
Cheesy Potatoes Gratin
  • Click to share on Pinterest (Opens in new window) Pinterest
  • Click to share on Facebook (Opens in new window) Facebook
  • Click to email a link to a friend (Opens in new window) Email
  • Click to print (Opens in new window) Print
  • Click to share on X (Opens in new window) X
  • Click to share on Tumblr (Opens in new window) Tumblr
  • More
  • Click to share on Reddit (Opens in new window) Reddit

Filed Under: Poultry Tagged With: chicken, dinner

Fresh from the Garden, Delicious Summer Squash with Peppers and Onions

June 20, 2019 by Becky Spoon

Summer Squash
Please follow and like us:
onpost_follow
fb-share-icon
Tweet
Jump to Recipe
Summer Squash
Summer Squash

When you grow summer squash there is an abundance when you start harvesting and you’re trying to figure out what to do with all this squash! This is my quick go to!

Easy, yet delicious! Just a few ingredients and you have a side dish for any main course!

Fresh from the Garden, Delicious Summer Squash with Peppers and Onions

I actually made this with my Chicken and Dumplings the other day! It was the perfect side dish for the dumplings. Here’s my Chicken and Dumplings recipe which you have to try! https://the2spoons.com/chicken-and-dumplings-the-perfect-comfort-food/.

My Mom would boil squash, drain it, then mash it with a potato masher. Then she would add butter, salt and pepper. It was delicious! So simple, yet so delicious. I still make it that way. You know, it’s just one of those things you ate growing up and you just crave it sometime!

I didn’t grow squash this year. A friend of ours gave us this squash. There are a couple of different summer squash. Here’s a list for future growing: https://www.thekitchn.com/a-visual-guide-to-8-varieties-of-summer-squash-220740

Fresh from the Garden, Delicious Summer Squash with Peppers and Onions

Ok, back to cooking squash! And my recipe! I really shouldn’t call this a recipe because it’s so simple!

Summer Squash with Peppers and Onions

Print Recipe
Course Side Dish
Cuisine American

Ingredients
  

  • 3-4 Yellow she merry squash or Zucchini, or Combination of the two, diced
  • 1 Green bell pepper, diced
  • 1 red onion, diced
  • 2 tbsp extra virgin olive oil
  • 2 tbsp butter
  • sal and pepper to taste

Instructions
 

  • Heat the oil and butter in a skillet to medium high. I like to use non stick skillet. add the onions and peppers and cook until they begin to soften. Add the squash, increase the heat if you need to so your ingredients will start to brown, turning as the bottom browns. Season with salt and pepper. Cook until good n brown and the squash is tender!
Keyword Summer Squash Casserole
  • Click to share on Pinterest (Opens in new window) Pinterest
  • Click to share on Facebook (Opens in new window) Facebook
  • Click to email a link to a friend (Opens in new window) Email
  • Click to print (Opens in new window) Print
  • Click to share on X (Opens in new window) X
  • Click to share on Tumblr (Opens in new window) Tumblr
  • More
  • Click to share on Reddit (Opens in new window) Reddit

Filed Under: Side dish, Vegetables Tagged With: Easy Side Dish, side dish, summer squash, vegetables, yellow squash

  • « Go to Previous Page
  • Page 1
  • Interim pages omitted …
  • Page 43
  • Page 44
  • Page 45
  • Page 46
  • Page 47
  • Interim pages omitted …
  • Page 67
  • Go to Next Page »

Primary Sidebar

Categories

  • Appetizer
  • Beans, Lentils, Grains, Rice
  • Beef
  • Bread
  • Breakfast/Brunch
  • Cocktails
  • Dessert
  • Dishes of Mexico, Tex Mex and New Mexico Red and Green Chile
  • Fish/Seafood
  • Ice Cream
  • Pasta
  • Pizza
  • Pork
  • Poultry
  • Salad Dressings
  • Salads
  • Salsas
  • Sandwiches/Burgers/Hot Dogs
  • Sauces, Compound Butters, Condiments
  • Side dish
  • Soups/Stews/Gumbo//Chili
  • Stocks, Broths, Gravies
  • Vegetables

Copyright © 2025 The 2 Spoons on the Foodie Pro Theme

Manage Cookie Consent
We use cookies to optimize our website and our service.
Functional Always active
The technical storage or access is strictly necessary for the legitimate purpose of enabling the use of a specific service explicitly requested by the subscriber or user, or for the sole purpose of carrying out the transmission of a communication over an electronic communications network.
Preferences
The technical storage or access is necessary for the legitimate purpose of storing preferences that are not requested by the subscriber or user.
Statistics
The technical storage or access that is used exclusively for statistical purposes. The technical storage or access that is used exclusively for anonymous statistical purposes. Without a subpoena, voluntary compliance on the part of your Internet Service Provider, or additional records from a third party, information stored or retrieved for this purpose alone cannot usually be used to identify you.
Marketing
The technical storage or access is required to create user profiles to send advertising, or to track the user on a website or across several websites for similar marketing purposes.
Manage options Manage services Manage {vendor_count} vendors Read more about these purposes
Preferences
{title} {title} {title}